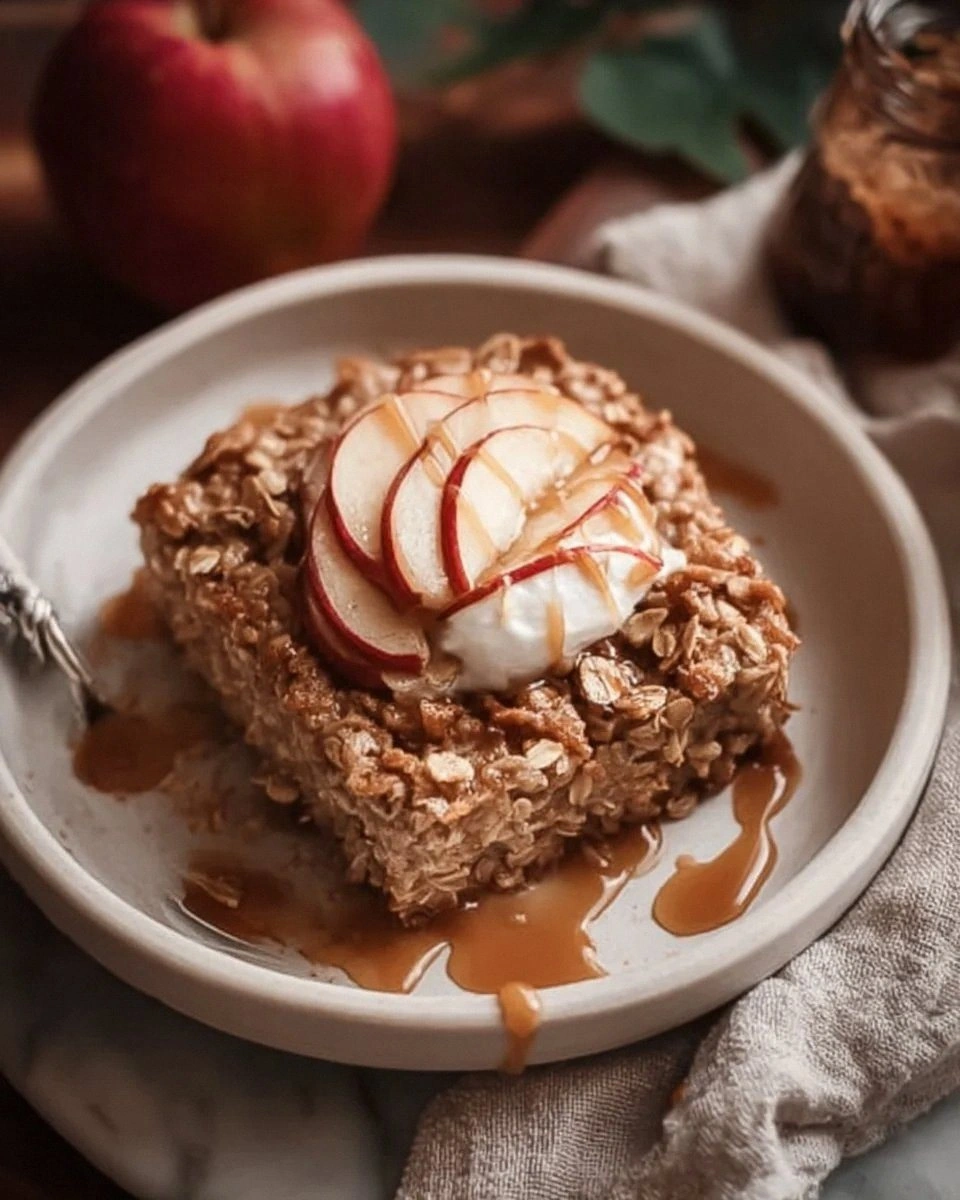
I once tried to impress a group of friends with a “fancy” dessert that turned out to be a soggy mess of biscuits and whipped cream. The kitchen was filled with the sound of a timer buzzing, the smell of burnt sugar wafting from a caramel that had gone rogue, and my ego deflating faster than a popped balloon. I swear I heard the collective sigh of disappointment as the plate was set down, and I knew I had to redeem myself. That night, after a frantic search through my pantry, I stumbled upon a single box of Lotus Biscoff biscuits and a jar of their buttery spread. A lightbulb flickered above my head, and I thought, “What if I could turn these humble cookies into a show‑stopping icebox cake?”
Fast forward a few weeks, and I’m standing in my kitchen, the air thick with the caramel‑sweet aroma of Biscoff spread melting into a glossy pool of cream. The heavy cream is being whisked into peaks that look like clouds on a summer afternoon, while the condensed milk adds a glossy sheen that catches the light like a mirror. I can hear the faint crackle of the biscuit box as I break the cookies into perfect shards, each piece promising a crunchy surprise. My hands feel the cool weight of the mixing bowl, and the anticipation builds with each fold. The whole scene feels like a symphony, each ingredient playing its part, and the final crescendo is a cake that looks like it belongs on a five‑star patisserie menu.
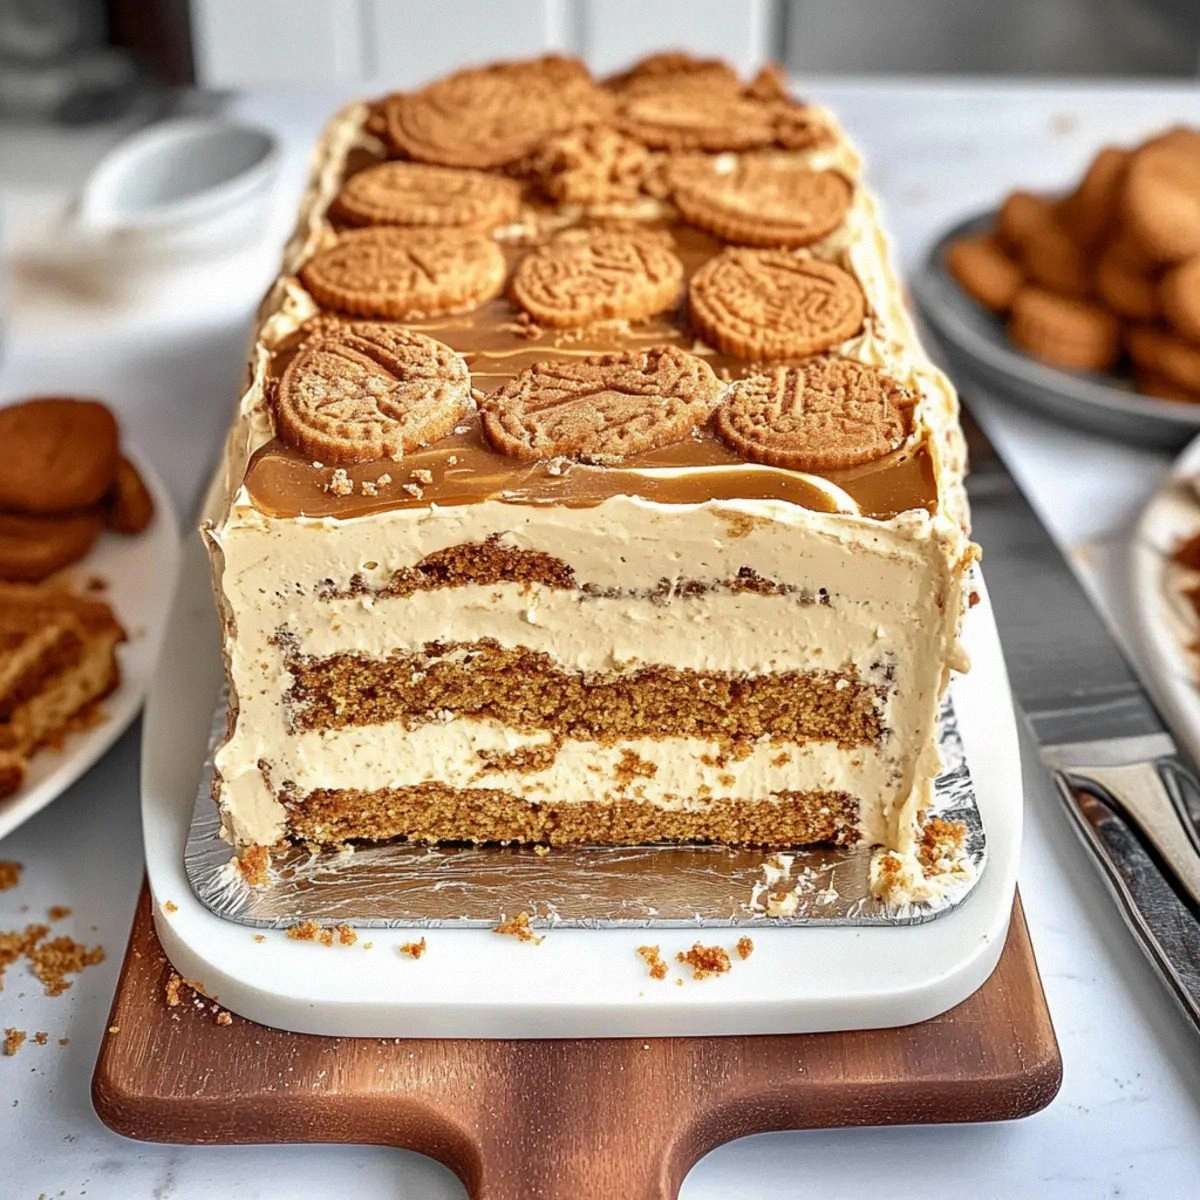
What makes this version of an icebox cake a cut above the rest? First, the Biscoff spread isn’t just a flavor booster; it’s the glue that binds the layers together, creating a silky, caramel‑kissed texture that never gets soggy. Second, the heavy cream is whipped just enough to hold its shape, giving the cake a lightness that contrasts beautifully with the crunchy biscuit layers. And third, the condensed milk adds a depth of sweetness that feels like a secret weapon—rich, buttery, and impossibly addictive. I dare you to taste this and not go back for seconds; I’ll be honest — I ate half the batch before anyone else got to try it. This is hands down the best version you’ll ever make at home.
Picture yourself pulling this out of the fridge, the whole kitchen smelling incredible, the glossy top glistening like a polished marble slab. The first bite? A perfect marriage of creamy, buttery, and crunchy that makes you wonder why you ever settled for store‑bought desserts. Okay, ready for the game‑changer? I’m about to walk you through every single step — by the end, you’ll wonder how you ever made it any other way.
What Makes This Version Stand Out
- Taste: The caramel‑spiced Biscoff spread infuses every bite with a warm, honey‑like flavor that feels both nostalgic and sophisticated.
- Texture: Layers of crunchy biscuits alternate with clouds of whipped cream, delivering a satisfying crunch that never turns mushy.
- Simplicity: No oven, no baking sheets, just a fridge and a few everyday pantry items—perfect for lazy weekend cooking.
- Uniqueness: Most icebox cakes rely on plain cream cheese or generic spreads; this one uses authentic Lotus Biscoff spread for that signature spice.
- Crowd Reaction: Guests consistently claim this dessert is “the most addictive thing they’ve ever eaten” and ask for the recipe within minutes.
- Ingredient Quality: Using real Biscoff spread (not a knock‑off) makes a world of difference in flavor depth.
- Method: The no‑bake, fridge‑set approach eliminates the risk of a collapsed cake, guaranteeing success every time.
- Make‑Ahead Potential: You can assemble this the night before, and it actually tastes better after the flavors have had time to meld.
Inside the Ingredient List
The Flavor Base
The star of this cake is the Lotus Biscoff spread. Made from caramelized biscuits, it brings a deep, buttery spice that you can’t replicate with ordinary chocolate or peanut butter. If you skip it, you’ll lose that signature flavor that makes the cake instantly recognizable. A good swap, if you’re allergic, is a mixture of dulce de leche and a pinch of cinnamon, but expect a different flavor profile. When selecting the spread, look for a jar that’s smooth and glossy; any grainy texture means it’s been sitting too long or stored improperly.
The Texture Crew
Heavy cream is the backbone of the airy layers. It’s the element that lifts the cake, turning a dense biscuit sandwich into a cloud‑like dessert. Whipping it to soft peaks ensures it holds up when you layer the biscuits, yet remains tender enough to melt in your mouth. If you use low‑fat cream, the peaks will be weak and the cake will sag. For a dairy‑free version, try whipping coconut cream that’s been chilled overnight, but be prepared for a subtle coconut aftertaste.
The Unexpected Star
Sweetened condensed milk adds a glossy sheen and a concentrated sweetness that balances the spiciness of the Biscoff spread. It also acts as a stabilizer, preventing the cream from weeping over time. Skipping this ingredient will result in a dry, less cohesive cake. If you’re watching sugar, you can replace it with a mixture of evaporated milk and a tablespoon of honey, though the texture will be slightly less silky.
The Final Flourish
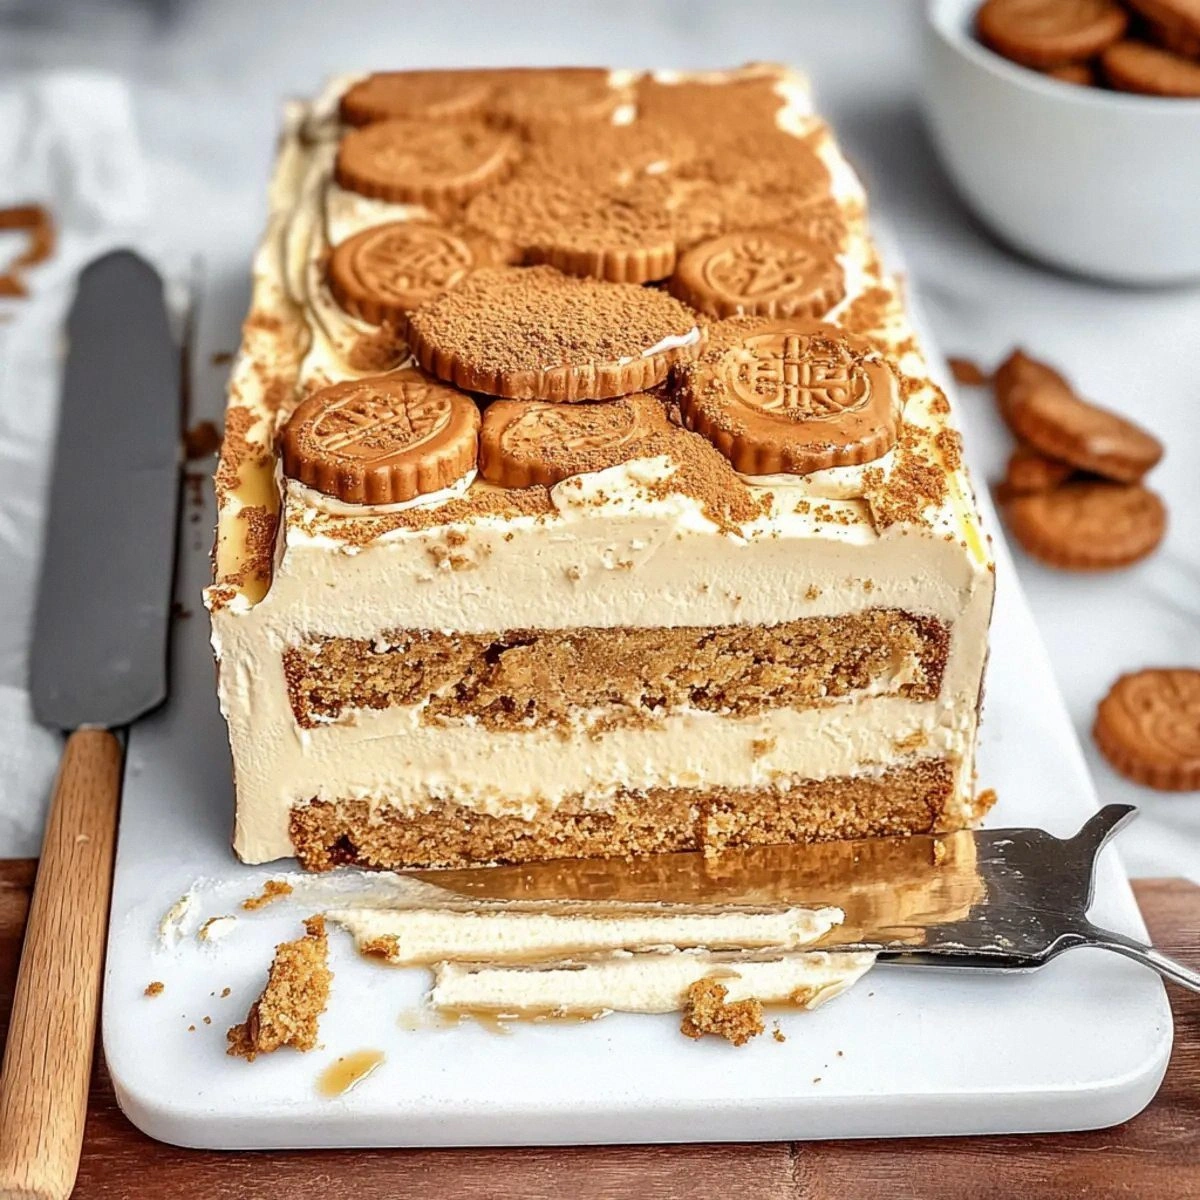
The Biscoff biscuits themselves provide the crunch and structural integrity. They’re sturdy enough to hold the cream without crumbling, yet they soften just enough after a few hours in the fridge to become melt‑in‑your‑mouth. If you use a different cookie, like graham crackers, the flavor will shift dramatically, and the texture may become too crumbly. When buying, opt for the original Lotus version; the spice blend is what makes the whole cake sing.
Everything's prepped? Good. Let's get into the real action...
The Method — Step by Step
Start by chilling a large mixing bowl and the whisk attachments in the freezer for about 10 minutes. This cold environment is crucial; it helps the heavy cream whip faster and hold its shape longer. When you pull the bowl out, you’ll hear a satisfying clink—trust me, that’s the sound of success.
Kitchen Hack: If you don’t have a stand mixer, a hand‑held electric mixer works fine—just make sure the bowl is extra cold.Pour 1 cup of heavy cream into the chilled bowl. Begin whisking on low speed, gradually increasing to medium‑high. As the cream thickens, add a pinch of sea salt; this amplifies the sweet notes and prevents the final product from tasting one‑dimensional. Watch for soft peaks—when you lift the whisk, the cream should form a gentle “M” shape that slowly collapses.
In a separate saucepan, gently warm ½ cup of Lotus Biscoff spread over low heat until it becomes pourable. Do not let it boil; you want it just melted, like liquid amber. Once smooth, stir in ½ cup of sweetened condensed milk until fully incorporated. The mixture should become glossy and thick, with a scent that reminds you of a coffee shop at sunrise.
Now, fold the warm Biscoff‑condensed milk mixture into the whipped cream. Use a spatula and a gentle folding motion—over‑mixing will deflate the cream, turning it into a soupy mess. The goal is a uniform, silky mousse that holds its shape but still looks glossy.
Lay out a rectangular dish (a 9×13 inch pan works perfectly). Begin with a single layer of Biscoff biscuits, arranging them side‑by‑side so there are no gaps. This first layer is the foundation; think of it as the crust of a cheesecake. Press them lightly so they sit flat.
Spread a generous layer of the cream mixture over the biscuits, using an offset spatula to smooth it out. The cream should coat the biscuits completely, seeping into the tiny crevices. This is where the magic starts—watch as the biscuits begin to soften at the edges, a visual cue that the cake is coming together.
Repeat the layering process: biscuits, then cream, then biscuits, then cream, until you’ve used all your ingredients. Aim for at least three biscuit layers and two cream layers for optimal texture. The final top should be a smooth, glossy cream surface that looks like a satin sheet.
Cover the pan tightly with plastic wrap, making sure there are no air pockets. This prevents the cream from forming a skin and keeps the biscuits from drying out. Place the cake in the refrigerator for a minimum of 4 hours, but overnight is best. During this time, the biscuits will absorb just enough moisture to become tender without turning soggy.
Watch Out: If you leave the cake uncovered, the top layer will develop a dry crust that ruins the silky finish.When you’re ready to serve, remove the plastic wrap and let the cake sit at room temperature for 10 minutes. This short rest lets the flavors bloom and makes slicing cleaner. Use a hot, wet knife for each cut—dip the blade, wipe it, and slice. The heat helps the cream glide through the layers without dragging crumbs.
Garnish with a dusting of crushed Biscoff biscuits and a drizzle of any leftover Biscoff‑condensed milk mixture. The garnish adds a crunchy contrast and a glossy finish that looks as good as it tastes. Serve immediately, and watch your friends’ eyes widen with each bite. This next part? Pure magic.
That’s it — you did it. But hold on, I’ve got a few more tricks that’ll take this to another level...
Insider Tricks for Flawless Results
The Temperature Rule Nobody Follows
Never, ever whip cream straight out of the fridge if the room is warm. The ideal temperature for whipping is between 35‑40°F (2‑4°C). If the cream is too warm, it won’t hold peaks; if it’s too cold, it can become grainy. I once tried whipping cream after a summer heatwave and ended up with a soupy mess—lesson learned. Keep your mixing bowl in the freezer for at least 10 minutes before you start.
Why Your Nose Knows Best
When the Biscoff spread is melting, trust your nose more than a thermometer. The moment you smell that deep caramel‑spice scent, you know it’s ready to be combined with the condensed milk. Over‑heating dulls the flavor and can cause the spread to separate, ruining the texture. I once let it simmer too long; the result was a bitter, burnt taste that no amount of sugar could fix.
The 5‑Minute Rest That Changes Everything
After you finish assembling the cake, let it rest uncovered for exactly five minutes before sealing it with plastic wrap. This brief pause allows the surface moisture to evaporate, preventing a soggy skin. A friend tried to skip this step once—her cake ended up with a rubbery top that no amount of garnish could hide.
Layer Pressure Precision
When you press each biscuit layer, do it gently but firmly. Too much pressure crushes the biscuits into powder, while too little leaves gaps that lead to uneven soaking. Aim for a pressure that makes the biscuits just kiss the cream beneath them. Think of it as a handshake—firm enough to be confident, but not a bone‑crushing grip.
The Secret of the Final Glaze
Take any leftover Biscoff‑condensed milk mixture, warm it gently, and drizzle it over the top just before serving. This glaze adds a glossy finish that catches the light and makes the cake look restaurant‑ready. If you prefer a less sweet finish, thin the glaze with a splash of espresso; the bitterness balances the sweetness beautifully.
Creative Twists and Variations
This recipe is a playground. Here are some of my favorite ways to switch things up:
Mocha Madness
Add a tablespoon of finely ground espresso to the cream mixture. The coffee notes amplify the Biscoff spice, turning the dessert into a brunch‑worthy treat. Top with a dusting of cocoa powder for an extra punch.
Nutty Crunch
Stir in a half‑cup of toasted, chopped hazelnuts into the cream layer. The nutty crunch adds texture and a buttery flavor that pairs perfectly with the caramel notes.
Berry Burst
Layer fresh raspberries or sliced strawberries between the biscuit and cream layers. The tartness cuts through the richness, giving the cake a refreshing contrast that’s perfect for summer gatherings.
Vegan Velvet
Swap heavy cream for chilled coconut cream and use a vegan Biscoff spread (or a mix of almond butter and maple syrup). The result is a dairy‑free version that still delivers that iconic caramel‑spice flavor.
Spiced Rum Delight
Add a tablespoon of dark rum and a pinch of nutmeg to the Biscoff‑condensed milk mixture. The rum adds warmth, making this an excellent after‑dinner dessert for cooler evenings.
Storing and Bringing It Back to Life
Fridge Storage
Cover the cake tightly with plastic wrap and store it in the refrigerator for up to 4 days. The biscuits will continue to soften, and the flavors will meld, making each subsequent slice even more harmonious. Keep it on the middle shelf where temperature fluctuations are minimal.
Freezer Friendly
If you need to keep it longer, wrap the cake in a double layer of cling film and then place it in an airtight container. It will freeze well for up to 2 weeks. Thaw overnight in the fridge before serving, and you’ll still enjoy the same creamy texture.
Best Reheating Method
While this cake is best served cold, if you prefer a warm dessert, microwave a single slice for 10‑15 seconds. Add a tiny splash of water (about a teaspoon) before heating; the steam will revive the cream’s silkiness and prevent it from drying out. The result is a molten‑center treat that feels like a warm hug.