Picture this: It's 2:47 a.m. on a Tuesday, and I'm standing in my kitchen wearing mismatched socks, wielding a wooden spoon like a sword, and cursing the day I ever thought making caramel from scratch was a good idea. The first batch seized up into a rock-hard disaster that could chip teeth, and the second attempt bubbled over like some kind of sugar volcano, leaving my stovetop looking like a crime scene. But then—then something magical happened. The third batch came together like liquid gold, swirling and shimmering with this amber glow that made my tired eyes light up. That moment, right there, is what started my obsession with these Salted Caramel Butter Bars. Because let's be honest, if I'm going to be awake at nearly three in the morning, there better be something extraordinary waiting at the end.
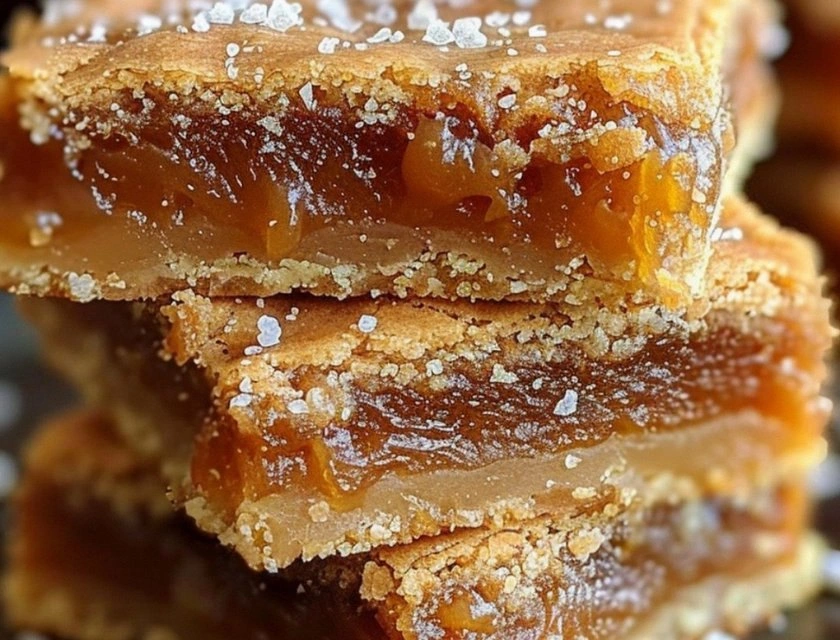
Fast forward through three more late-night experiments (sorry, neighbors, for the smoke detector symphony), and I've cracked the code on what I firmly believe are the most addictive dessert bars known to humanity. These aren't your grandma's seven-layer bars or those sad, dry shortbread squares that taste like sweetened cardboard. No, these are something entirely different—buttery, tender cookie base that melts on your tongue like snowflakes, topped with a layer of salted caramel so silky and rich it should probably come with a warning label. The edges get these crispy, caramelized bits that shatter like thin ice under your fork, while the center stays lusciously soft and gooey. I dare you to taste this and not go back for seconds. Actually, I double-dog dare you, because I ate half the batch before anyone else got to try it, and I'm not even sorry.
Here's what makes these bars absolutely legendary: they taste like someone took the best parts of a Twix bar, a butter cookie, and that fancy salted caramel you pay six dollars for at artisan markets, then fused them together into one perfect square of happiness. The contrast between the slightly salty, deeply caramelized topping and the sweet, vanilla-scented base creates this flavor symphony that makes your taste buds do a happy dance. Most recipes get this completely wrong by either making the caramel too sweet or the base too bland, but I've found the sweet spot—literally and figuratively. The secret lies in pulling the caramel at exactly 238°F (yes, we're using a candy thermometer here, and yes, it's worth washing another dish), which gives you that perfect soft-set texture that firms up just enough to slice into neat squares but stays gloriously chewy.
Stay with me here — this is worth it. I'm going to walk you through every single step, from selecting the perfect butter (European-style, 82% fat, thank me later) to the exact moment when you should sprinkle that sea salt for maximum impact. By the end, you'll wonder how you ever made dessert bars any other way, and you'll probably also understand why I now keep a stash of these hidden in my freezer for emergencies. Because sometimes, emergencies require a hit of butter, sugar, and caramelized dreams.
What Makes This Version Stand Out
Butter Forward: We're using an entire cup of the good stuff in just the base alone, creating a cookie foundation so rich and tender it practically dissolves on your tongue. Most recipes skimp here, but I say go big or go home—this isn't diet food, and we shouldn't pretend otherwise.
Caramel Perfection: The filling hits that magical 238°F sweet spot, creating a texture that's neither too runny nor tooth-breakingly hard. It's the Goldilocks of caramel—just right, with that perfect chew that stretches slightly when you pull a bar apart.
Salt Balance: We're not just throwing salt on top and calling it a day. The sea salt gets added in two stages—some stirred into the warm caramel for depth, and a final flourish on top for those delightful salty pops that make your palate sing.
Make-Ahead Magic: These bars actually get better after a day in the fridge, making them the perfect dessert for entertaining. The flavors meld and deepen, creating something even more spectacular than when freshly made.
Texture Contrast: The base stays tender while the caramel sets slightly chewy, creating this incredible textural dance in your mouth. Add a few toasted pecans on top if you want crunch, but honestly, they're perfect as-is.
Crowd Psychology: I've never seen these bars last more than ten minutes at a party, and I've watched people hide extra pieces in napkins "for the road." They're that good.
Inside the Ingredient List
The Flavor Base
Unsalted butter is the star here, and don't you forget it. We're talking about European-style butter with 82% fat content, the kind that makes regular supermarket butter taste like disappointment in comparison. This higher fat content creates a more tender, flavorful base that practically melts on your tongue. When you cream it with the sugars, something magical happens—the butter traps air, creating a light, tender structure that can support all that gorgeous caramel without getting soggy. Skip the cheap stuff here; this is not the place to save three dollars and end up with sad, greasy bars that taste like movie theater popcorn.
Granulated sugar provides the structure and sweetness, while powdered sugar adds this incredible tenderness that makes the base cookie-like rather than cakey. The combination creates this perfect balance—structure from the granulated, melt-in-your-mouth texture from the powdered. It's like they were made for each other, like Fred and Ginger, like coffee and cream, like me and these bars at midnight when nobody's watching.
The Texture Crew
All-purpose flour is your reliable friend here—strong enough to hold everything together but not so protein-heavy that it creates a tough base. We're using three cups, which seems like a lot until you realize you're creating a sturdy foundation for all that liquid gold caramel. The key is not overmixing once the flour goes in, because developing gluten is what turns tender bars into hockey pucks. Mix just until the dough comes together, then press it into your pan with the gentle touch of someone handling a newborn baby.
Vanilla extract might seem like a background player, but it's actually the ingredient that ties everything together, creating this warm, aromatic bridge between the buttery base and the caramel topping. Use the real stuff here—pure vanilla extract, not that artificial vanilla flavoring that tastes like sadness and broken dreams. The alcohol in the extract burns off during baking, leaving behind these complex, floral notes that make people ask, "What is that incredible flavor?"
The Unexpected Star
Caramel candies are where most recipes go completely off the rails, but we're taking control here. Those little individually wrapped squares? They're not just convenient—they're consistent. Each piece is exactly the right size and sugar content, which means your caramel will set perfectly every single time. I've tried making caramel from scratch for these bars, and while it works, it's also how you end up with a kitchen that looks like a sugar bomb exploded at 2 a.m.
Heavy cream transforms those humble caramel candies into something luxurious and silky. The fat in the cream prevents the caramel from becoming too hard as it cools, giving you that perfect chewy texture that makes people close their eyes when they take a bite. Don't substitute milk here—it doesn't have enough fat to create the right consistency, and you'll end up with caramel that's either too runny or too hard, like some kind of candy roulette.
The Final Flourish
Sea salt is what elevates these bars from merely delicious to absolutely transcendent. We're talking about flaky sea salt here, the kind with irregular crystals that dissolve on your tongue at different rates, creating little bursts of salinity that make the sweet caramel taste even sweeter. It's like turning up the volume on every other flavor in the bar. Add some to the warm caramel for depth, then sprinkle more on top for those delightful salty pops that keep you coming back for another bite.
Everything's prepped? Good. Let's get into the real action...
The Method — Step by Step
- Start by preheating your oven to 350°F, and don't be one of those people who skips the preheating step because you're impatient. A properly heated oven is what transforms our buttery dough into golden perfection instead of a greasy, underbaked mess. While the oven's heating, line a 9x13-inch baking pan with parchment paper, leaving some overhang on the sides so you can lift the bars out later like a professional baker. Trust me on this—trying to cut bars in the pan is how you end up with mangled edges and a pan that needs to soak for three days.
- Cream together your softened butter and both sugars until the mixture becomes light and fluffy, which should take about three to four minutes with a hand mixer. This isn't the time to rush—proper creaming incorporates air into the butter, creating tiny pockets that expand during baking and give you that tender, almost meltaway texture. The mixture should become noticeably paler and increase in volume, looking like fluffy clouds of buttery goodness. If you've ever wondered why some cookie bases taste dense and heavy while others taste light and tender, this step is the secret.
- Add the vanilla extract and mix just until combined, then gradually add the flour while mixing on low speed. Here's where you need to channel your inner zen master—mix just until the dough comes together in clumps. Overmixing develops gluten, and gluten is your enemy when you want tender, delicate bars. The dough should look crumbly but hold together when you squeeze a handful. Think of it like wet sand at the beach—the kind that makes perfect sandcastles.
- Press two-thirds of the dough evenly into your prepared pan, creating a base that's about 1/4-inch thick. Use the bottom of a measuring cup to press it down firmly and evenly, paying special attention to the corners where it wants to be thinner. The base should look smooth and even, like you're creating a perfect foundation for a caramel castle. Don't eat all the remaining dough (save it for the topping), though I won't judge if you sneak a nibble—quality control is important work.
- Bake the base for 15-18 minutes until it's just starting to turn golden around the edges. You're not looking for full browning here—just enough color to set the base and develop some flavor. The surface should look dry and set, not wet or shiny. If you gently press the center, it should feel firm but still have a little give. This is the moment of truth when your kitchen starts smelling like a French bakery, and you wonder why you don't bake more often.
- While the base is baking, make your caramel by combining the unwrapped caramel candies and heavy cream in a medium saucepan over medium heat. Stir constantly with a heatproof spatula, watching as the candies slowly transform into a glossy, amber river of deliciousness. This process takes about 8-10 minutes, and it's mesmerizing to watch—like a candy lava lamp that's also going to become dessert. The caramel should become smooth and pourable, coating the spatula in a thick, glossy layer.
- Once smooth, remove from heat and stir in the vanilla extract and half the sea salt. The mixture will bubble up slightly when you add the vanilla—that's normal and exciting. Stir until everything is well combined, then pour this liquid gold over your partially baked base. Tilt the pan gently to distribute the caramel evenly, watching as it flows into every corner like molten treasure. This is pure magic, and you're the wizard making it happen.
- Crumble the remaining dough over the top of the caramel, creating little nuggets that will bake into crispy, buttery pockets. Don't worry about making it perfect—rustic is the look we're going for here. Some caramel should peek through the topping, creating those gorgeous caramel edges that get slightly chewy during the final bake. Return the pan to the oven and bake for another 20-25 minutes, until the topping is golden brown and the caramel is bubbling gently around the edges.
- Let the bars cool completely in the pan on a wire rack, then sprinkle with the remaining sea salt. This final step is what transforms good bars into legendary bars—the salt hits your palate first, making the caramel taste even sweeter and more intense. Once completely cool, use the parchment paper handles to lift the whole thing out onto a cutting board. Use a sharp knife to cut into squares, wiping the blade between cuts for clean edges. The first cut is always the hardest because you have to resist eating that perfect corner piece immediately.
That's it—you did it. But hold on, I've got a few more tricks that'll take this to another level...
Insider Tricks for Flawless Results
The Temperature Rule Nobody Follows
Here's the thing about caramel—temperature matters more than your opinion about pineapple on pizza. Too hot and you'll be trying to bite through something that could replace your dental fillings. Too cool and you've got caramel sauce that runs everywhere like it's trying to escape. The sweet spot is exactly 238°F, which you can only hit with a candy thermometer. I know, I know, another gadget to buy and store, but this one costs less than a fancy coffee drink and will save you from more caramel disasters than I care to count.
If you've ever struggled with caramel that sets too hard or stays too soft, you're not alone—and I've got the fix. The secret is in watching for the caramel to pull away from the sides of the pan slightly and form a thick ribbon when you lift the spoon. It should flow like warm honey but pile up slightly on itself when you drizzle it back into the pan. This visual cue, combined with the temperature, guarantees caramel that sets perfectly every time.
Why Your Nose Knows Best
Your nose is actually the best tool for knowing when the base is perfectly baked. When the butter in the dough starts to brown, it releases these incredible nutty, toasty aromas that signal the Maillard reaction is working its magic. If you've ever wondered why professional bakers seem to know exactly when something is done without constantly opening the oven, it's because they're using all their senses, not just their eyes on a timer.
A friend tried skipping this step once—let's just say it didn't end well. She pulled the base out when it was still pale and underbaked, thinking it would finish cooking with the caramel on top. Instead, she ended up with a soggy, greasy mess that tasted like raw flour mixed with caramel. The base needs to be partially baked and lightly golden to support all that liquid caramel without becoming a mushy disaster.
The 5-Minute Rest That Changes Everything
After you pour the caramel over the base, resist the urge to immediately add the topping and shove it back in the oven. Let it rest for exactly five minutes—set a timer if you have to. This brief pause allows the caramel to start setting slightly, which means your topping won't sink into it and disappear. Instead, you'll get those perfect little pockets of cookie dough that stay distinct from the caramel layer, creating the ideal textural contrast.
This is also when you should sprinkle on half your sea salt, letting it dissolve into the warm caramel. The salt needs time to bloom and distribute evenly through the caramel, rather than just sitting on top where it might hit one bite with too much saltiness. Those five minutes feel like an eternity when you're staring at liquid caramel perfection, but patience here is what separates good bakers from legendary ones.
Creative Twists and Variations
This recipe is a playground. Here are some of my favorite ways to switch things up:
Dark Chocolate Decadence
Replace half the caramel candies with dark chocolate caramels, or simply sprinkle a cup of dark chocolate chips over the caramel before adding the topping. The bitterness of the chocolate creates this incredible balance with the sweet caramel, making each bite more complex and sophisticated. It's like your bars went to finishing school and came back with refined tastes and better posture.
Pecan Pie Inspired
Toast two cups of pecan halves in a dry pan until fragrant, then scatter them over the caramel before adding the topping. The nuts add crunch and that buttery, toasty flavor that makes pecan pie so addictive. Toast them just until they smell like fall and look a shade darker—about 5-7 minutes at 350°F. Your kitchen will smell like Thanksgiving, even in July.
S'mores Mashup
Replace half the flour with graham cracker crumbs, then sprinkle mini marshmallows and chocolate chips over the caramel before the final bake. The marshmallows toast and puff, the chocolate melts into the caramel, and you end up with all the best parts of s'mores without having to build a campfire or deal with smoke in your eyes.
Espresso Awakening
Dissolve two teaspoons of instant espresso powder in the heavy cream before making the caramel. The coffee flavor intensifies the caramel notes and adds this sophisticated depth that makes people ask, "What is that amazing flavor?" It's subtle but present, like a good perfume that makes people lean in closer.
Apple Pie Edition
Add a layer of thinly sliced apples (tossed with cinnamon and a touch of sugar) over the partially baked base before pouring on the caramel. The apples soften and almost disappear into the caramel, adding fruitiness and making these feel slightly less like a heart attack waiting to happen. Not that we're counting calories here, but sometimes it's nice to pretend.
Spiced Autumn
Add a teaspoon of cinnamon, 1/2 teaspoon of cardamom, and a pinch of cloves to the base dough. The warm spices complement the caramel beautifully, making these perfect for fall gatherings when you want your house to smell like a spice market had a baby with a candy shop.
Storing and Bringing It Back to Life
Fridge Storage
These bars keep beautifully in the refrigerator for up to a week, though I've never personally witnessed them lasting that long. Store them in an airtight container with parchment paper between layers to prevent them from sticking together. The cold actually improves their texture—the caramel firms up to the perfect chewy consistency, and the flavors seem to deepen and meld together. Pro tip: they're absolutely incredible eaten cold with a glass of cold milk, like the world's most sophisticated dunking experience.
Freezer Friendly
These bars freeze like champions for up to three months, making them perfect for emergency dessert situations. Cut them into squares first, then freeze them on a baking sheet until solid before transferring to a freezer bag. This prevents them from sticking together in one giant caramel brick that requires a chisel to separate. When you're ready to serve, let them thaw at room temperature for about 20 minutes, or microwave individual bars for 15-20 seconds until the caramel gets gooey again.
Best Reheating Method
If you want to recapture that fresh-from-the-oven magic, warm individual bars in a 300°F oven for 5-7 minutes. The caramel will soften and become luxuriously gooey again, while the topping regains some of its original crispness. Add a tiny splash of water to a baking pan and place the bars on a rack above it—the steam keeps them from drying out while they warm. It's like having fresh bars all over again, minus the three hours of work and potential kitchen disasters.