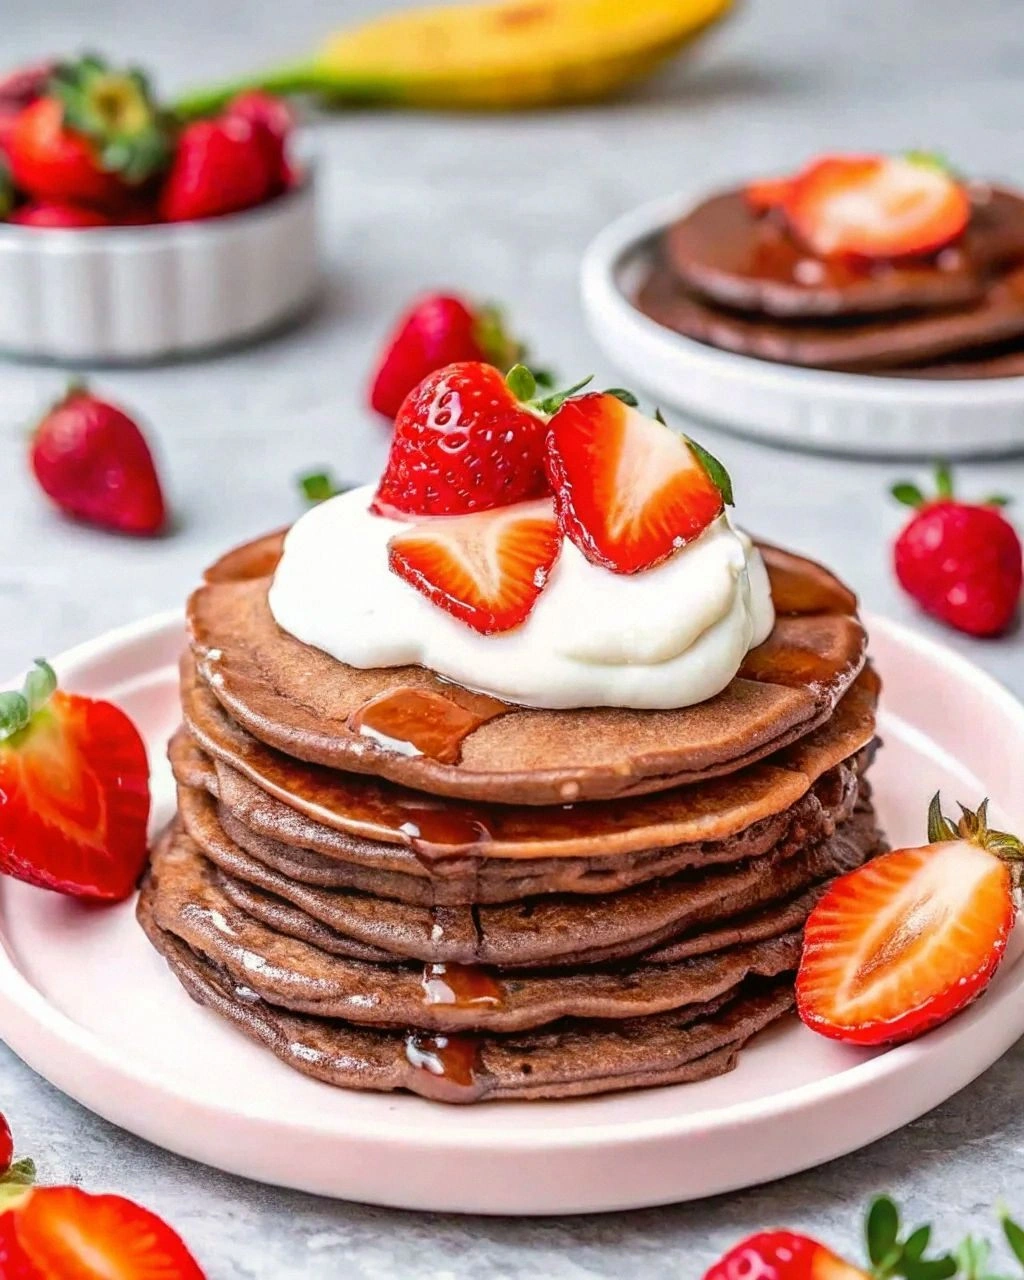
I still remember the morning I accidentally created the most decadent breakfast of my life. There I was, standing in my pajamas at 7 AM, craving red velvet cake like a woman possessed, but also needing actual breakfast before my zoom meetings started. My stomach was having an identity crisis — part of me wanted dessert, part of me needed something substantial enough to face a day of adulting. In my caffeine-deprived state, I grabbed the cocoa powder instead of the cinnamon, dumped in red food coloring instead of vanilla, and what emerged from that skillet was nothing short of breakfast sorcery.
The first pancake hit the pan with that satisfying sizzle that makes every home cook feel like they've got their life together. The batter spread into perfect circles, the edges crisping to golden perfection while the centers puffed up like tiny crimson clouds. That first flip? Pure magic. The bottom had developed this gorgeous mahogany color that made my kitchen smell like a French patisserie had collided with an American diner. I dare you to taste these and not go back for seconds — I polished off three before my coffee was even ready, standing at the counter in complete breakfast bliss.
Here's what makes these red velvet pancakes completely different from anything you've tried before. Most recipes get this completely wrong — they either taste like regular pancakes with food coloring (boring) or they're so sweet they might as well be cake (which defeats the purpose of breakfast). This version strikes that perfect balance: the buttermilk tang, subtle cocoa notes, and that signature red velvet flavor that makes your taste buds do a happy dance. Picture yourself pulling these off the griddle, steam rising into the morning light, the whole kitchen smelling like you've got your own personal bakery.
Stay with me here — this is worth it. I'm about to show you how to create pancakes so good, your weekend mornings will never be the same. The secret lies in the technique I'm sharing today, a method I stumbled upon after ruining countless batches that either spread too thin or sat like lead weights in your stomach. Let me walk you through every single step — by the end, you'll wonder how you ever made it any other way.
What Makes This Version Stand Out
Cloud-Soft Texture: These pancakes achieve that impossible balance between fluffy and substantial. The secret? A combination of buttermilk for tenderness and a touch of vinegar to activate the baking soda, creating bubbles that make each pancake rise like a dream. The result is a stack that compresses gently under your fork but never turns gummy or dense.
Authentic Red Velvet Flavor: Unlike those sad imposters that just taste like red food coloring, these pancakes capture the true essence of red velvet cake. We're talking about that subtle cocoa backdrop, the slight tang from buttermilk, and just enough sweetness to make them feel indulgent without crossing into dessert territory. It's like having your cake and eating breakfast too.
Restaurant-Quality Crust: The edges develop this incredible lacy crispness that shatters like thin ice when you bite into it, giving way to a tender interior. This happens because we let the batter rest for exactly five minutes — not less, not more — allowing the gluten to relax while the leavening agents get primed for action.
Make-Ahead Magic: The batter actually improves if you make it the night before, letting the flour fully hydrate and the flavors meld together. I learned this trick after a particularly ambitious Sunday brunch prep session, and now it's my go-to for stress-free entertaining. Your future self will thank you when you're flipping perfect pancakes instead of frantically whisking at dawn.
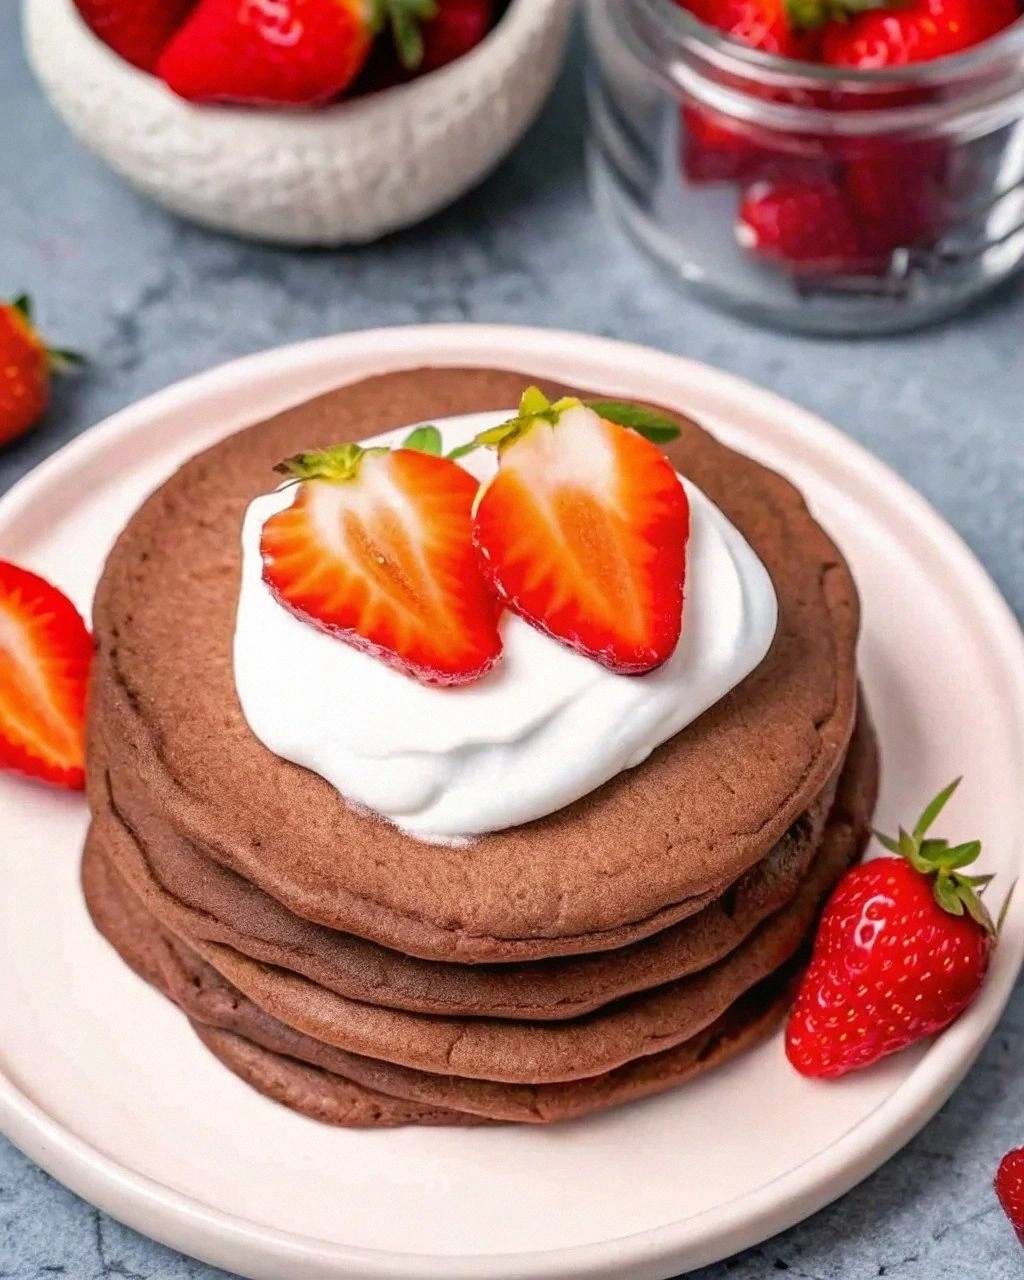
Color That Lasts: Ever notice how red velvet baked goods can turn an unappetizing brown? This recipe uses a combination of natural cocoa powder and just enough food coloring to maintain that gorgeous crimson hue even after cooking. The color stays vibrant, making your breakfast table look like something out of a magazine.
Crowd-Pleasing Factor: I've served these to everyone from picky toddlers to sophisticated food snobs, and they all go back for seconds. There's something about the combination of familiar comfort food with that gorgeous color that makes people feel special. Plus, they're impressive enough for brunch guests but easy enough for a random Tuesday when you need a little breakfast excitement.
Breakfast Meets Dessert: This is hands down the best version you'll ever make at home because it perfectly captures that indulgent feeling of eating cake for breakfast while still being substantial enough to fuel your morning. It's the breakfast equivalent of having your cake and eating it too — literally.
Inside the Ingredient List
The Flavor Base
Let's start with the foundation that gives these pancakes their signature taste. All-purpose flour provides the structure, but here's the thing — you can't just dump everything in a bowl and hope for the best. The flour needs to be aerated, either by sifting or fluffing it up with a whisk before measuring. I learned this the hard way after producing pancake hockey pucks that could've been used as paperweights.
Natural cocoa powder is your next crucial player, and don't you dare reach for the Dutch-processed stuff. Natural cocoa has the acidity we need to react with our leavening agents, creating lift and that subtle chocolate undertone that makes red velvet so distinctive. Skip this and your pancakes will taste like regular pancakes that someone accidentally dyed red — tragic and completely avoidable.
Buttermilk isn't negotiable here, folks. The tang it provides is essential for that authentic red velvet flavor profile. In a pinch, you can make your own by adding a tablespoon of white vinegar or lemon juice to regular milk, but the real deal produces superior results. I'll be honest — I once tried using regular milk in a desperate breakfast moment and the resulting pancakes tasted like sweet sadness.
The Texture Crew
Baking soda and baking powder work together like a superhero duo to give these pancakes their incredible lift. The baking soda reacts with the acidic buttermilk and cocoa, while the baking powder provides additional rise through its dual-action chemistry. Most recipes get this completely wrong by using only one or the other, resulting in either flat pancakes or ones that taste like baking soda.
Eggs do more than just bind everything together — they're responsible for that rich, custardy interior that makes these pancakes feel downright luxurious. Room temperature eggs incorporate better into the batter, creating a smoother, more homogenous mixture. Take them out of the fridge first thing when you start cooking, and by the time you're ready to mix, they'll be perfect.
Melted butter adds richness and helps create those gorgeous golden edges we all fight over. Don't substitute with oil here — butter provides flavor that oil simply can't match. Plus, the milk solids in butter contribute to that beautiful browning that makes these pancakes look as good as they taste.
The Unexpected Star
White vinegar might seem like an odd addition to pancakes, but it's the secret weapon that activates our baking soda and adds that characteristic tang that makes red velvet so addictive. Just a teaspoon does the trick, and I promise you won't taste vinegar in the final product. It's like adding salt to chocolate chip cookies — you can't identify it, but you'd miss it if it weren't there.
Red food coloring is obviously essential for that signature look, but here's where things get interesting. Instead of dumping in a ton of liquid coloring that can throw off your batter consistency, we're using a concentrated gel color. You'll get maximum impact with minimum volume, keeping our carefully balanced texture intact. Picture yourself serving these at brunch — that vibrant red against a white plate is pure breakfast theater.
Vanilla extract rounds out the flavor profile, adding warmth and complexity that ties everything together. Use the good stuff here, not the imitation vanilla that tastes like regret. Real vanilla might cost more, but the difference is immediately apparent in the final product.
The Final Flourish
Salt isn't just an afterthought — it's crucial for balancing the sweetness and enhancing all the other flavors. Without it, your pancakes will taste flat and one-dimensional. I use kosher salt because the larger crystals distribute more evenly throughout the batter, preventing any salty surprises.
Granulated sugar provides sweetness, sure, but it also contributes to that beautiful browning we want. The sugar caramelizes on the griddle, creating those gorgeous golden edges that provide textural contrast to the fluffy interior. Don't reduce the sugar thinking you're being healthy — you're making pancakes, not a salad.
Everything's prepped? Good. Let's get into the real action...
The Method — Step by Step
- Start by creating your dry mix foundation. In a large bowl, whisk together the flour, cocoa powder, baking powder, baking soda, and salt until they're completely combined and the cocoa is evenly distributed. This step is crucial — you want every bite to have that perfect balance of chocolate undertone and leavening power. The mixture should look like chocolate powder, with no white streaks of flour visible. Take your time here; this isn't the place to rush.
- In a separate bowl, beat the eggs until they're light and frothy, about 30 seconds of vigorous whisking. You're not looking for stiff peaks here, just enough air incorporated to help with the lift. Add the buttermilk, melted butter, vinegar, vanilla, and food coloring, whisking until the mixture is smooth and homogenous. The color should be a deep, vibrant red — if it looks pink or pale, add a bit more coloring. This liquid mixture is where all your flavor lives, so make sure everything is well combined.
- Now comes the moment of truth — combining wet and dry. Pour the wet ingredients into the dry ingredients and use a spatula to gently fold them together. Here's the key: mix just until you no longer see dry flour streaks. The batter should be lumpy — I repeat, lumpy! Overmixing develops gluten, which leads to tough, chewy pancakes that nobody wants to eat. If you've ever struggled with dense pancakes, you're not alone — and I've got the fix right here.
- Let the batter rest for exactly five minutes. This isn't just culinary busywork — this rest allows the flour to fully hydrate and the leavening agents to start their magic. During this time, you'll notice the batter thickening slightly and bubbles beginning to form on the surface. That's the baking soda reacting with the acidic ingredients, creating carbon dioxide that will give your pancakes incredible lift. Don't skip this step unless you enjoy flat, sad pancakes.
- While your batter rests, heat your griddle or large skillet over medium heat. Here's where most home cooks go wrong — they crank the heat too high, resulting in pancakes that are burnt on the outside and raw in the middle. You want the surface hot enough that a drop of water sizzles and dances across it, but not so hot that it evaporates instantly. Test by sprinkling a few drops of water on the surface — they should skitter around like tiny hovercrafts.
- Lightly grease your cooking surface with butter or oil. I prefer butter for the flavor, but be careful — too much and your pancakes will fry instead of griddle. You want just enough to prevent sticking, not so much that your pancakes swim in fat. The butter should foam gently but not brown immediately. That sizzle when the batter hits the pan? Absolute perfection.
- Pour about 1/4 cup of batter onto the hot griddle for each pancake. Don't crowd them — leave enough space between pancakes so you can easily flip them. The batter should spread into a nice circle about 4 inches across. If it spreads too thin, your batter is too runny (add a tablespoon of flour). If it sits in a mound, it's too thick (add a splash of buttermilk).
- Watch for the telltale signs that it's time to flip. Small bubbles will begin to form on the surface, and the edges will start to look set and slightly dry. This usually takes about 2-3 minutes, but don't go by time alone — visual cues are your best friend here. When you see bubbles popping and leaving tiny holes that don't immediately fill with batter, you're ready for the flip.
- The flip is where confidence matters. Slide your spatula under the pancake in one smooth motion, then flip it over in a quick, decisive movement. Hesitation leads to folding, tearing, or worse — pancake on the floor. The second side needs less time, usually just 1-2 minutes. Resist the urge to press down with your spatula — this squeezes out the air pockets that make pancakes fluffy.
- Transfer your finished pancakes to a warm plate and cover loosely with foil while you cook the remaining batter. If you've ever been that person eating cold pancakes while everyone else is still waiting, you know the importance of keeping them warm. The residual heat will continue cooking them slightly, so it's okay if they're just a touch underdone when you remove them from the griddle.
That's it — you did it. But hold on, I've got a few more tricks that'll take this to another level...
Insider Tricks for Flawless Results
The Temperature Rule Nobody Follows
Here's the game-changer that separates amateur pancakes from restaurant-quality ones: maintain consistent griddle temperature throughout cooking. After each batch, let the pan recover for about 30 seconds before adding more batter. I learned this working the breakfast shift at a busy diner, where we had to produce hundreds of perfect pancakes every morning. The first batch always looks perfect, but by the third batch, people start getting flat, pale disasters because the griddle temperature has dropped. Keep a spray bottle handy — if the surface gets too hot, a quick mist brings it back to the sweet spot.
Why Your Nose Knows Best
Don't walk away from the stove here — this next part is crucial. Your nose is actually one of the best tools for perfect pancake timing. When you start smelling sweet, buttery aromas wafting up from the griddle, it's usually time to check the underside. That smell means the Maillard reaction is happening — the chemical process that creates those gorgeous golden-brown surfaces and complex flavors. A friend tried skipping this step once — let's just say it didn't end well. She ended up with a kitchen full of smoke and pancakes that tasted like charcoal briquettes.
The 5-Minute Rest That Changes Everything
Okay, ready for the game-changer? After cooking, let your pancakes rest for five minutes before serving. I know, I know — when you're starving and that stack is calling your name, waiting feels like torture. But this rest allows the steam inside to redistribute, creating a more uniformly tender texture throughout. It's the difference between good pancakes and great pancakes. Plus, it gives you time to warm your maple syrup and brew another pot of coffee.
The Secret to Even Browning
Here's what actually works for that picture-perfect color: rotate your pancakes 90 degrees halfway through cooking the first side. Not flip — rotate. This compensates for any hot spots on your griddle and ensures even browning. Professional chefs do this religiously, but home cooks rarely know about it. The result is pancakes that look like they came from a magazine photoshoot, all perfectly golden and Instagram-ready.
When Size Matters
Size actually does matter when it comes to pancakes, and bigger isn't always better. Stick to that 4-inch diameter for optimal texture. Larger pancakes are harder to flip evenly and tend to cook unevenly, with burnt edges and raw centers. Smaller ones cook too quickly and don't develop that nice contrast between crispy edges and fluffy centers. Four inches is the sweet spot where everything comes together perfectly.
Creative Twists and Variations
This recipe is a playground. Here are some of my favorite ways to switch things up:
White Chocolate Chip Red Velvet
Add 1/2 cup of white chocolate chips to the batter just before cooking. The creamy sweetness of the white chocolate creates an incredible contrast with the tangy buttermilk base. The chips melt into little pockets of sweetness that make each bite feel like you're eating dessert for breakfast — which, let's be honest, is exactly what we want sometimes.
Cream Cheese-Stuffed Centers
Mix 4 ounces of softened cream cheese with 2 tablespoons of powdered sugar and a splash of vanilla. Drop a teaspoon of this mixture onto each pancake after you've poured the batter onto the griddle, then cover with a tiny bit more batter. When you flip them, you get these amazing cream cheese centers that mimic the frosting on red velvet cake. It's like having a filled pancake without any complicated techniques.
Lemon Zest Brightness
Add the zest of one lemon to your wet ingredients for a bright, citrusy twist that cuts through the richness. The lemon enhances the buttermilk tang while adding a fresh dimension that makes these perfect for spring brunches. Your guests will taste them and wonder what that amazing background flavor is — it's your secret weapon.
Coconut Red Velvet
Replace 1/4 cup of the flour with unsweetened shredded coconut for a tropical twist. The coconut adds texture and a subtle sweetness that pairs beautifully with the cocoa. Toast the coconut first for even more depth of flavor — it brings out these nutty, caramel notes that take these pancakes somewhere completely new.
Mini Pancake Cereal
Make tiny, dime-sized pancakes and serve them in a bowl with maple syrup for "pancake cereal" that kids go absolutely wild for. Use a squeeze bottle or piping bag to control the size. It's ridiculously fun to eat and makes portion control easier — though I dare you to stick to one bowl.
Savory-Sweet Bacon Version
Crumble cooked bacon into the batter for that sweet-savory magic that makes taste buds sing. The saltiness of the bacon creates an incredible contrast with the sweet pancake base. Use thick-cut bacon cooked until crispy, then crumbled into small pieces. This is breakfast for people who can't decide between sweet and savory.
Storing and Bringing It Back to Life
Fridge Storage
Let your pancakes cool completely before storing — warm pancakes create condensation that leads to soggy, sad leftovers. Layer them between sheets of parchment paper in an airtight container, where they'll keep for up to 4 days in the refrigerator. The parchment prevents them from sticking together, so you can grab just one or two without defrosting the entire batch. Pro tip: undercook them slightly if you plan to reheat later — they'll finish cooking when you warm them up.
Freezer Friendly
These pancakes freeze beautifully, making them perfect for meal prep or those mornings when you need breakfast but can't even. Freeze them in a single layer on a baking sheet first, then transfer to freezer bags once solid. This prevents them from freezing into one giant pancake brick that requires an ice pick to separate. They'll keep for up to 2 months frozen, though honestly, they've never lasted more than a week in my house.
Best Reheating Method
Add a tiny splash of water to your pancakes before reheating — it steams them back to perfection. The microwave works in a pinch (15-20 seconds per pancake), but the toaster oven is your best friend for restoring that fresh-off-the-griddle texture. For the ultimate revival, wrap them in foil with a small ice cube and bake at 350°F for 8-10 minutes. The ice cube creates steam that rehydrates the pancakes while the foil traps moisture, bringing them back to life like breakfast zombies in the best possible way.