I was elbow-deep in a failed batch of caramel cookies when it hit me: what if I took everything wrong with that recipe and made it absolutely right? The cookies were too sweet, too flat, and the caramel tasted like someone melted a candy bar and called it a day. I was frustrated, covered in flour, and ready to give up on caramel desserts forever. But then my neighbor knocked on the door, smelled the sugar in the air, and dared me to create something that would actually make sense of all that caramel chaos. That challenge led me to these Caramel Crush Bars, and now I'm convinced this is the dessert that will make you rethink everything you thought you knew about caramel treats.
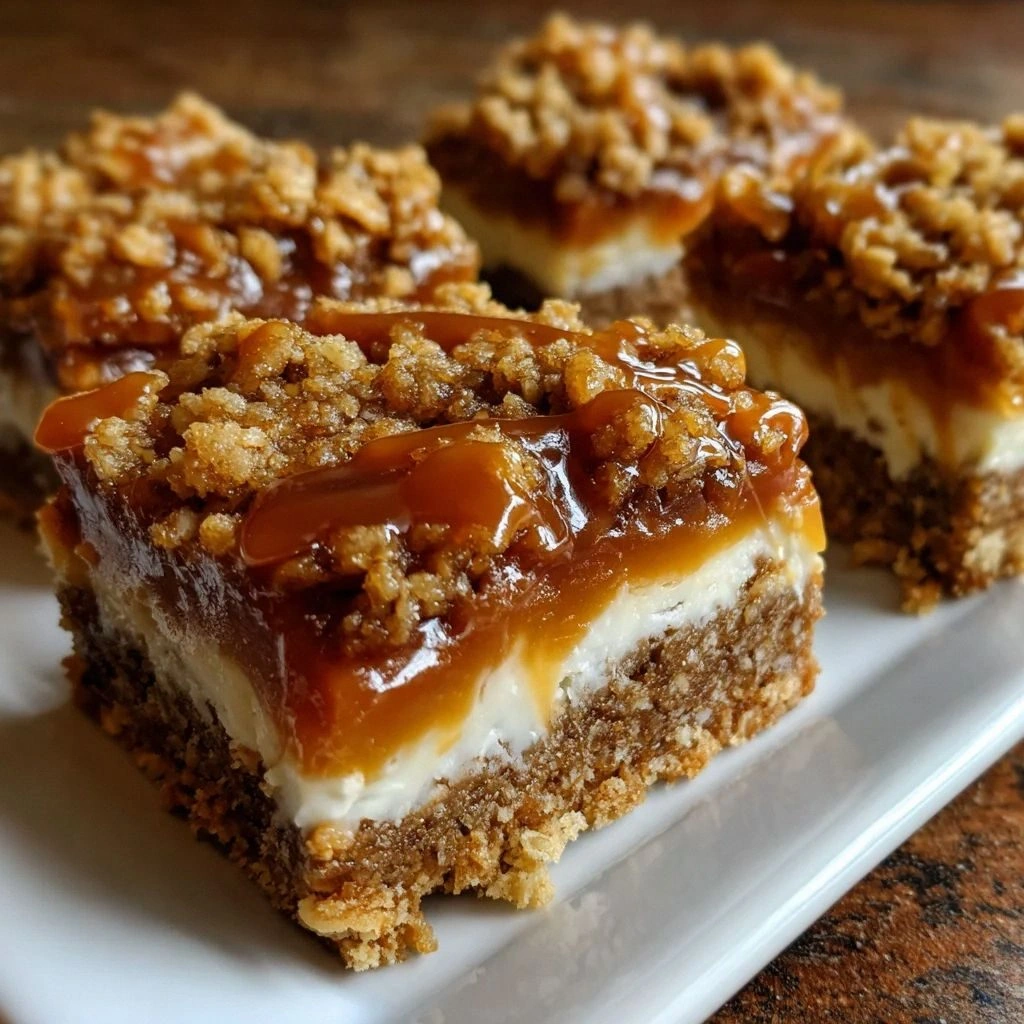
Picture this: a buttery, golden base that shatters like thin ice when you bite into it, revealing a gooey caramel layer that stretches like a golden ribbon. The edges caramelize into these crispy bits that taste like someone turned brown sugar into pure joy. The smell alone—buttery, toasty, with hints of vanilla and molasses—makes people appear in your kitchen like you're summoning dessert spirits. I've made these bars for office parties, family gatherings, and midnight snacks, and the reaction is always the same: eyes widen, conversation stops, and suddenly everyone's best friend asking for the recipe.
What makes these bars different from every other caramel bar recipe cluttering the internet? Most recipes get the caramel layer completely wrong—they use sweetened condensed milk and end up with this cloying, tooth-aching sweetness that overpowers everything else. Or they go the opposite direction and create a caramel that's so thin it soaks into the crust and turns everything into a soggy mess. My version creates this perfect balance: a caramel that's firm enough to hold its shape but soft enough to yield under the pressure of your teeth, releasing waves of complex flavor that dance between buttery richness and deep, almost burnt-sugar complexity.
Let me walk you through every single step—by the end, you'll wonder how you ever made it any other way. Trust me, once you taste these bars with their perfect ratio of crust to caramel, with those little pockets of chewiness that make you close your eyes involuntarily, you'll understand why I call them "crush bars." They're the dessert that makes people develop instant crushes on your baking skills.
What Makes This Version Stand Out
Perfect Caramel Texture: The caramel layer hits that elusive sweet spot between firm and gooey. It's not the tooth-breaking hardness of commercial caramel candies, nor the runny mess that most homemade versions become. Instead, it holds together in beautiful squares that yield gracefully when bitten, creating those Instagram-worthy cheese pulls that make people stop scrolling.
Oatmeal Cookie Crust That Actually Tastes Like Something: Too many bar recipes treat the crust as a mere vehicle for the topping. Not here. The oatmeal base gets toasted before the filling goes on, developing this nutty, almost butterscotch flavor that complements the caramel perfectly. It's like having two desserts in one, each enhancing the other.
Balanced Sweetness: Here's where most recipes fail—they go full sugar bomb and leave you with that uncomfortable throat-burning sensation. My version uses brown sugar's molasses notes and a touch of salt to create complexity. The result? A dessert that tastes like caramel should taste, not like someone dissolved sugar cubes in butter.
Make-Ahead Magic: These bars actually improve after a day in the fridge. The flavors meld and deepen, the caramel sets perfectly, and the crust develops this amazing chewy-crispy texture. I dare you to make them on Sunday and see if they last past Tuesday. Spoiler alert: they won't, because you'll keep finding excuses to "just check if they're still good."
Pantry-Friendly Ingredients: No specialty items that require a trip to three different stores. Everything comes from your local grocery, and I've included tested substitutions for every dietary restriction your friends claim to have developed since the last potluck. Gluten-free? Got you covered. Dairy-free? No problem. Sugar-conscious? There's a version for that too.
Fail-Proof Technique: I've stripped away all the candy-making voodoo that makes caramel scary. No thermometers, no "soft-ball stage" nonsense, no hovering over a pot wondering if you're about to ruin everything. Just simple steps that create magic every single time. Even if you've never made caramel before, you'll nail this on your first try.
Crowd Psychology: There's something about cutting desserts into neat squares that makes people feel safe about indulging. It's portion control they can ignore by taking "just one more small piece." I've watched self-proclaimed "not dessert people" polish off three of these at parties, then sheepishly ask if there were any left to take home.
Inside the Ingredient List
The Flavor Base
Quick oats form the backbone of our crust, but not for the reason you might think. Sure, they provide structure, but their real magic lies in how they absorb the butter and brown sugar, creating these little pockets of caramelized goodness throughout the base. Old-fashioned oats are too tough and steel-cut oats would be like eating gravel. Quick oats hit that perfect middle ground where they maintain some texture but still meld into the surrounding ingredients. If all you have are old-fashioned oats, give them a quick blitz in the food processor—about three pulses should do it.
All-purpose flour might seem boring, but it's the unsung hero that prevents our crust from becoming a greasy, crumbly disaster. It forms the gluten network that holds everything together when the caramel goes on top. Too little flour and your bars will fall apart like a bad relationship. Too much and they become tough and dry. The ratio I've developed hits that sweet spot where the bars hold their shape but still have that tender, almost cookie-like bite.
The Texture Crew
Brown sugar isn't just about sweetness—it's a flavor bomb that brings molasses, toffee, and deep caramel notes to the party. I use dark brown sugar because it has nearly twice the molasses content of light brown sugar, giving our caramel that complex, almost smoky undertone that makes people ask "what's in these?" Don't even think about substituting white sugar unless you want bland, one-dimensional bars that taste like disappointment.
Butter is non-negotiable here. Margarine or oil won't create that flaky, almost pastry-like texture that makes these bars special. The water content in butter creates steam as it bakes, lifting the crust slightly and creating these delicate layers. Use good butter—European-style if you can find it—because the higher fat content means richer flavor and better texture. And yes, use salted butter. The salt enhances all the other flavors and balances the sweetness.
The Unexpected Star
Milk in the caramel filling isn't just about thinning the mixture. It provides proteins that help the caramel set properly, creating that perfect chewy texture. Whole milk works best because the fat helps prevent the caramel from becoming grainy. If you're going dairy-free, full-fat coconut milk is your best bet—it adds this subtle tropical note that works surprisingly well with the caramel. Just don't use skim milk unless you want caramel that tastes like it has commitment issues.
Vanilla extract is where most recipes cheap out, but not here. Use the good stuff—Madagascar or Tahitian vanilla if you can swing it. The vanilla doesn't just add vanilla flavor; it enhances the caramel notes and adds this warm, almost floral undertone that makes the whole dessert taste more expensive than it is. Skip the imitation vanilla unless you want your bars to taste like a candle store.
The Final Flourish
Flour in the caramel filling is the secret weapon nobody talks about. It prevents the caramel from becoming too runny by absorbing excess moisture, but it does it invisibly—you'll never detect it in the final texture. Cornstarch works too, but flour gives a slightly richer mouthfeel that I prefer. Use too much and your caramel becomes pudding; use too little and it runs all over your pan. The ratio I've perfected gives you that perfect sliceable texture.
Everything's prepped? Good. Let's get into the real action...
The Method — Step by Step
- Start by preheating your oven to 350°F (175°C). This isn't just about getting the oven hot—it's about creating the right environment for our crust to develop that perfect golden color and crispy edges. While the oven heats, line an 8x8 inch pan with parchment paper, leaving some overhang on the sides. These "handles" will save you from the frustration of trying to pry perfect bars out of the pan later. Trust me, I learned this the hard way after destroying my first three batches trying to invert them onto a cutting board.
- For the crust, combine your oats, flour, brown sugar, and a pinch of salt in a large bowl. Mix these dry ingredients with your fingers or a fork until they're well combined. Now comes the fun part—add your melted butter and vanilla extract. Stir until everything is moistened and starts clumping together like wet sand at the beach. The mixture should hold together when squeezed but still have some crumbly bits. If it's too dry, add another tablespoon of melted butter; too wet, sprinkle in a bit more oats.
- Press this mixture firmly and evenly into your prepared pan. Use the bottom of a measuring cup or glass to really compact it down—you want it tight enough that it won't crumble when you cut the bars later. The crust should be about 1/4 inch thick all around. Don't be gentle here; really lean into it. This is the foundation everything else builds on, so take your time getting it right. Pop this into the oven for 12-15 minutes, until the edges start turning golden and your kitchen smells like you're baking the world's best oatmeal cookie.
- While the crust bakes, start your caramel. In a heavy-bottomed saucepan, combine your butter, brown sugar, milk, and a pinch of salt. Don't use a cheap thin pan here—it needs to distribute heat evenly or your caramel will burn in spots while staying grainy in others. Cook over medium heat, stirring constantly with a wooden spoon or heat-proof spatula. This isn't the time to multitask; caramel can go from perfect to burnt in the time it takes to check your phone.
- After about 5-7 minutes, the mixture will start bubbling and thickening. Keep stirring and watch for the color to deepen from light brown to a rich, almost mahogany shade. The caramel is ready when it coats the back of your spoon and leaves a clear trail when you run your finger through it. It should be thick but still pourable. Remove from heat immediately and stir in the vanilla extract. The mixture will bubble up—this is normal and exactly what you want.
- By now your crust should be ready. Pour the hot caramel over the warm crust, using a spatula to spread it evenly to the edges. Tilt the pan gently to help it reach the corners, but don't scrape too hard—you want the caramel to stay smooth and glossy. The heat from the crust will help the caramel set perfectly, creating that seamless integration between layers that makes these bars so addictive.
- Return the pan to the oven for another 12-15 minutes. You're looking for the caramel to bubble gently around the edges and develop a slightly darker color on top. The center should still jiggle a bit when you shake the pan—it will firm up as it cools. This is the moment of truth: pull them out too early and the caramel won't set properly; leave them too long and it becomes hard and chewy like a Tootsie Roll.
- Cool completely in the pan on a wire rack for at least 2 hours. I know, this is the hardest part. Your kitchen smells like heaven and you want to dig in immediately. Resist! The caramel needs time to set properly. For clean cuts, refrigerate for 30 minutes before slicing. Use a sharp knife wiped clean between cuts for those perfect bakery-style squares that make people think you're a professional.
That's it—you did it. But hold on, I've got a few more tricks that'll take this to another level...
Insider Tricks for Flawless Results
The Temperature Rule Nobody Follows
Room temperature ingredients aren't just a suggestion—they're the difference between caramel that sets like velvet and caramel that separates into an oily mess. Take your milk and butter out of the fridge 30 minutes before you start. Cold dairy drops the temperature of your caramel too quickly, causing the butter to seize up into little greasy pockets. Warm ingredients emulsify smoothly, creating that perfect glossy finish that makes people ask if you bought these from a fancy bakery. I've tested this with cold ingredients and the difference is dramatic—like comparing a silk scarf to a burlap sack.
Why Your Nose Knows Best
Don't rely on timing alone when making the caramel—your nose is your most reliable tool. When the caramel is ready, your kitchen will fill with this incredible aroma that's like butterscotch and toffee had a baby. It's deeper and more complex than just sweet—it has these nutty, almost coffee-like undertones. If you only smell sugar, keep cooking. If you smell anything remotely burnt, you've gone too far. This might take a few tries to recognize, but once you do, you'll never need a thermometer again. A friend tried making these by timing alone and ended up with caramel that tasted like burnt sugar cookies.
The 5-Minute Rest That Changes Everything
After you pour the caramel over the crust, let it sit for exactly 5 minutes before putting it back in the oven. This brief rest allows the caramel to start seeping into the crust slightly, creating this seamless integration between layers. The bottom of the crust absorbs just enough caramel to become this magical hybrid of cookie and candy, while the top stays distinct. Skip this step and you get two separate layers that fall apart when you cut them. I've had people ask how I got the caramel to "fuse" with the crust—this is the secret.
The Cutting Technique That Prevents Crumbling
Here's the thing about cutting these bars—everyone wants to do it while they're warm because warm caramel is delicious. But warm caramel is also runny caramel, and you'll end up with a mess that looks like it was attacked by a toddler. Wait until they're completely cool, then score the top with a sharp knife where you want to cut. This breaks the surface tension so when you press down firmly, you get clean cuts instead of cracks. Wipe your knife between cuts for those perfect edges that make people think you went to culinary school.
Storage That Actually Improves Them
These bars are one of those rare desserts that get better with age. The flavors need time to meld and deepen, so make them at least a day ahead if you can. Store them in an airtight container with parchment between layers. The slight humidity that builds up actually helps the caramel become even more luscious. I've had people tell me the bars I made three days ago were even better than the fresh ones. Just keep them away from heat or the caramel will start to weep and get sticky on top.
Creative Twists and Variations
This recipe is a playground. Here are some of my favorite ways to switch things up:
Salted Caramel Pretzel Crush
Replace half the oats with crushed pretzels for the crust, and sprinkle coarse sea salt over the caramel before the final bake. The pretzels add this incredible crunch and salty contrast that makes the caramel taste even sweeter. It's like taking everything good about a salted caramel pretzel and condensing it into bar form. People go absolutely crazy for this version at game day parties—it has that perfect sweet-salty thing that keeps you reaching for "just one more piece" until suddenly the pan's empty.
Chocolate-Drizzled Elegance
Melt 4 ounces of dark chocolate with a teaspoon of coconut oil and drizzle it in a zigzag pattern over the cooled bars. The chocolate sets into these snappy shards that give way to the chewy caramel underneath. Use a good quality chocolate—something in the 70% range that has enough bitterness to balance all that sweetness. This version looks so sophisticated that people assume you bought them from a French bakery. Little do they know it took you all of five extra minutes.
Nutty Buddy Upgrade
Stir 1/2 cup of toasted pecans or walnuts into the caramel just before pouring it over the crust. The nuts add this incredible toasty flavor and break up the chewy texture with their crunch. Toast the nuts first—raw nuts have this green, almost bitter taste that doesn't play well with caramel. Toasted nuts bring these warm, buttery notes that make the whole thing taste like a praline bar. My grandmother swears this version is better than her famous pecan pie, which is basically the highest compliment in our family.
Coffee Caramel for the Win
Dissolve 1 teaspoon of instant espresso powder in the milk before adding it to the caramel. The coffee flavor isn't obvious—it just deepens the caramel notes and adds this subtle complexity that makes people ask "what's that amazing flavor?" It's like the difference between a good perfume and a great one—there's something you can't quite identify that makes it irresistible. This version is particularly popular with the "I don't really like sweets" crowd.
Spiced Autumn Version
Add 1/2 teaspoon of cinnamon and 1/4 teaspoon of cardamom to the crust mixture. The spices bloom in the oven and create this warm, almost chai-like undertone that makes these bars taste like autumn in dessert form. Cardamom is the secret weapon here—it adds this floral, almost citrusy note that makes the caramel taste brighter and more complex. Make these in September and October and watch them disappear faster than pumpkin spice anything.
Coconut Dream Bars
Replace the milk with full-fat coconut milk and stir 1/2 cup of toasted coconut flakes into the caramel. The coconut adds this tropical note that transforms the whole dessert into something that tastes like a candy bar you'd find in Hawaii. Toast the coconut first until it's golden and fragrant—untoasted coconut has this raw, almost soapy flavor that doesn't work here. This version is dangerously good frozen—like a chewy, caramel-coconut candy that's impossible to stop eating.
Storing and Bringing It Back to Life
Fridge Storage
These bars keep beautifully in the refrigerator for up to a week—though I've never seen them last that long. Store them in an airtight container with parchment paper between layers to prevent sticking. The cold actually improves their texture, making the caramel even chewier and the crust more crisp. Take them out of the fridge 15 minutes before serving if you want them slightly softer, but honestly, they're addictive straight from cold storage. The caramel firms up but doesn't become rock hard, creating this perfect contrast with the tender crust.
Freezer Friendly
These bars freeze incredibly well for up to three months, making them perfect for emergency dessert situations. Cut them into squares first, then freeze them in a single layer on a baking sheet. Once solid, transfer to a freezer bag with parchment between layers. Thaw them in the refrigerator overnight, or if you're impatient (like me), microwave them for 10-15 seconds. Don't overdo it or the caramel will become lava-hot and run all over the place. Frozen bars have this amazing texture—like a caramel candy that's been left just slightly soft.
Best Reheating Method
If your bars have been in the fridge or freezer and you want to serve them at room temperature, the key is patience. Let them come to room temperature naturally for about 30 minutes. If you're in a hurry, a quick 5-second microwave blast will soften them slightly without melting the caramel into a mess. The goal is to take the chill off, not warm them through. Warm caramel bars sound appealing but they quickly become a sticky, hard-to-eat mess that gets all over your fingers and face. Room temperature is where the magic happens.