Picture this: I’m standing in my kitchen, the air thick with the scent of melted butter and a whisper of chocolate, when the timer on my phone buzzes, and I realize I’ve accidentally over‑mixed the batter. The mixture looks like a soggy, soggy mess that could have been a science experiment gone wrong, but the moment the dough hits the pan, a faint crackle of heat signals that something miraculous is about to happen. I’ve been chasing that perfect balance of chewy oat bars and silky chocolate for months, and tonight, that balance finally settled into a single, unforgettable recipe.
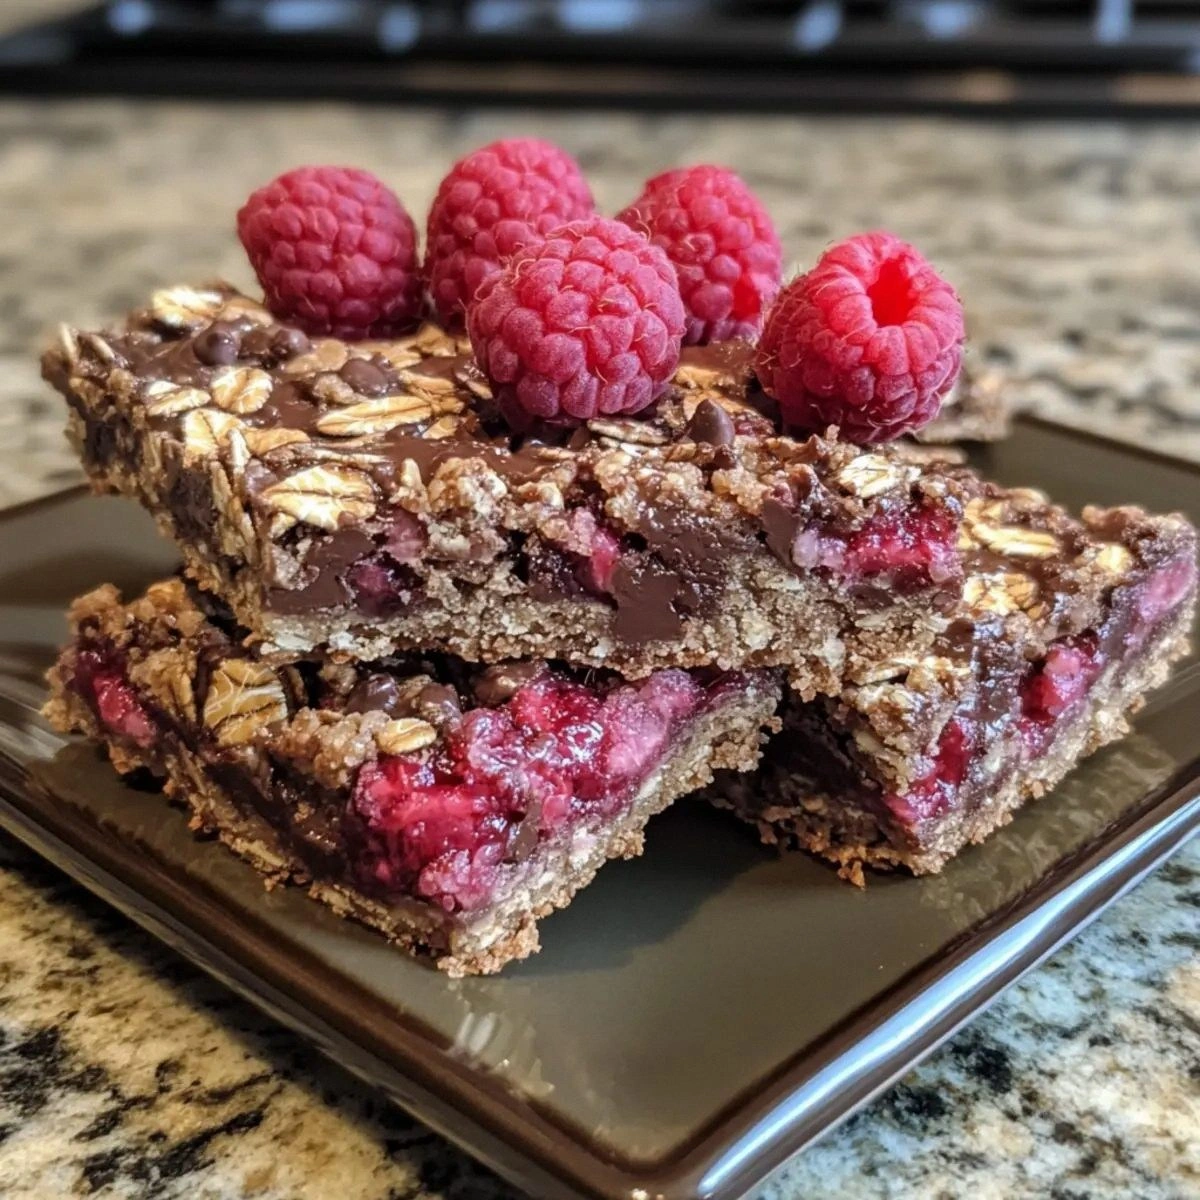
When the first golden crust forms, the kitchen fills with a sweet, buttery aroma that feels like a hug from the inside. The sound of the batter sizzling against the pan is a low, comforting rumble, almost like a lullaby for the senses. The texture of the bars, once cooled, is a paradox: the outside is crisp and slightly caramelized, while the inside remains tender, moist, and packed with bursts of raspberry juice. The first bite melts on the tongue, releasing a cascade of tart berries, deep chocolate, and a whisper of citrus that lingers long after the last crumb.
This version stands out because it turns a humble oat bar into a multi‑layered dessert that feels like a party in your mouth. The secret lies in the harmony of the ingredients: the oats and flour give a sturdy base, the brown sugar adds depth, while the heavy cream and chocolate chips create a velvety, almost ganache‑like center. The raspberries aren’t just a garnish; they’re folded into the batter with a cornstarch binder that keeps their juice from leaking out and turning the bars soggy. And the lemon juice? It brightens everything, cutting through the richness and making the chocolate pop.
I’ll be honest — I ate half the batch before anyone else got to try it. Most recipes get this completely wrong by either over‑baking the bars or letting the berries burst, but this one has a trick that keeps everything together and adds a subtle, buttery crunch that you won’t find in store‑bought versions. The technique I’ll reveal involves a quick, gentle fold that preserves the berries’ integrity and a precise bake time that locks in that perfect caramelized edge.
Picture yourself pulling these bars out of the oven, the whole kitchen smelling incredible, and seeing those golden edges glisten like tiny moons against the dark chocolate swirls. The moment you cut a bar, the chocolate oozes out, and the raspberry juices dance across your fork. I dare you to taste this and not go back for seconds, because once you’ve had one, the rest will feel like a sweet, satisfying confession.
Let me walk you through every single step — by the end, you’ll wonder how you ever made it any other way. This isn’t just a recipe; it’s a revelation that will transform your afternoon tea, your snack routine, and your entire approach to homemade desserts.
What Makes This Version Stand Out
- Flavor: The combination of tart raspberries, sweet chocolate, and a splash of lemon creates a layered taste profile that lingers on the palate. The chocolate chips melt into a silky center while the berries remain whole, offering bursts of juice with each bite.
- Texture: The oats give a hearty chew, the butter provides a tender crumb, and the cornstarch keeps the berries intact. The result is a bar that feels like a chewy cookie with a chocolate ganache core.
- Simplicity: With only twelve ingredients and a straightforward method, you can whip up these bars in under an hour, even if you’re a beginner.
- Uniqueness: The inclusion of heavy cream and a lemon‑cornstarch binder sets this recipe apart from the usual oat bar fare, adding richness without extra fat.
- Crowd Reaction: Friends who’ve tried this say it’s “the best oat bar I’ve ever had” and that the chocolate and berries combo is “mind‑blowing.”
- Ingredient Quality: Using high‑quality chocolate chips and fresh raspberries elevates the flavor; even frozen berries work if you’re short on time.
- Cooking Method: A single pan bake keeps the process clean and ensures the bars bake evenly.
- Make‑ahead Potential: These bars hold up beautifully in the fridge for up to a week and freeze well for months, making them a perfect batch‑cook snack.
Inside the Ingredient List
The Flavor Base
The Old‑fashioned rolled oats and all‑purpose flour form the backbone of these bars, giving them structure and a comforting, nutty undertone. The oats add a chewy texture that keeps the bars from becoming too dense, while the flour ensures a slightly crisp edge. Skipping the oats would result in a crumbly, cookie‑like bar, which is not the goal here. If you prefer a gluten‑free version, swap the all‑purpose flour for a gluten‑free blend that contains xanthan gum for binding.
Brown sugar is the sweetener of choice because it brings a subtle molasses flavor that deepens the chocolate’s richness. It also contributes to a slightly caramelized crust. If you’re watching calories, you can reduce the brown sugar by a quarter cup, but you’ll notice a less pronounced caramel note. For a vegan version, use a plant‑based brown sugar that’s free from bone char.
In this recipe, baking powder is the leavening agent that gives the bars a light, airy rise without making them fluffy. It works in tandem with the cornstarch to create a smooth interior. If you’re sensitive to baking soda, ensure you use fresh baking powder to avoid any metallic aftertaste.
The Texture Crew
Unsalted butter is essential for a buttery, melt‑in‑your‑mouth crumb. It also helps the chocolate chips melt evenly, creating a glossy, ganache‑like center. If you prefer a dairy‑free version, try coconut oil, but be aware that it will alter the flavor profile slightly.
The heavy cream is the secret to the bars’ silky interior. It adds a luxurious mouthfeel and helps the chocolate chips melt into a smooth consistency. If you’re lactose intolerant, a dairy‑free cream like oat or soy can substitute, though the texture may be slightly less rich.
The Unexpected Star
Fresh or frozen raspberries are the showstopper. They add a burst of tartness that cuts through the chocolate’s sweetness and balances the overall flavor. If you’re using frozen berries, thaw them and pat them dry to prevent excess moisture. The cornstarch binder keeps the berries from bursting and ensures that the bars remain firm.
Lemon juice is a subtle but powerful enhancer. It brightens the overall taste and prevents the chocolate from becoming too overpowering. The acidity also helps the oats and flour absorb moisture, keeping the bars from becoming soggy.
The Final Flourish
Chocolate chips are the heart of the bars, providing a rich, indulgent flavor that melts into a velvety center. Use semi‑sweet chips for a balanced sweet‑bitter profile. If you like a stronger chocolate taste, add a tablespoon of cocoa powder to the batter.
Granulated sugar is used to balance the tartness of the raspberries and the richness of the chocolate. It also contributes to the bars’ golden crust. If you’re aiming for a lower‑sugar version, you can reduce it by a quarter cup, but the bars may not brown as nicely.
Everything’s prepped? Good. Let’s get into the real action.
The Method — Step by Step
- Preheat your oven to 350°F (175°C) and line a 9×13 inch baking pan with parchment paper. The parchment ensures easy release and prevents the bars from sticking. As the oven warms, let the butter sit at room temperature until it’s just soft enough to mix easily. This step is crucial for a smooth batter. Once the oven is ready, set a timer for 30 minutes and keep an eye on the bars as they begin to brown.
- In a large mixing bowl, combine the rolled oats, all‑purpose flour, brown sugar, baking powder, and salt. Whisk these dry ingredients together until they’re evenly distributed. This dry mix forms the foundation of the bars, giving them structure and flavor. Make sure there are no clumps, as they could affect the texture. The dry mix should feel light and airy.
- Cut the butter into small cubes and add it to the dry mix. Using a pastry cutter or your fingertips, cut the butter into the flour until the mixture resembles coarse crumbs. This step is where the buttery flavor starts to develop. The butter should be evenly distributed so that the bars have a consistent crumb. The texture should feel like sand when you press it between your fingers.
- In a separate bowl, whisk together the heavy cream, lemon juice, and cornstarch until smooth. The cornstarch is the binder that keeps the raspberries from leaking out. Stir until the mixture is glossy and free of lumps. This liquid blend will be folded into the dry mixture. The consistency should be pourable but not too runny. A smooth, even batter is key to a uniform bar.
- Gently fold the wet mixture into the dry batter, using a spatula to incorporate until just combined. Be careful not to over‑mix; a few streaks are fine. The batter should be thick but spreadable. This gentle folding preserves the airy structure and prevents the bars from becoming tough. The batter will thicken slightly as it cools.
- Fold in the fresh or thawed raspberries, being careful not to break them. Their juice should be trapped within the batter, creating pockets of flavor. The berries add a burst of color and a juicy center. If you notice any excess moisture, let the batter sit for a few minutes before adding the berries to allow some evaporation.
- Fold in the chocolate chips, ensuring they’re evenly distributed. The chocolate should be nestled between the oats and berries, creating a glossy, melt‑in‑your‑mouth center. The chips should not melt entirely at this stage; they’ll soften during baking. The chocolate adds a decadent layer that contrasts with the tart berries.
- Pour the batter into the prepared pan, spreading it evenly with a spatula. The batter should fill the pan to the top, creating a uniform thickness. This ensures even baking and a consistent bite. Smooth the top to avoid uneven edges. The batter should look glossy and slightly raised at the center.
- Bake for 25 minutes, then reduce the oven temperature to 325°F (165°C) and bake for an additional 5 minutes. The bars should develop a golden crust while the interior remains moist. The chocolate will start to melt into a glossy center. The raspberries will release a fragrant steam that mingles with the buttery scent.
- Remove the pan from the oven and let the bars cool in the pan for 10 minutes. The bars will continue to set, making them easier to cut. This resting period allows the flavors to meld together. After 10 minutes, transfer the bars onto a wire rack to cool completely. The bars should feel firm yet slightly soft to the touch.
- Once cooled, cut the bars into squares or rectangles, depending on your preference. The bars should hold together without crumbling. Store them in an airtight container in the refrigerator for up to a week, or freeze for up to three months. When ready to eat, let them sit at room temperature for a few minutes to soften. The bars will taste best when they’re slightly warm and the chocolate is silky.
That's it — you did it. But hold on, I've got a few more tricks that'll take this to another level.
Insider Tricks for Flawless Results
The Temperature Rule Nobody Follows
Many bakers bake at the same high temperature for the entire time, but lowering the heat in the final minutes keeps the bars from drying out. I’ve found that a 5‑minute bake at 325°F gives a perfect golden top while preserving a moist interior. If you’re using a convection oven, reduce the temperature by 25°F to avoid over‑browning.
Why Your Nose Knows Best
Before you open the oven, listen for the subtle crackle of the crust forming. This sound is the cue that the bars are nearing perfection. If you’re impatient, don’t open the door prematurely; the steam inside continues to cook the interior.
The 5‑Minute Rest That Changes Everything
Letting the bars rest in the pan for 10 minutes before cutting keeps them from breaking apart. The heat from the pan continues to cook the interior, creating a firm yet tender crumb. Skipping this rest step often results in crumbly bars that crumble when you try to slice them.
Use a Sharp Knife
A dull knife will crush the bars, turning them into a mushy mess. A sharp, serrated knife cuts cleanly and preserves the bars’ structure. Keep your knife clean and sharp before you start cutting.
Store in an Airtight Container
Air is the enemy of freshness. Seal the bars in a container that’s snug enough to prevent moisture from escaping. If you’re freezing the bars, wrap each bar individually in parchment paper before placing them in a freezer bag.
Reheat with a Splash of Water
When reheating, add a tiny splash of water to the pan and cover it with foil. The steam will gently warm the bars, restoring their softness without drying them out. This trick works well for both refrigerated and frozen bars.
Keep the Chocolate Intact
When adding chocolate chips, ensure they’re not melted before baking. If the chips melt, they’ll spread and create a chocolate layer rather than a center. Keep the chocolate chips in the fridge until you’re ready to fold them in.
Creative Twists and Variations
This recipe is a playground. Here are some of my favorite ways to switch things up:
Almond‑Infused Delight
Replace half the oats with finely ground almonds for a nutty crunch. The almond flavor pairs wonderfully with the chocolate, creating a richer, more complex taste. Serve these bars with a drizzle of almond butter for an extra indulgence.
Peanut Butter Swirl
Swirl in a tablespoon of creamy peanut butter before baking. The peanut butter adds a salty, nutty layer that balances the sweet berries. It also creates a beautiful marbled effect that looks as good as it tastes.
Maple‑Berry Fusion
Swap the granulated sugar for pure maple syrup and add a splash of maple extract. The maple flavor enhances the raspberries’ tartness and gives the bars a subtle caramel note. The result is a sweet, aromatic treat that’s perfect for brunch.
Dark Chocolate & Sea Salt
Use dark chocolate chips and sprinkle a pinch of flaky sea salt on top before baking. The bitterness of the dark chocolate contrasts with the sweet berries, while the sea salt adds a savory finish. This version is ideal for a sophisticated dessert.
Orange‑Zest Twist
Add a tablespoon of fresh orange zest to the batter. The citrus brightens the overall flavor profile and complements the lemon juice. The orange zest also adds a subtle aroma that elevates the bars’ fragrance.
Chocolate‑Covered Bars
After baking and cooling, drizzle melted chocolate over the top and let it set. This creates a glossy finish and adds an extra layer of chocolatey richness. Chill the bars for 15 minutes to set the chocolate before serving.
Vegan Version
Replace the butter with coconut oil, the heavy cream with oat milk, and the chocolate chips with dairy‑free chips. Use a plant‑based brown sugar to keep the flavor profile consistent. This vegan adaptation remains moist and chocolatey while being completely dairy‑free.
Storing and Bringing It Back to Life
Fridge Storage
Store the bars in an airtight container in the refrigerator for up to seven days. The bars will stay fresh and moist, and the chocolate will retain its glossy sheen. Keep the container in the main compartment rather than the door to maintain a consistent temperature.
Freezer Friendly
Wrap each bar individually in parchment paper, then place them in a freezer bag. Freeze for up to three months. When ready to eat, let them thaw at room temperature for 20 minutes before serving. This method preserves the bars’ texture and flavor.
Best Reheating Method
Place the bars in a microwave‑safe dish and heat on medium power for 20‑30 seconds. Alternatively, warm them in a preheated oven at 300°F for 5 minutes. Adding a tiny splash of water before reheating creates steam, which helps the bars regain their softness and prevents them from drying out.