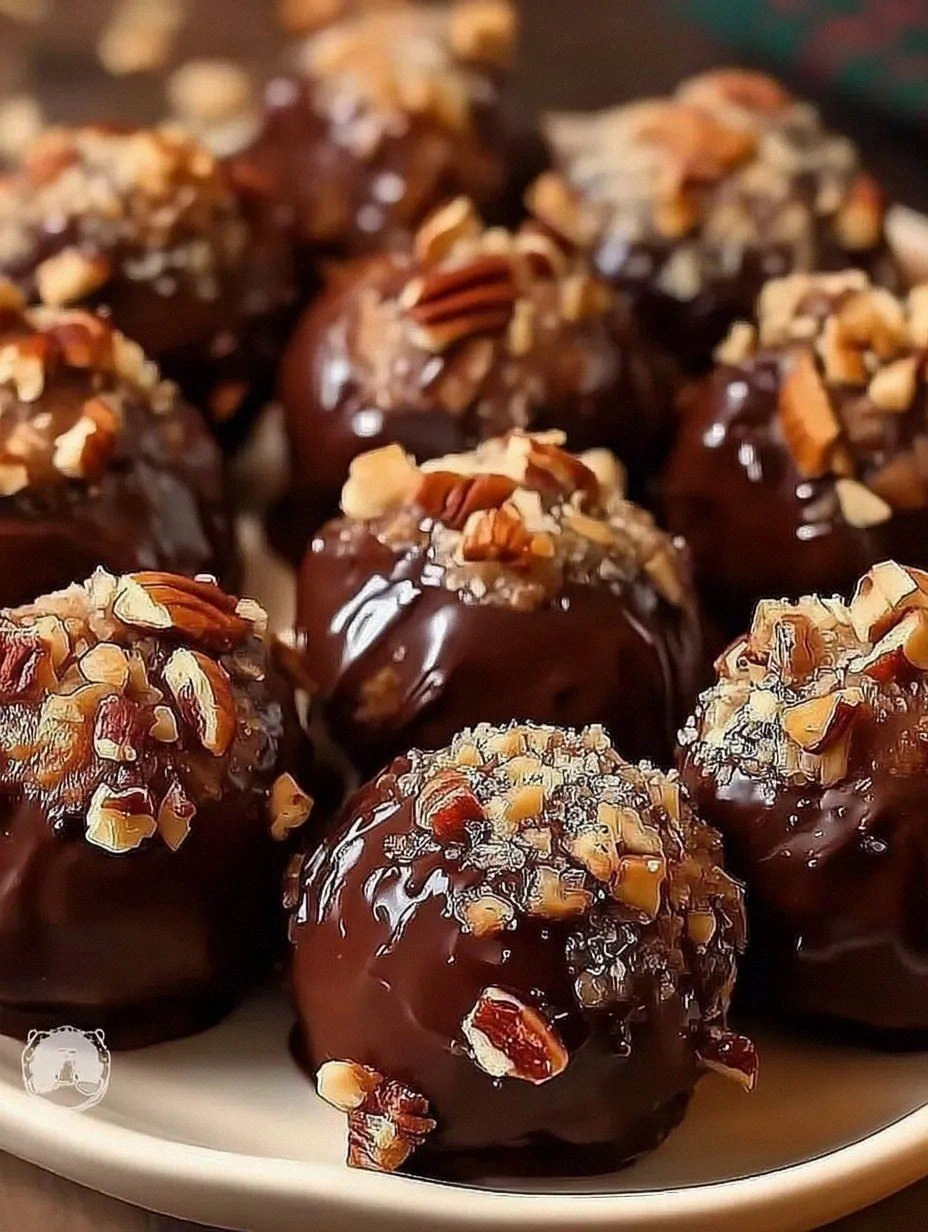
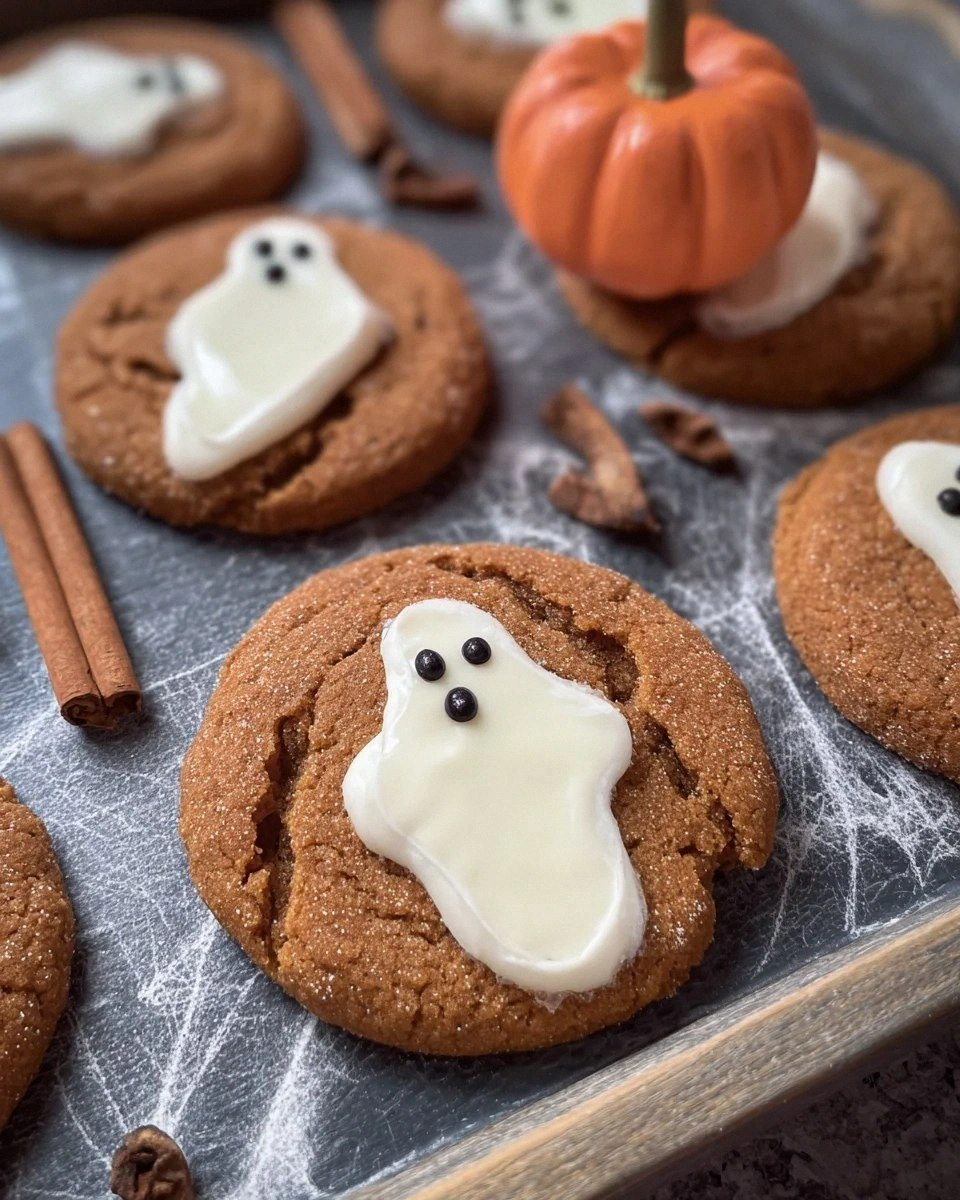
I still remember the day I set out to make ordinary ginger molasses cookies and accidentally created the most hauntingly delicious treats to ever emerge from my oven. It was one of those grey October afternoons when the wind rattles the maple leaves like dry bones against the windows, and the kitchen smelled of cinnamon and anticipation. I had promised my neighbor's kids I'd bring over something festive for their Halloween party, but I wanted to elevate the classic ginger molasses cookie into something that would make even the most jaded adult gasp with delight. What happened next was pure kitchen alchemy: the dough rolled out thinner than usual, the cookies baked up with edges so crisp they snapped like autumn twigs, and when I dusted them with powdered sugar, they looked like little ghosts floating on the parchment paper. That first bite? Imagine the deepest, darkest molasses wrapped in a warm ginger hug, with edges that shatter like thin ice and centers that stay chewy for days. I ate three before they even cooled, standing at the counter in my flour-dusted apron, completely unable to stop myself.
Here's the thing about most ginger molasses cookie recipes: they get it all wrong. They're too cakey, too sweet, or they taste like someone just emptied the spice cabinet into a bowl of flour and hoped for the best. This version is different — it's the result of three years of obsessive testing, dozens of failed batches, and one memorable incident involving a smoke alarm and a very angry cat. The secret lies in the balance: just enough molasses to make them taste like autumn itself, ginger that actually tastes like ginger (revolutionary, I know), and a technique that creates those distinctive ghostly shapes while keeping the centers perfectly chewy. I dare you to taste these and not go back for seconds — actually, I double-dog dare you, because resistance is futile when your kitchen smells like a spice market collided with a candy factory.
What makes these cookies truly special is how they transform simple pantry ingredients into something that tastes like it came from a Parisian patisserie. The dough comes together in one bowl (yes, really), the cookies keep for a week (if you have that kind of willpower), and they freeze beautifully for those midnight cravings that strike without warning. Picture yourself pulling these out of the oven, the whole kitchen filling with that intoxicating blend of ginger, cinnamon, and caramelized sugar that makes neighbors knock on your door with hopeful expressions. Stay with me here — this is worth it. Let me walk you through every single step — by the end, you'll wonder how you ever made ginger molasses cookies any other way.
What Makes This Version Stand Out
Ultra-Thin Edges: These cookies bake up with edges so delicate they practically levitate off the baking sheet, creating that ethereal ghost-like appearance that gives them their name. The centers stay deliciously chewy while the edges achieve a caramelized crispness that makes an audible snap when you bite into them.
Molasses Depth Charge: Most recipes skimp on the molasses and end up with bland, pale cookies. This version uses a full quarter-cup of dark molasses, giving the cookies that deep, complex flavor that tastes like autumn evenings and childhood memories all rolled into one.
Triple Ginger Threat: Fresh ginger, ground ginger, and a whisper of crystallized ginger create layers of heat and flavor that build beautifully. It's not just spicy — it's sophisticated, with each type of ginger bringing its own personality to the party.
One-Bowl Wonder: While other recipes have you creaming butter and sugar separately, dirtying every bowl in your kitchen, this technique lets you build the dough in one bowl. Less mess, less stress, more cookies in your mouth faster.
Make-Ahead Magic: The dough keeps for three days in the fridge and freezes for three months. Slice and bake whenever the craving hits — which, let's be honest, will be approximately every twelve hours once you've tasted these.
Crowd Psychology: I've watched grown adults fight over the last cookie at dinner parties. I've seen teenagers abandon their phones to hover by the cooling rack. These cookies have actual magical properties, I'm convinced.
Shape-Shifting Simplicity: The dough rolls out like a dream and holds its shape perfectly, so you can cut classic rounds, ghost shapes, or even little bats if you're feeling festive. No spreading, no distortion, just perfect cookies every single time.
Flavor That Deepens: Unlike most cookies that are best fresh from the oven, these actually improve after a day. The spices meld and deepen, creating a more complex flavor profile that will have you hiding them from family members.
Inside the Ingredient List
The Flavor Base
Butter is the foundation of any great cookie, but here we're using browned butter for an extra layer of nutty, caramel complexity. When you brown the butter, you're essentially toasting the milk solids, creating hundreds of new flavor compounds that taste like toasted hazelnuts and butterscotch. Don't skip this step — I know it sounds fussy, but it's the difference between good cookies and cookies that make people close their eyes and sigh. The key is to stop browning when the butter smells like toasted nuts and the milk solids turn golden amber, about 5-7 minutes over medium heat.
Dark brown sugar isn't just sweeter than white sugar — it contains molasses, which brings its own complex flavors of toffee, smoke, and caramel. The molasses in the brown sugar works in tandem with the added molasses, creating layers of depth that make these cookies taste like they've been perfected over generations. If you only have light brown sugar, you can use it, but your cookies will lack that deep, almost smoky undertone that makes these special. Pack it firmly into your measuring cup, but don't compress it so much that it becomes a sugar brick.
The Spice Symphony
Fresh ginger is non-negotiable here — the powdered stuff just can't compete with the bright, almost citrusy heat that fresh ginger brings. I grate it on a microplane until I have a heaping tablespoon, which sounds like a lot until you taste the final cookie. The fresh ginger adds a peppery bite that makes the back of your throat tingle pleasantly, like a warm hug from someone you really like. Don't worry about peeling it perfectly; just scrape off the knobby bits and grate away, fibers and all.
Ground ginger plays backup to the fresh stuff, adding a warmer, more mellow ginger flavor that permeates the whole cookie. I use a full tablespoon, which might seem excessive if you're used to recipes that call for a timid teaspoon. Trust me on this — the molasses can handle the spice, and the combination creates a ginger flavor that's bold but not overwhelming. If your ground ginger has been sitting in the cupboard since last holiday season, treat yourself to a fresh jar — the difference is remarkable.
Cinnamon, nutmeg, and cloves form the supporting cast, each playing their part without stealing the show. The cinnamon adds warmth, the nutmeg brings a mysterious floral note, and the cloves contribute a subtle bitterness that keeps the cookies from being too sweet. I grind whole spices when I have time — the flavor difference is like the difference between a fresh tomato and one from a can. But don't stress if you're using pre-ground spices; just make sure they're less than six months old for maximum impact.
The Unexpected Star
Black pepper might seem like an odd addition to cookies, but it's my secret weapon for creating cookies that taste like nothing else out there. Just a quarter teaspoon adds a subtle heat that makes people ask, "What is that amazing flavor I can't quite identify?" It doesn't make the cookies taste peppery — instead, it amplifies the ginger and adds complexity that makes these cookies completely addictive. If you're skeptical, start with just a pinch, but I promise you'll end up adding more next time.
Crystallized ginger is optional but highly recommended for little bursts of sweet-spicy joy throughout the cookies. I chop it into tiny pieces, about the size of chocolate chips, so you get these delightful pockets of intense ginger flavor that surprise and delight. The sugar coating on the crystallized ginger adds little crunchy bits that contrast beautifully with the chewy cookie. If you can't find crystallized ginger, you can substitute chopped candied orange peel, which adds a different but equally delicious dimension.
The Final Flourish
Bread flour might seem like an odd choice for cookies, but its higher protein content gives these cookies their distinctive chewy texture. The extra gluten development creates that satisfying resistance when you bite into them, followed by a tender center that melts in your mouth. If you only have all-purpose flour, you can use it, but your cookies will be more cake-like and less chewy. I sometimes use a 50/50 blend when I want something in between — experimentation is half the fun.
Egg yolk rather than a whole egg adds richness without extra moisture, creating a more tender cookie that stays soft for days. The fat in the yolk helps carry the flavors of the spices, while the lecithin acts as a natural emulsifier, keeping everything perfectly blended. Save the egg white for an omelet, or better yet, make a tiny batch of royal icing to decorate your ghost cookies once they're cool. One yolk is all you need for a batch that makes about thirty cookies.
Everything's prepped? Good. Let's get into the real action...
The Method — Step by Step
Step 1: Start by browning your butter in a medium saucepan over medium heat. Cut the butter into chunks so it melts evenly, then swirl the pan occasionally as it foams and bubbles. This is not the time to check Instagram — butter goes from perfectly browned to burnt in about thirty seconds. You'll know it's ready when it smells like toasted hazelnuts and the milk solids at the bottom turn golden amber. Immediately pour it into a heatproof bowl and let it cool while you prep everything else. That nutty, caramel flavor is going to permeate every bite of your cookies.
Step 2: While the butter cools, whisk together your dry ingredients in a large bowl. I use a whisk rather than a sifter because it breaks up any clumps while keeping things light and airy. The bread flour, baking soda, salt, and all those gorgeous spices should smell like Christmas and autumn and everything good in the world. Take a moment to appreciate how the cinnamon creates little brown swirls through the flour — this is the beginning of something beautiful. Set this aside where your cat can't walk through it (ask me how I learned this lesson).
Step 3: Now for the wet ingredients — and here's where I diverge from traditional cookie methods. Instead of creaming butter and sugar, you'll whisk the cooled brown butter with the brown sugar, molasses, and egg yolk until it looks like glossy chocolate frosting. The molasses will seem to seize up at first, but keep whisking and it will transform into this gorgeous, ribbon-y mixture. Add the fresh ginger and give it another good whisk — it should smell like you're about to make the best gingerbread of your life. This method creates a more tender cookie because we're not incorporating air the way traditional creaming does.
Step 4: Combine the wet and dry ingredients with a wooden spoon or sturdy spatula. This is where most people panic because the dough seems impossibly stiff and dry. Keep folding and pressing — the heat of your hands will soften the butter and bring everything together. Within a minute or two, you'll have a cohesive dough that's Play-Doh consistency. If it's still crumbly after two minutes of vigorous mixing, add a teaspoon of milk, but resist the urge to add more liquid than necessary. The dough should be firm enough to roll out immediately.
Step 5: Roll the dough between two sheets of parchment paper to about 1/4-inch thickness. Don't flour the surface — the parchment prevents sticking without adding extra flour that would make the cookies tough. If the dough cracks around the edges, just press it back together with your fingers. The parchment trick means you can reroll the scraps multiple times without the dough getting tough from excess flour. Slide the whole parchment sandwich onto a baking sheet and pop it in the fridge for 15 minutes while you preheat the oven to 350°F. This chilling step is crucial for clean edges and prevents spreading.
Step 6: Remove the top sheet of parchment and cut out your shapes. I use a small ghost cookie cutter, but a knife works fine for free-form ghosts if you're feeling artistic. The dough should cut cleanly without sticking — if it's too soft, slide it back in the fridge for five minutes. Arrange the cookies on a parchment-lined baking sheet, leaving about an inch between them. They won't spread much, but they need room for the air to circulate and crisp up those edges. Gather the scraps, reroll, and cut again until you've used every bit of dough.
Step 7: Bake for 8-10 minutes, but start checking at 7 minutes. The cookies are done when the edges look set and have turned a shade darker than the centers. They'll still feel soft in the middle — that's perfect. They continue cooking on the hot sheet for a minute after you pull them out, and you want that chewy center. The smell should be intoxicating: warm spices and caramelized sugar filling your kitchen with autumn magic. Let them cool on the sheet for 5 minutes before transferring to a rack — they're delicate when hot.
Step 8: While the cookies cool, make the optional but highly recommended ghostly coating. Whisk together powdered sugar with a pinch of cinnamon and a tiny splash of milk until you have a thick glaze. Dip just the tops of the cooled cookies or drizzle it in ghost-like swoops. The glaze dries to a matte finish that makes the cookies look like they're wearing little white sheets. If you're feeling fancy, add mini chocolate chip eyes with a toothpick dipped in melted chocolate. But honestly, they're pretty spectacular even naked.
Step 9: Store cooled cookies in an airtight container with a small piece of bread to maintain chewiness. The bread trick works like magic — it releases just enough moisture to keep the cookies perfect without making them soggy. These cookies actually improve after a day as the flavors meld and deepen. If you can resist eating them all immediately, you'll be rewarded with an even more complex flavor profile. That's it — you did it. But hold on, I've got a few more tricks that'll take this to another level...
Insider Tricks for Flawless Results
The Temperature Rule Nobody Follows
Your butter temperature makes or breaks these cookies. Too hot and the dough will be greasy, leading to cookies that spread into puddles. Too cool and the molasses won't incorporate properly, leaving you with streaky dough that bakes unevenly. The sweet spot is when the browned butter is still liquid but just barely warm to the touch — think warm bathwater, not hot coffee. If you're impatient (I see you), spread the hot butter in a thin layer on a plate and pop it in the freezer for 5-7 minutes. Stir it every couple minutes so it cools evenly. A friend tried skipping this step once — let's just say her "ghosts" looked more like amoebas, and the neighborhood kids were thoroughly confused about her Halloween theme.
Why Your Nose Knows Best
Don't rely on timers alone — your nose is the most sophisticated kitchen tool you own. When these cookies are perfectly baked, your kitchen will smell like a spice market had a baby with a candy shop. The moment you catch that rich, caramelized scent wafting from the oven, start checking for doneness. The edges should look set and slightly darker than the centers, but the real test is the smell. If you wait for visual cues alone, you might overbake them, and overbaked ginger molasses cookies taste like disappointment and broken dreams. Trust the aroma — when it hits that perfect crescendo of ginger and caramel, you're about 30 seconds from cookie nirvana.
The 5-Minute Rest That Changes Everything
Let the cookies rest on the baking sheet for exactly 5 minutes before moving them to a cooling rack. I know, I know — you're impatient and they're calling your name. But here's what happens during those crucial minutes: the residual heat finishes setting the centers while the bottoms develop that perfect slight crispness. Move them too early and they'll break apart in your hands, leaving you with ghost fragments and sadness. Wait too long and they'll stick to the parchment, requiring archaeological-level excavation efforts. Set a timer and walk away if you must. Use this time to make coffee or tea — you'll want something hot to dip these cookies into anyway.
The Spice Freshness Factor
Ground spices lose about 40% of their potency every six months, which means that jar of ginger from 2019 isn't doing you any favors. For maximum impact, buy whole spices and grind them yourself in a coffee grinder dedicated to spices. The difference is like switching from black and white TV to 4K — suddenly you can taste individual notes instead of generic "spice" flavor. If you're using pre-ground spices, give them a sniff before adding. They should smell bright and strong, not dusty and muted. When in doubt, double the amount called for in older recipes — your taste buds will thank you, and your cookies will taste like they're supposed to.
Creative Twists and Variations
This recipe is a playground. Here are some of my favorite ways to switch things up:
Mexican Hot Chocolate Ghosts
Add a teaspoon of cayenne pepper and a tablespoon of cocoa powder to the dry ingredients, then dip the cooled cookies in melted dark chocolate spiked with cinnamon. The heat builds slowly, warm and complex, while the chocolate adds richness that plays beautifully with the molasses. These disappeared faster than regular ghosts at my last dinner party — people couldn't figure out why they kept reaching for "just one more." The cayenne doesn't make them spicy-hot; it just adds warmth that makes the ginger taste even more vibrant.
Citrus-Scented Spirits
Swap the crystallized ginger for candied orange peel and add a teaspoon of orange zest to the wet ingredients. The bright citrus notes lift the heavy molasses, creating cookies that taste like sunshine and autumn leaves. Lemon zest works beautifully too, especially if you add a lemon glaze made with fresh juice and zest. These are particularly good with tea — the citrus cuts through the richness and refreshes your palate between bites.
Salted Caramel Phantoms
Drizzle cooled cookies with homemade caramel sauce (or the good stuff from a jar, I won't tell) and finish with flaky sea salt. The salt intensifies all the warm spices while the caramel adds buttery richness that makes these taste like candy. Maldon salt is my favorite here — those big crunchy flakes add textural interest and little bursts of salinity that make the sweet flavors sing even louder.
Nutty Apparitions
Add 1/2 cup of very finely chopped toasted pecans or walnuts to the dough. The nuts should be chopped almost to a powder so they don't interfere with the ghost shapes, but they add incredible depth and richness. Toast them first in a dry pan until fragrant — this step is crucial for nutty flavor that doesn't taste raw or green. These taste like pecan pie met gingerbread and had a beautiful baby.
Espresso Hauntings
Dissolve a tablespoon of instant espresso powder in the molasses before adding it to the dough. The coffee doesn't make the cookies taste like mocha — instead, it deepens the molasses flavor and adds complexity that makes people ask, "What is that amazing flavor?" It's like adding vanilla extract times ten. The bitterness balances the sweetness perfectly, creating a more sophisticated cookie that adults go crazy for.
Gluten-Free Ghosts
Substitute the bread flour with a 1:1 gluten-free baking blend plus 2 tablespoons of oat flour for chewiness. The texture is slightly more delicate, but the flavor is identical to the original. I've served these to gluten-eating friends who couldn't tell the difference — high praise from people who are usually skeptical of GF baking. Just be extra careful not to overbake them, as GF flours tend to dry out faster than wheat flour.
Storing and Bringing It Back to Life
Fridge Storage
These cookies keep beautifully in an airtight container at room temperature for up to a week, but here's the secret: add a small piece of apple or bread to the container. The cookies will absorb just enough moisture to stay perfectly chewy without getting soggy. Change the apple piece every couple days to prevent any weird apple flavors from developing. I've had cookies that tasted just-baked after five days using this method — it's like having a time machine for baked goods. Store them in a single layer if possible; if you must stack, separate layers with parchment paper to prevent sticking.
Freezer Friendly
Both the dough and baked cookies freeze exceptionally well. For dough, shape it into a log, wrap tightly in plastic wrap, then foil, and freeze for up to three months. Slice and bake from frozen, adding just 2-3 extra minutes to the baking time. For baked cookies, freeze them in a single layer on a baking sheet first, then transfer to a freezer bag. This prevents them from freezing into one giant cookie clump. Thaw at room temperature for 30 minutes, or microwave for 10-15 seconds for that fresh-from-the-oven experience. The frozen cookies are actually amazing crumbled over vanilla ice cream — instant ginger molasses cookie sundae.
Best Reheating Method
If your cookies have gone a bit stale (though they rarely last long enough in my house), revive them by wrapping in a damp paper towel and microwaving for 8-10 seconds. The steam rehydrates them perfectly without making them soggy. Alternatively, pop them in a 300°F oven for 3-4 minutes — this crisps up the edges while warming the centers. Add a tiny splash of water to the baking sheet before reheating; it creates steam that brings them back to life without drying them out. They're almost better this way, like they've been kissed by the oven twice.