I was halfway through a frantic Tuesday night when my roommate dared me to create a pizza that could convince a meat‑lover to go vegetarian for at least one bite. I laughed, tossed a handful of pepperoncini into the pantry, and stared at a sad, store‑bought dough that looked like it had been through a war. The kitchen was a symphony of clattering pans, the hum of the fridge, and the faint whiff of garlic that lingered from earlier experiments. I could hear the timer on the oven ticking like a metronome, urging me to move faster, but I also felt that thrilling pause right before the magic happens. That moment—when you’re teetering between a culinary disaster and a masterpiece—is exactly why I’m writing this.
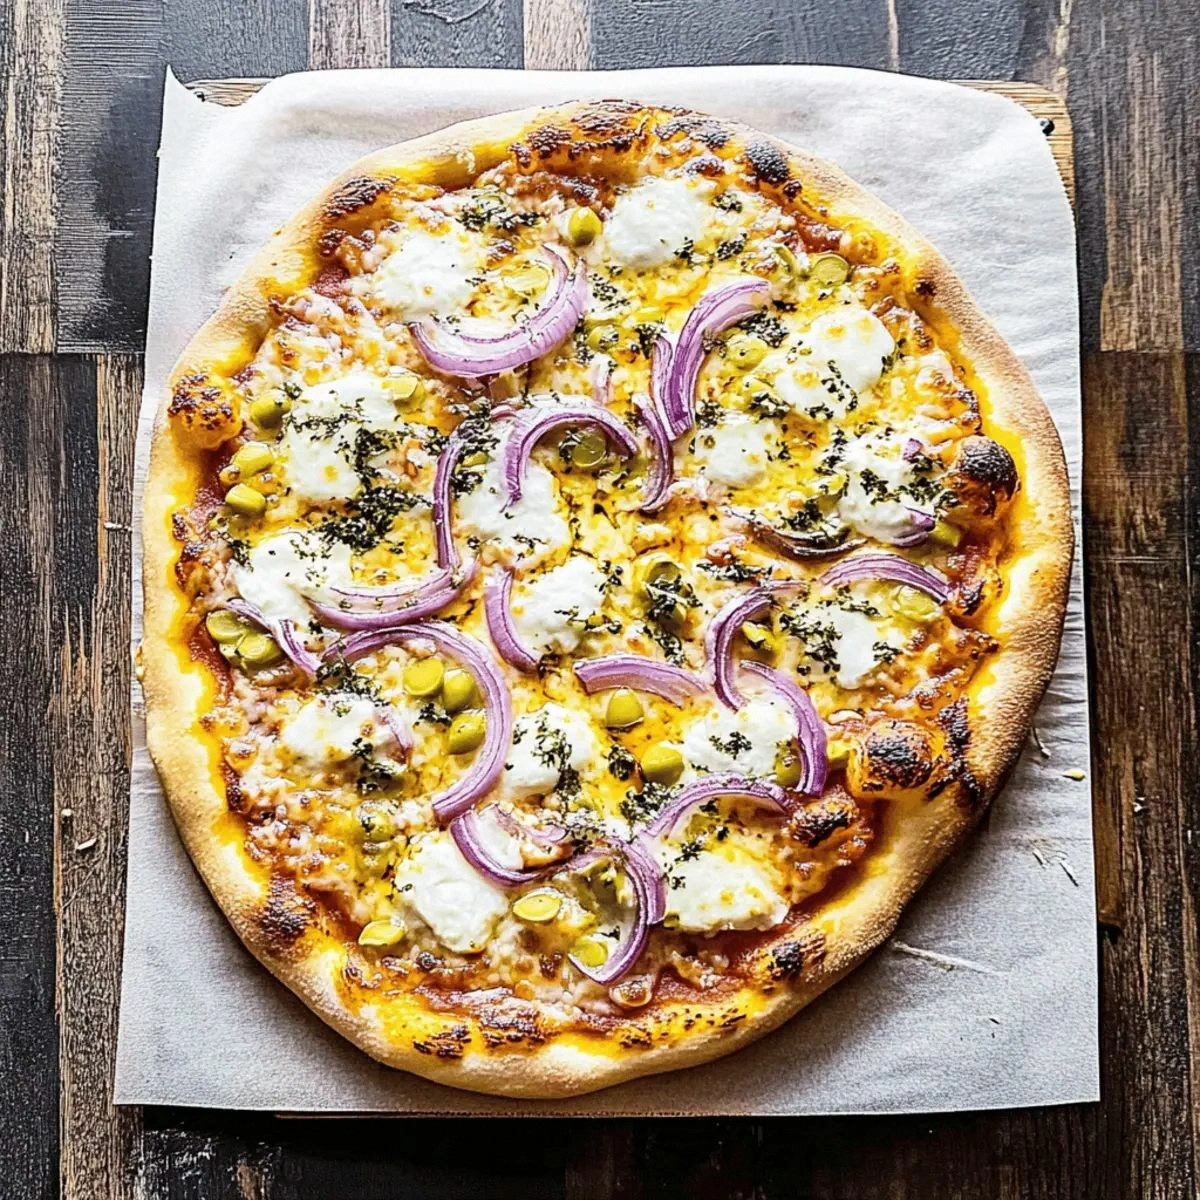
Picture this: a golden crust that cracks just enough to reveal a tender, airy interior, the sweet bite of caramelized onion mingling with the briny pop of pepperoncini, and a cheese blanket that stretches like a warm hug. The aroma? Imagine a summer garden after rain, where oregano leaves release their perfume and the sauce bubbles with a whisper of basil. The first bite is a cascade of textures: the crisp edge, the melt‑in‑your‑mouth cheese, and that surprising zing that makes your tongue do a little happy dance. I dare you to taste this and not go back for seconds—because once you’ve had this, every other pizza feels like a rehearsal.
Most pizza recipes get the balance wrong. They either drown the dough in sauce, or they skimp on the toppings, leaving you with a bland canvas. This version stands out because I treat each component like a soloist in an orchestra, giving it space to shine while still playing harmoniously with the rest. The secret? A quick caramelization of red onion that adds a natural sweetness, and a strategic sprinkle of fresh oregano at the end that lifts the whole dish into a fragrant climax. I’ll be honest — I ate half the batch before anyone else got to try it, and that’s a confession I’m willing to make because the flavor is that unforgettable.
But the real game‑changer? The pepperoncini. Most people think of them as a sidekick, a garnish for salads, but in this pizza they become the star, delivering a tangy snap that cuts through the richness of the cheese. And there’s a technique I’m about to reveal that will make those little peppers caramelize just enough to bring out a subtle sweetness without losing their bite. Okay, ready for the game‑changer? Let me walk you through every single step — by the end, you’ll wonder how you ever made it any other way.
What Makes This Version Stand Out
- Flavor Explosion: The combination of pepperoncini’s tang and caramelized onion’s sweetness creates a layered taste that keeps you reaching for another slice.
- Texture Symphony: A crust that’s crisp on the edges yet pillowy inside, balanced by the melt‑in‑your‑mouth mozzarella and a light dusting of Parmesan.
- Simplicity Meets Sophistication: Only eight ingredients, but each is treated with a technique that elevates the whole dish.
- Unique Ingredient Play: Pepperoncini isn’t a typical pizza topping, giving you a flavor profile that most recipes completely miss.
- Crowd‑Pleaser Factor: Even the most skeptical carnivores admit they’re hooked after the first bite.
- Ingredient Quality: Using fresh oregano and good‑quality mozzarella makes the difference between “good” and “legendary.”
- Cooking Method: A high‑heat oven (ideally a pizza stone) gives you that restaurant‑style char without the need for a wood‑fired oven.
- Make‑Ahead Potential: The dough can be pre‑shaped and refrigerated, and the sauce can be prepared days ahead for a stress‑free night.
Inside the Ingredient List
The Flavor Base
Tomato sauce is the canvas, but not just any sauce will do. I use a simple, no‑added‑sugar marinara that lets the natural acidity shine. The ¾ cup provides enough moisture to keep the crust from drying out while still allowing the cheese to dominate. If you skip the sauce, you’ll end up with a dry, flavorless crust that feels like chewing on cardboard. A quick tip: warm the sauce slightly before spreading; it helps it meld with the dough more evenly.
The Texture Crew
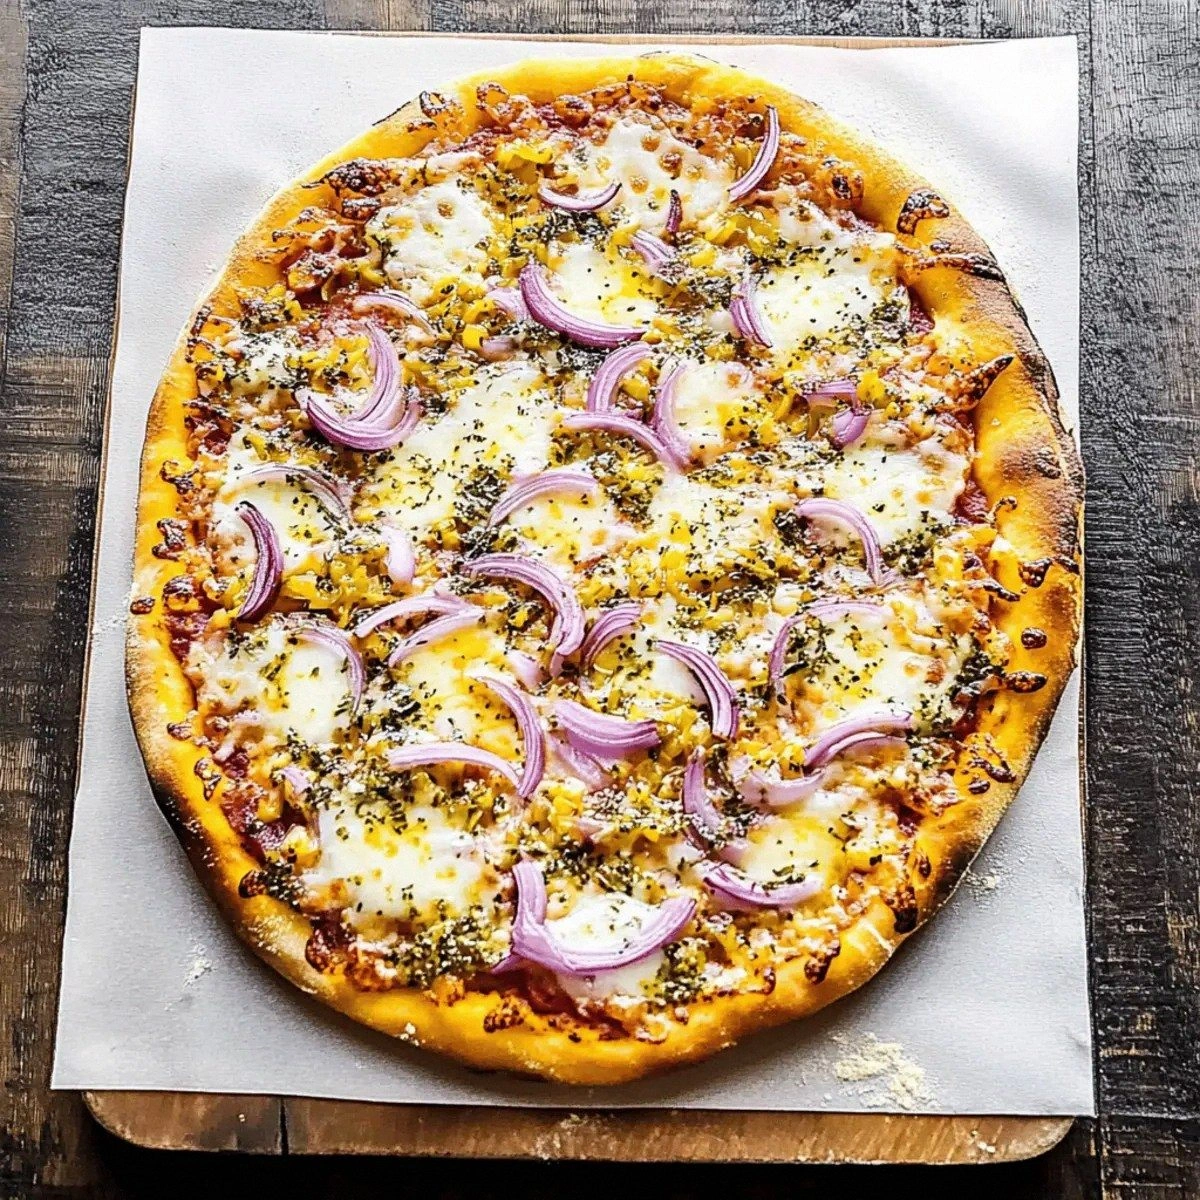
Mozzarella cheese, shredded, is the melt‑master. One full cup creates that gooey stretch that makes pizza lovers swoon. Skip it, and you lose the signature stringy pull that makes every bite feel indulgent. For a richer flavor, you can blend part‑skim with whole‑milk mozzarella, but be careful not to over‑load—too much cheese can make the crust soggy. The Parmesan, at ½ cup, adds a salty, nutty finish that crisps up on the edges during baking.
The Unexpected Star
Pepperoncini, chopped, might sound like a side note, but its ¼ cup brings a briny brightness that cuts through the dairy richness. If you omit it, the pizza leans too heavily on cheese and onion, losing that zing that keeps the palate excited. Want a milder version? Rinse the pepperoncini briefly to tame the heat, or swap with sliced banana peppers for a sweeter twist.
The Final Flourish
Fresh oregano, a tablespoon, is sprinkled after the bake, preserving its volatile oils and delivering an aromatic burst. Dried oregano would work, but it would lack the fresh, citrusy lift that makes this pizza feel like a summer garden. If you can’t find fresh oregano, try a mix of thyme and basil for a comparable herbaceous note. And remember, a little goes a long way—over‑seasoning can overwhelm the delicate balance.
Everything's prepped? Good. Let’s get into the real action…
The Method — Step by Step
Preheat your oven to its highest setting—250°C (475°F) if you have a pizza stone, place the stone inside and let it heat for at least 30 minutes. The stone acts like a mini‑brick oven, delivering that coveted leopard‑spot char on the crust. While the stone heats, take the pizza dough out of the fridge and let it sit at room temperature for 10 minutes; this relaxes the gluten and prevents tearing. That sizzle when it hits the stone? Absolute perfection.
Kitchen Hack: Sprinkle a little cornmeal on your parchment paper before sliding the dough onto the stone; it prevents sticking and adds a subtle crunch.On a lightly floured surface, gently stretch the dough into a 12‑inch circle. Avoid using a rolling pin; you want to keep those air pockets intact for a light, airy crumb. If the dough resists, let it rest for another 5 minutes—this short relaxation period makes it pliable again. Once shaped, transfer the dough onto a piece of parchment paper, which will act as a shuttle to the stone.
Spread the ¾ cup of tomato sauce evenly, leaving a ½‑inch border for the crust. Use the back of a spoon to swirl the sauce in a spiral motion; this creates tiny ridges that hold cheese in delightful pockets. The sauce should be thin enough to see the dough underneath, but thick enough to cling during the bake. If you notice any pooling, gently tilt the dough to even it out.
Now comes the caramelized onion. In a skillet over medium heat, add a drizzle of olive oil and toss the thinly sliced red onion. Cook for 8‑10 minutes, stirring occasionally, until the edges turn a deep amber and the scent becomes sweet and fragrant. This is the moment where the kitchen smells like a cozy bistro—trust me, you’ll be checking the clock more for the aroma than the timer.
Watch Out: If the heat is too high, the onions will burn before they caramelize, turning bitter and ruining the balance.Scatter the caramelized onion over the sauce, followed by the minced garlic (4 cloves). The garlic should be evenly distributed; you don’t want a single hot spot that overwhelms the palate. Next, sprinkle the shredded mozzarella (1 cup) in a generous layer, ensuring every bite gets that gooey stretch. The cheese should melt quickly, creating a bubbling surface that’s a visual cue you’re on the right track.
Add the chopped pepperoncini (¼ cup) and the grated Parmesan (½ cup). The pepperoncini’s bright pink speckles will pop against the white cheese, while the Parmesan will begin to brown around the edges, forming a crunchy halo. This combination creates a textural contrast that’s both crisp and tender—think of it as the culinary equivalent of a surprise encore.
Slide the parchment‑topped pizza onto the preheated stone using a pizza peel or the back of a baking sheet. Bake for 10‑12 minutes, or until the crust is golden‑brown and the cheese has formed bubbly, caramelized spots. Keep an eye on the edges; they should start pulling away from the parchment, a sign that the crust is fully set. The aroma at this stage should be intoxicating—think garden herbs, toasted dough, and a hint of tang from the pepperoncini.
Remove the pizza with the peel, let it rest on a cutting board for 2‑3 minutes—this allows the cheese to settle and prevents it from sliding off the slice. While it rests, drizzle a tiny drizzle of extra‑virgin olive oil and sprinkle the fresh oregano (1 tablespoon) over the top. The fresh herbs wilt just enough to release their oils without losing their bright green color. Slice, serve, and watch your friends’ eyes widen with every bite.
That’s it — you did it. But hold on, I’ve got a few more tricks that’ll take this to another level…
Insider Tricks for Flawless Results
The Temperature Rule Nobody Follows
Most home cooks bake pizza at 200°C (400°F) and complain about a soggy middle. The secret is blasting the oven at its max—250°C (475°F) or higher if your oven allows. The high heat creates a rapid steam burst inside the dough, puffing it up and giving you that airy interior while the exterior crisps instantly. I once tried a “low‑and‑slow” approach and ended up with a dough that felt like a dense biscuit. Trust the heat; it’s the fastest route to pizzeria‑grade crust.
Why Your Nose Knows Best
Your sense of smell is a better timer than any kitchen gadget when it comes to pizza. When the cheese starts to turn golden‑brown and you catch that nutty aroma of Parmesan, you’re within seconds of perfection. If you’re ever unsure, lean in and inhale—the scent of toasted oregano is the final cue that the pizza is ready to come out.
The 5‑Minute Rest That Changes Everything
After pulling the pizza from the oven, let it rest for exactly five minutes. This short pause lets the cheese settle, preventing it from sliding off the slice when you cut. It also allows the crust to finish its final steam expansion, resulting in a lighter bite. Skipping this step is a common mistake; I’ve seen people dive straight in and end up with a soggy slice that drips sauce everywhere.
Pepperoncini Power‑Soak
If you love the tang but want a milder heat, soak the chopped pepperoncini in warm water for 5 minutes, then pat dry. This reduces the brine’s intensity while preserving the pepper’s bright flavor. I tried this once for a family dinner and the kids actually asked for seconds—proof that a tiny tweak can broaden appeal.
The Crust Flip Trick
Halfway through baking, use a thin spatula to gently lift the edge of the pizza and give it a quick flip. This ensures both sides of the crust receive equal heat, especially if you’re using a baking sheet instead of a stone. It’s a small maneuver that can turn a flat, uneven crust into a perfectly domed masterpiece.
Creative Twists and Variations
This recipe is a playground. Here are some of my favorite ways to switch things up:
Smoky Chipotle Kick
Swap half of the pepperoncini for finely diced chipotle peppers in adobo. The smoky heat adds depth, perfect for those who love a little fire. Pair with a drizzle of lime crema for a Mexican‑inspired twist.
Mediterranean Olive Medley
Add a handful of sliced Kalamata olives and a sprinkle of feta cheese. The salty olives complement the pepperoncini’s tang, while feta adds a creamy crumble. This version pairs beautifully with a glass of crisp rosé.
Garden Veggie Burst
Include thinly sliced zucchini, bell pepper strips, and a handful of fresh spinach. The veggies add color and extra nutrition without overwhelming the core flavors. Roast the veggies briefly before adding them to keep the crust crisp.
Herb‑Infused White Pizza
Skip the tomato sauce and use a mixture of ricotta, garlic, and a drizzle of olive oil as the base. Top with the same onion, pepperoncini, and oregano. The result is a creamy, herbaceous pizza that feels like a luxurious brunch.
Cheese‑Lover’s Double‑Deck
Add a second layer of mozzarella and a sprinkle of smoked gouda after the first 6 minutes of baking. This creates a cheesy pull that rivals any deep‑dish, perfect for the ultimate comfort bite.
Storing and Bringing It Back to Life
Fridge Storage
Allow the pizza to cool completely, then slice and store in an airtight container. It will keep fresh for up to 3 days. Reheat in a skillet over medium heat, covering with a lid for 2‑3 minutes; the crust revives its crispness while the cheese melts again.
Freezer Friendly
Wrap individual slices tightly in parchment paper, then place them in a freezer‑safe zip bag. They’ll survive up to 2 months. When ready to eat, bake directly from frozen at 220°C (425°F) for 12‑15 minutes, adding a splash of water to the pan to generate steam and prevent drying.
Best Reheating Method
For the ultimate reheated slice, use a preheated cast‑iron skillet. Add a tiny splash of water (about a teaspoon) to the pan, cover, and heat for 4‑5 minutes. The water creates steam that revives the crust’s crunch while keeping the cheese luscious. No microwave needed—trust me, the flavor stays true.