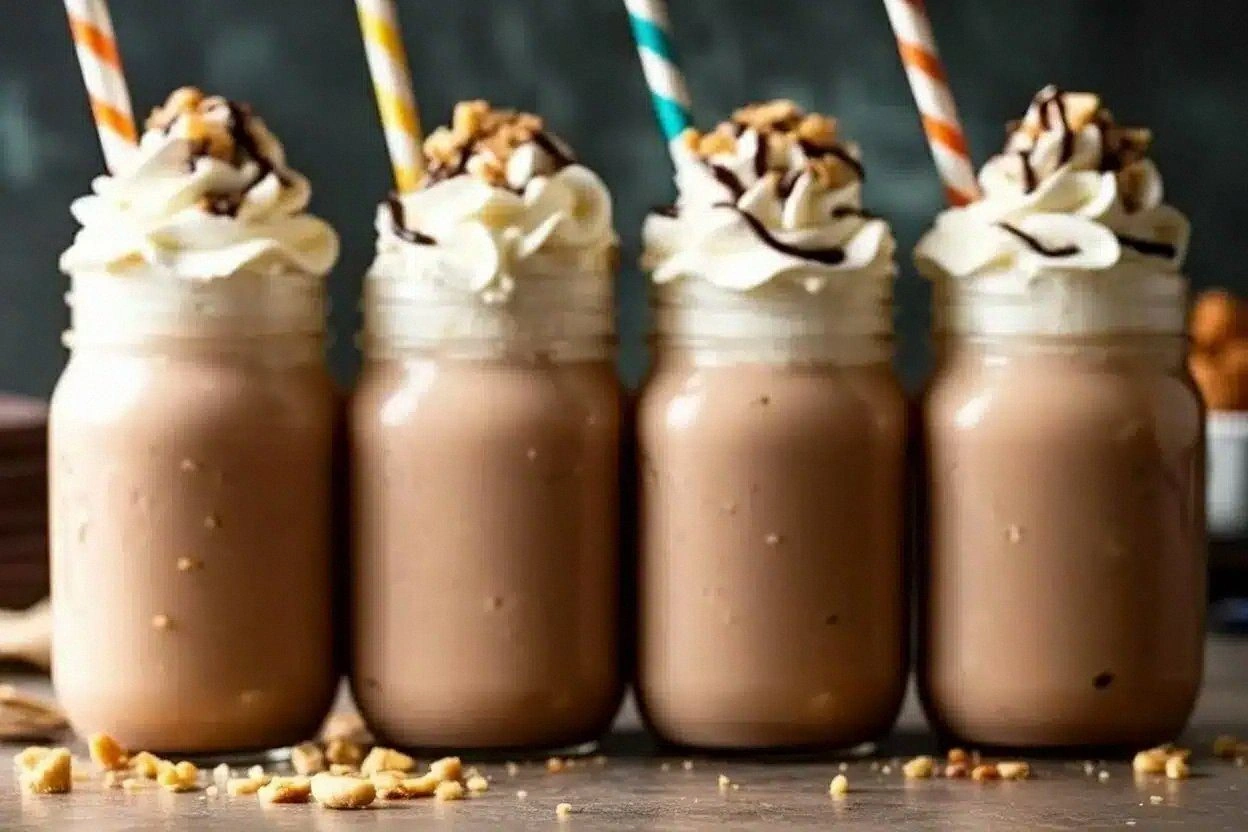
I still remember the Tuesday afternoon when my blender died. There I stood, sweatshirt hood up, staring at a pile of ice cream, peanut butter, and chocolate syrup like some tragic still life painting. My in-laws were due in twenty minutes, my kids were circling like caffeinated vultures, and I had promised them a milkshake worthy of a drive-in movie montage. No blender, no backup plan, and definitely no time for tears. What happened next was part genius, part desperation, and 100 percent the beginning of the creamiest, dreamiest no-blend chocolate peanut butter milkshake I have ever tasted.
Picture this: the kitchen smelled like a candy factory had a wild night with a coffeehouse—roasted cocoa notes swirling with the sweet perfume of melted peanut butter. I grabbed a mason jar, jammed in a handful of ice-cold dairy, and started shaking like my life depended on it. Ten minutes later I was pouring a liquid silk that hugged the glass so luxuriously you would swear it was auditioning for a dessert commercial. That first sip? A velvet wave of dark cocoa, followed by the salty-sweet nuttiness that sticks to your happy memories. If clouds could melt, they would taste like this.
Most milkshake recipes treat peanut butter like an awkward wallflower—just a timid tablespoon hiding behind vanilla. This version hands it the microphone and cranks the volume. We are talking a generous scoop that clings to the roof of your mouth in the best possible way, balanced by bittersweet chocolate syrup that ribbons through every sip. No ice crystals, no watery separation, no sad puddle at the bottom. Instead, you get a spoon-coating thickness that makes ordinary milkshakes feel like watered-down regrets.
Stay with me here—this is worth it. By the time you finish reading, you will know the frozen-glass trick that keeps everything frosty, the double-salt move that amplifies flavor, and the single extra ingredient that turns humble milk into a malt-shop milkshake without a malted powder tub in sight. Let me walk you through every single step—by the end, you will wonder how you ever made it any other way.
What Makes This Version Stand Out
Before we dive elbow-deep into peanut butter jars, let me brag about why this milkshake will ruin you for all others.
- Maximum Flavor: We bloom the cocoa in warm syrup first, coaxing out a depth you usually only get from hot fudge. The result is a chocolate presence that tastes like it took hours, not seconds.
- Silk-Smooth Texture: By pre-melting the peanut butter with a splash of hot milk, we eliminate those sticky globs that clog straws. Every sip glides like satin.
- Zero Equipment Drama: No blender, no problem. A simple whisk, a bowl, and a jar create the same froth you thought only motorized blades could achieve.
- Make-Ahead Magic: Mix the base, stash it in a thermos, and pour over ice when guests show up. It stays thick for a shocking four hours—perfect for barbecues or movie night.
- Allergen-Friendly Swaps: Sunflower seed butter and oat milk give you the same nutty vibe without the nuts. Nobody will detect the switch.
- Over-the-Top Garnish Game: We rim the glass with crushed peanut brittle and drizzle the inside with warm fudge so every glance promises decadence.
- Balanced Sweetness: A whisper of salt and a squeeze of dark molasses tame the sugar, turning kid candy into grown-up dessert nirvana.
Alright, let's break down exactly what goes into this masterpiece, because ingredient quality here is the difference between ho-hum and hold-the-phone good.
Inside the Ingredient List
The Flavor Base
Vanilla ice cream is the canvas for our masterpiece. Full-fat versions whip up fluffier because the butterfat traps air, giving you a naturally thick shake without icy shards. Reach for premium brands sporting flecks of vanilla bean; those tiny black specks are flavor bombs that read your taste buds their rights. If dairy is off the table, oat-milk ice cream is a revelation—nutty, creamy, and environmentally smug.
The Texture Crew
Milk is the silent negotiator between solid ice cream and liquid drinkability. Whole milk yields the creamiest body, but 2 percent keeps things lighter if you plan on seconds (and you will). Almond milk adds a gentle marzipan note that plays nicely with chocolate, while oat milk brings a malty sweetness reminiscent of cereal milk. Whatever you pick, make sure it is ice-cold so the fat does not seize when it meets the frozen ice cream.
The Unexpected Star
Peanut butter is the diva here, so choose a brand that sings. Natural creamy varieties blend faster, but the stabilizers in commercial brands help the shake stay emulsified longer. If you are using natural butter, stir in the oil completely before measuring; otherwise you will get greasy slicks. Chunky enthusiasts, I see you—reserve a spoonful to fold in at the end for pops of crunch.
The Final Flourish
Chocolate syrup is more than a sweetener; it adds viscosity that makes the shake cling to your straw like a guilty secret. Homemade syrup simmered with a pinch of espresso powder blooms into something fudgy. Store-bought works in a pinch, but splurge on the darker varieties that list cocoa rather than caramel color first. A tiny splash of molasses deepens the chocolate and adds a nostalgic edge you cannot quite name but will definitely miss if skipped.
The Method — Step by Step
- Place your serving glass in the freezer to frost. Trust me, lukewarm glassware is the sneak thief that melts your hard work before the first sip.
- Scoop the vanilla ice cream onto a chilled plate and pop it back into the freezer for five minutes. You want it firm enough to snap a spoon through, not soft-serve soup.
- Warm ¼ cup of milk until it steams but does not boil—about twenty seconds in the microwave. Whisk in the peanut butter until the mixture looks like glossy paint. This hot bloom dissolves the sugar and salt, giving you a seamless blend.
- Add chocolate syrup to the peanut butter milk and whisk until the color turns to midnight. Let it cool for a minute so it will not shock the ice cream into premature melting.
- In a large jar with a tight lid, combine the ice cream, remaining cold milk, and the chocolate-peanut slurry. Screw the lid on with the force of a thousand storms.
- Shake the jar up and down for thirty seconds, then side to side for another thirty. You are whipping air into the cream, essentially creating a manual ice-cream churn. That swoosh-slosh symphony means you are doing it right.
- Remove your frosted glass from the freezer and drizzle chocolate syrup around the inside wall so it dribbles into artistic squiggles. It looks fancy, costs pennies, and photographs like a dream.
- Pour the milkshake through a wide-mouth funnel into the prepared glass. If you want extra thickness, hold back a splash of milk and shake again. The consistency should mound slightly before relaxing—like slow lava.
- Top with a cloud of whipped cream, a shower of chopped peanuts, and a final zig-zag of chocolate. Serve with an extra-long straw or, better yet, a stainless-steel one that keeps everything cold.
Insider Tricks for Flawless Results
The Temperature Rule Nobody Follows
Everything must be cold—ice-cold. Melted fat is a milkshake's kryptonite, creating greasy slicks that refuse to mix. Chill your whisk, your bowl, even the jar lid. If you are working in a hot kitchen, set the bowl over an ice pack while you mix. The payoff is a shake that stays thick long enough for you to snap photos without a soft-serve puddle ruining the shot.
Why Your Nose Knows Best
Smell the peanut butter before you scoop. If the oil smells rancid or flat, your shake will taste like cardboard. Natural oils oxidize quickly, so buy smaller jars if you shake infrequently. Rotate stock the way bakeries rotate flour—first in, first out.
The 5-Minute Rest That Changes Everything
After mixing, let the milkshake rest in the freezer for exactly five minutes. This short nap lets air bubbles settle, creating a denser, spoon-worthy texture akin to old-fashioned malted milk. Skip this and you get foam; over-extend and you get concrete.
Creative Twists and Variations
This recipe is a playground. Here are some of my favorite ways to switch things up:
Salted Caramel Pretzel
Swap the chocolate syrup for warm caramel sauce and rim the glass with crushed pretzels. The salty crunch against buttery caramel tastes like Oktoberfest in a glass.
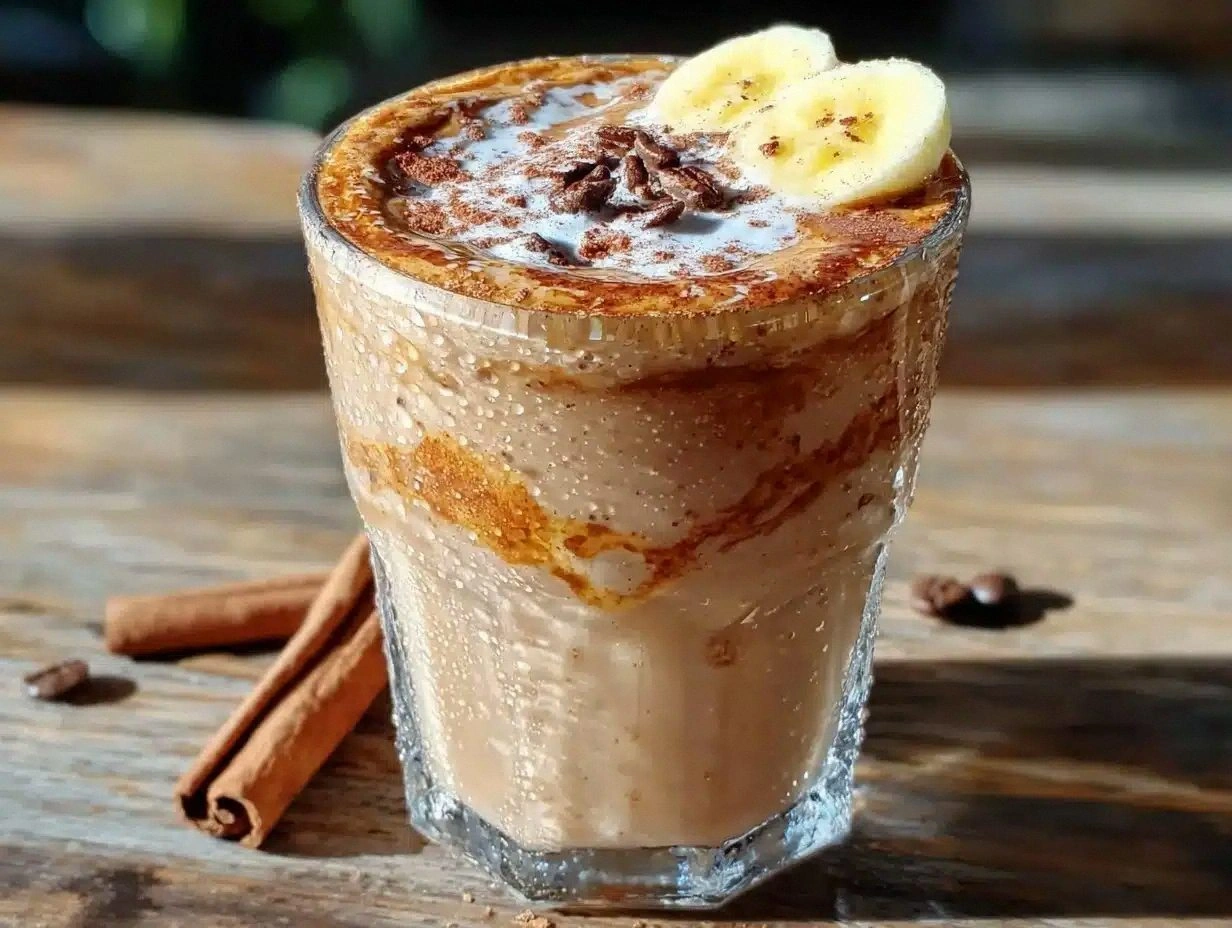
Banana Bread Breakfast
Blend in half a frozen banana and a dash of cinnamon. The banana thickens naturally, turning your dessert into a breakfast that feels almost responsible.
Espresso Buzz
Add a shot of cooled espresso and a teaspoon of cocoa powder. Coffee amplifies the roasted notes in peanut butter, giving you a milkshake that doubles as an afternoon pick-me-up.
Coconut Paradise
Use coconut milk ice cream and toasted coconut flakes. The tropical vibe makes this version taste like a peanut butter cup went on vacation to the islands.
Spicy Mayan
Whisk a pinch of cayenne and cinnamon into the chocolate syrup. The gentle heat sneaks up at the end, turning each sip into an adventure.
Storing and Bringing It Back to Life
Fridge Storage
Pour leftovers into a thermos bottle and refrigerate up to 24 hours. The thermos prevents off-flavors from the fridge. Re-shake before serving; some separation is natural.
Freezer Friendly
Freeze the milkshake in a zip-top bag laid flat. Break off chunks and re-blend with a splash of milk for a soft-serve revival. Keeps one month without texture loss.
Best Reheating Method
Let the frozen shake sit on the counter ten minutes, then whisk vigorously. Microwaving is a last resort—use five-second bursts and stir between each to avoid hot spots.