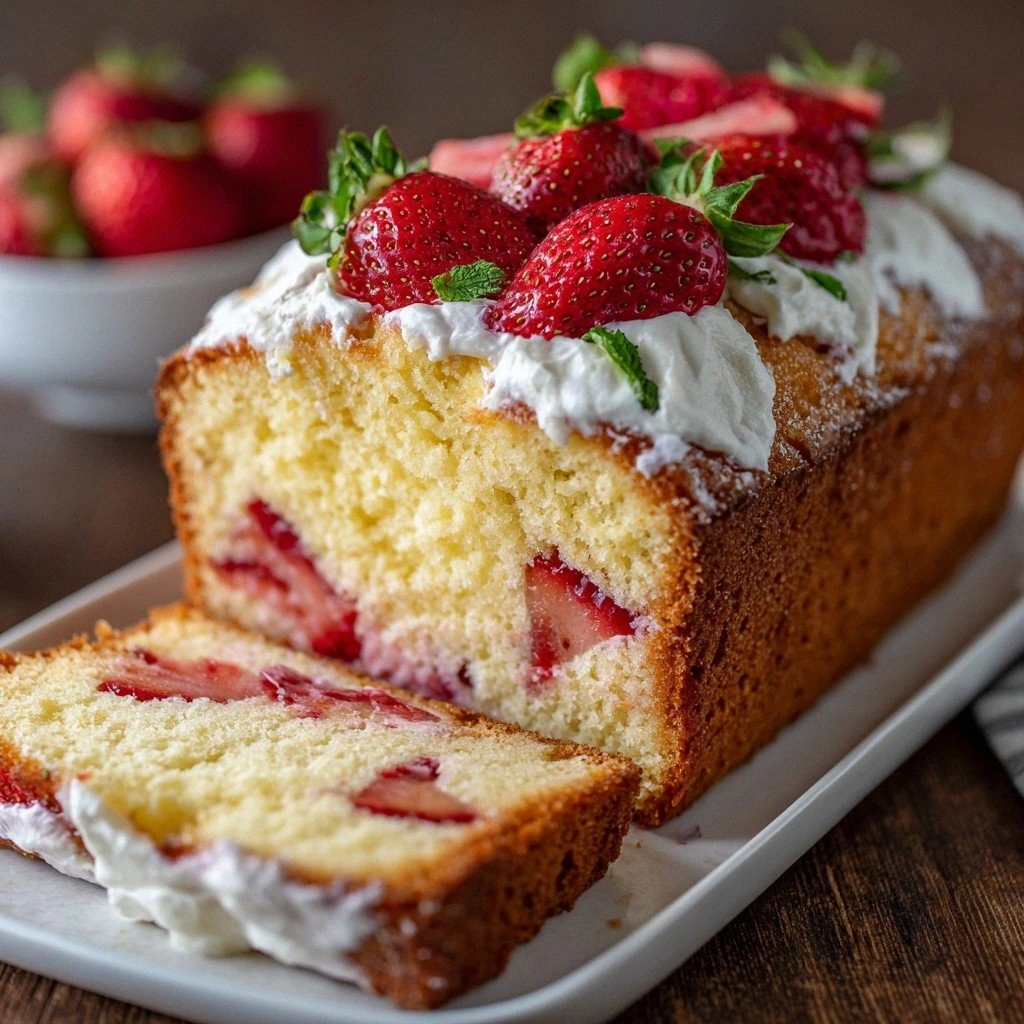
Picture this: it’s a rainy Saturday, the kettle’s whistling like a tired saxophone, and you’re staring at a pile of fresh strawberries that look like they’ve just escaped a summer festival. I was about to toss them into a bowl, when my friend dared me to make a strawberry‑infused cake that would make the whole neighborhood swoon. I laughed, grabbed my apron, and said, “Let’s see if I can turn these berries into a dessert that sings.” The kitchen smelled of melted butter and crushed sugar, the air humming with anticipation.
The moment those strawberries hit the blender, their sweet perfume filled the room, a fragrant promise of summer in every swirl. I could hear the gentle hiss of butter melting, the soft clink of eggs being cracked, and the rhythmic beat of my mixer. The texture of the batter was like a silky cloud, smooth and glossy, and the bright red of the puree added a pop of color that made my eyes water with excitement. I could already taste the tangy cream cheese mingling with the berries, a perfect balance of sweet and savory.
What makes this version stand out is not just the flavor but the way each component is orchestrated to create a cake that feels like a hug. It’s the combination of a buttery crust, the gentle lift of baking powder, and the luscious strawberry‑cream cheese filling that turns an ordinary pound cake into an edible masterpiece. I dare you to taste this and not go back for seconds. The first bite is a burst of sweetness followed by a creamy, slightly tangy finish that lingers. The second bite? It’s a gentle reminder that you’re still in summer, even if the weather outside is gray.
If you’ve ever struggled with a cake that falls flat or a filling that’s too watery, you’re not alone. I’ve been there, watching my cake collapse like a sandcastle in a storm. But this recipe is hands down the best version you’ll ever make at home. The secret? A precise balance of ingredients and a few clever hacks that keep the batter from becoming a sticky mess. Stay with me here — this is worth it. Let me walk you through every single step, and by the end, you’ll wonder how you ever made it any other way.
What Makes This Version Stand Out
- Texture: The batter is silky yet sturdy, thanks to the right ratio of flour to fat. It holds its shape without cracking, giving you a cake that looks as good as it tastes.
- Flavor: The strawberry puree brings a natural sweetness that cuts through the richness of the cream cheese, creating a balanced profile that’s hard to beat.
- Simplicity: With only ten ingredients, you can whip up this cake in under an hour, making it perfect for spontaneous dessert cravings.
- Uniqueness: The inclusion of lemon zest brightens the overall taste and adds a subtle citrusy lift that sets this cake apart from typical pound cakes.
- Crowd Reaction: Guests who’ve tried this cake say they can’t believe it’s homemade. The first bite is a revelation, and the second is a confession that they’ve never tasted anything like it.
- Ingredient Quality: Using fresh, high‑grade strawberries and cream cheese elevates the entire experience, turning ordinary ingredients into pure luxury.
- Cooking Method: Baking at a moderate temperature ensures the cake rises evenly and finishes with a golden crust without burning.
- Make‑Ahead Potential: The cake keeps wonderfully when refrigerated and can be frozen for up to a month, making it a reliable go‑to for busy weeks.
Alright, let’s break down exactly what goes into this masterpiece…
Inside the Ingredient List
The Flour Factor
All‑purpose flour is the backbone of this cake, providing structure without adding heaviness. A light touch of flour keeps the cake from becoming too dense, giving it a tender crumb that melts in your mouth. If you’re feeling adventurous, try substituting half the flour with whole wheat for a nuttier flavor; just be prepared for a slightly firmer texture.
The Sweet Core
Granulated sugar is the sweet heart of the batter, but it also plays a vital role in caramelizing the crust. A touch more sugar can create a glossy finish, while less will give you a softer bite. For a caramelized twist, sprinkle a pinch of sea salt on top before baking.
The Creamy Heart
Cream cheese is the soul of this cake. Its tangy richness balances the sweet berries, creating a complex flavor profile that’s both comforting and exciting. If you’re lactose intolerant, swap it for a dairy‑free alternative; the key is to keep the texture creamy and the flavor bright.
The Berry Burst
Fresh strawberries are the star. They bring natural sweetness, vibrant color, and a juicy texture that contrasts beautifully with the dense cake. When pureeing, reserve a handful for topping; this adds a fresh burst of flavor and a pop of color.
Everything’s prepped? Good. Let’s get into the real action…
The Method — Step by Step
- Preheat and Prep: Set your oven to 325°F (165°C) and line a 9‑inch loaf pan with parchment paper. The parchment ensures a clean release, and the moderate temperature keeps the cake from over‑browning. While the oven warms, whisk the flour, baking powder, and salt together to distribute the leavening agent evenly. This small step prevents any lumps from forming later.
- Butter & Sugar: In a large mixing bowl, cream the softened butter and granulated sugar together until pale and fluffy. The goal is to incorporate air, so beat on medium speed for about 3 minutes. As the mixture lightens, you’ll see a golden hue that signals the butter is ready.
- Eggs & Vanilla: Add the eggs one at a time, beating well after each addition. The mixture should thicken slightly after each egg. Stir in the vanilla extract and lemon zest; the zest adds a bright, citrusy aroma that lingers on the cake’s surface.
- Combine Dry & Wet: Gradually fold the flour mixture into the wet ingredients, alternating with milk. This method keeps the batter from becoming too dense. Finish with a final fold of flour to ensure everything is evenly mixed. The batter should be smooth, with no streaks of flour.
- Stir in Strawberry Puree: Gently fold in the pureed strawberries until the batter turns a blush pink. The puree adds moisture and a natural sweet flavor. Be careful not to over‑mix; you want the berries to be evenly distributed without over‑agitating the batter.
- Fill the Pan: Pour the batter into the prepared loaf pan, smoothing the top with a spatula. Tap the pan gently on the counter to release any air bubbles. The batter should be even, with a glossy surface that hints at the cake’s sweet interior.
- Bake: Place the pan in the preheated oven and bake for 45–50 minutes. The cake is done when a toothpick inserted in the center comes out clean and the top is a golden brown. The aroma that fills the kitchen will have you dreaming of the first bite.
- Cool & Finish: Remove the cake from the oven and let it cool in the pan for 10 minutes. Then transfer it onto a wire rack to cool completely. Once cooled, dust the top with powdered sugar and serve with fresh strawberries on the side.
That’s it — you did it. But hold on, I've got a few more tricks that'll take this to another level. The next section will give you insider knowledge that turns an ordinary dessert into a showstopper. Ready? Let’s dive in.
Insider Tricks for Flawless Results
The Temperature Rule Nobody Follows
Many bakers set the oven to 350°F, but the sweet spot for this cake is 325°F. The lower temperature allows the cake to rise slowly, creating a tender crumb. I’ve baked at 350°F once, and the top browned too quickly, leaving the center undercooked. The trick is to preheat the oven fully, then adjust the temperature down to 325°F before placing the cake in.
Why Your Nose Knows Best
As the cake bakes, the aroma will shift from buttery to caramelized. When you smell a hint of toasty sugar, the cake is almost done. This sensory checkpoint saves you from overbaking. Trust your nose; it’s a reliable judge of doneness.
The 5‑Minute Rest That Changes Everything
After removing the cake from the oven, let it rest in the pan for 10 minutes. This pause allows the crumb to set, preventing a crumbly texture. During this time, the residual heat finishes the baking process, ensuring a moist interior.
Dusting Techniques
Powdered sugar should be lightly dusted over the cooled cake using a fine sieve. This creates a delicate finish that’s both sweet and airy. If you prefer a richer look, use a flavored glaze instead of sugar.
Serving Size Adjustments
If you’re serving a large crowd, slice the cake into thicker pieces for a more substantial bite. For smaller parties, thinner slices allow more people to enjoy a share. Adjust the serving size in the recipe card to scale the ingredients accordingly.
Reheating Tips
To reheat a slice, place it in a microwave for 15 seconds, then finish in a toaster oven for a crisp crust. This method preserves the cake’s moisture while refreshing the flavor. Never overheat, or the cake will become dry.
Creative Twists and Variations
This recipe is a playground. Here are some of my favorite ways to switch things up:
Chocolate Swirl Surprise
Add a swirl of melted dark chocolate into the batter before baking. The chocolate adds a bittersweet depth that pairs beautifully with the strawberry. Serve with a dusting of cocoa powder for an extra chocolatey finish.
Almond Crunch Layer
Fold toasted almond slivers into the batter for a nutty crunch. The almonds provide texture and a subtle buttery flavor that complements the cream cheese. Sprinkle a few whole almonds on top before baking for a decorative touch.
Maple Syrup Infusion
Replace half the sugar with pure maple syrup for a caramelized flavor. The maple adds a warm, earthy note that balances the bright strawberry. Pair with a drizzle of maple glaze on top for a decadent finish.
Minty Freshness
Add a few fresh mint leaves to the strawberry puree for a cool, refreshing twist. The mint’s green hue also adds a pop of color. This variation is perfect for a spring or summer gathering.
Berry Medley Mix‑In
Combine blueberries, raspberries, and blackberries with the strawberries for a multi‑berry medley. Each berry brings a unique flavor profile, creating a complex, fruity experience. The cake will have a richer color palette and a more intense berry taste.
Cheesecake‑Style Finish
After baking, top the cake with a light cheesecake glaze made from cream cheese, powdered sugar, and lemon juice. This extra layer adds a silky texture and a tangy finish that elevates the overall flavor. Serve chilled for an extra indulgence.
Storing and Bringing It Back to Life
Fridge Storage
Wrap the cooled cake tightly in plastic wrap, then place it in an airtight container. Store it in the refrigerator for up to 5 days. The cool environment preserves the cake’s moisture and prevents mold growth.
Freezer Friendly
For longer storage, slice the cake and freeze each piece individually in a freezer‑safe bag. This prevents clumping and makes it easy to grab a slice. Thaw overnight in the refrigerator before serving.
Best Reheating Method
To reheat a slice, add a splash of water to the bottom of a microwave‑safe dish and heat for 15 seconds. The water steams the cake, keeping it moist. Finish by warming in a preheated oven at 300°F for 5 minutes to restore a crisp crust.