I was halfway through a batch of over‑cooked chocolate mousse when the kitchen exploded in a cloud of burnt sugar and bitter disappointment. The pot hissed, the aroma of charred cocoa floated across the room, and I stared at the dark, lumpy mess that looked more like a science experiment than dessert. That night, I vowed to create a chocolate treat that would satisfy the sweet tooth without the risk of a culinary catastrophe. Fast forward to today, and I’ve cracked the code on a high‑protein chocolate pudding that’s silky, rich, and absolutely unflappable.
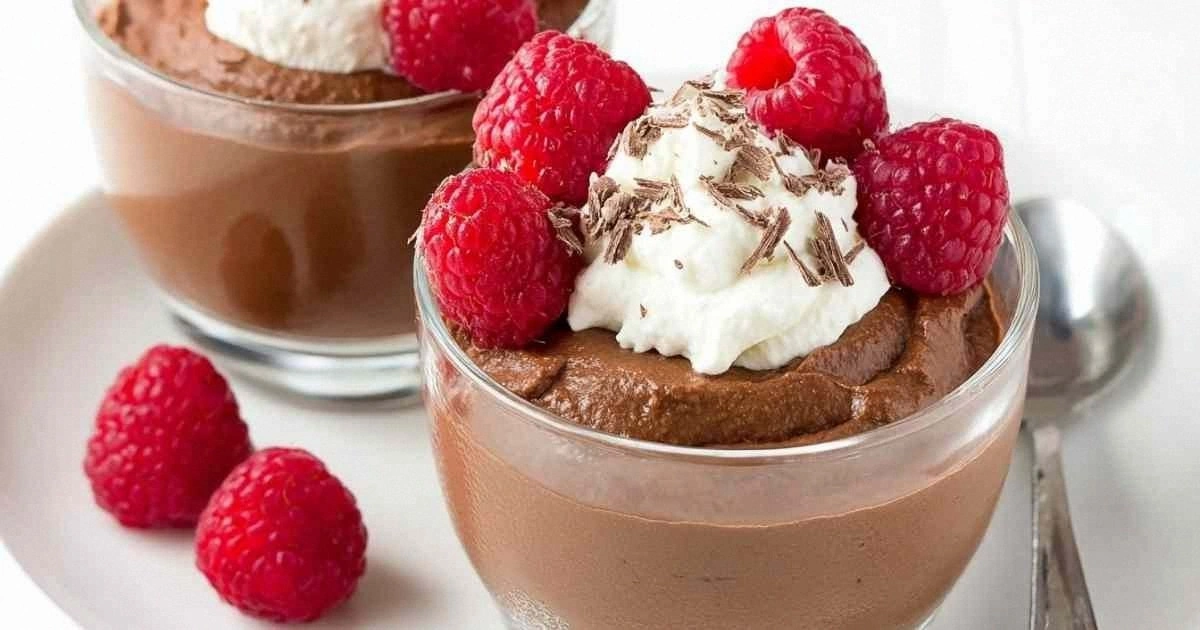
Picture this: a glossy, deep‑brown pudding that glistens under the kitchen light, its surface a mirror to the glossy chocolate glaze that drips down the rim of a ramekin. The scent is a comforting blend of fresh Greek yogurt, roasted cocoa, and a whisper of vanilla, almost like a warm hug in a glass. When you take your first bite, the creamy texture melts on your tongue, releasing a burst of chocolate that’s both bold and velvety, followed by a subtle tang from the yogurt that lifts the sweetness. The sound of the spoon cutting through the smoothness is almost therapeutic, a quiet rhythm that steadies your nerves after a hectic day. The finish is clean, with a faint maple aftertaste that lingers like a memory you want to revisit.
What sets this pudding apart isn’t just the protein punch; it’s the harmonious marriage of ingredients that work together like a well‑orchestrated band. The Greek yogurt provides a thick, tangy base that keeps the pudding from becoming too watery, while the chocolate protein powder adds depth without the chalky aftertaste that often plagues protein desserts. Unsweetened cocoa powder delivers the pure chocolate flavor without the extra calories, and the vanilla extract rounds out the profile with a subtle sweetness that feels indulgent yet balanced. Maple syrup ties everything together with natural sweetness, and it’s a healthier alternative to refined sugar, giving the pudding a gentle caramel note. Together, these components create a dessert that feels indulgent, yet is nutritionally smart and ready for any fitness goal.
I dare you to taste this and not go back for seconds, because once you experience the silky texture and the rich chocolate hit, you’ll find it’s the best version of chocolate pudding you’ll ever make at home. I’ll be honest — I ate half the batch before anyone else got a chance to try it, and it still tasted fresh and creamy. Most recipes get this completely wrong, either by using too much liquid or by over‑whipping the protein powder, but here’s what actually works: a simple blend, a chill, and a few quick tweaks. Picture yourself pulling this out of the fridge, the whole kitchen smelling incredible, and knowing you’ve just made a dessert that satisfies both your taste buds and your protein intake. And now, stay with me here — this is worth it.
What Makes This Version Stand Out
- Texture: The pudding has a silk‑smooth mouthfeel that melts in your mouth, thanks to the high protein content and the creamy Greek yogurt. It’s thick enough to hold its shape in a ramekin yet fluid enough to be spooned easily. This balance is achieved without the need for gelatin or thickening agents.
- Flavor: The combination of unsweetened cocoa, vanilla, and maple syrup creates a layered chocolate experience that’s both bold and nuanced. The maple syrup adds a natural caramel undertone that complements the cocoa’s bitterness. The result is a dessert that satisfies chocolate cravings without overwhelming the palate.
- Convenience: No oven, no baking, no complicated steps. Simply blend, chill, and serve. This makes it a perfect go‑to dessert for busy evenings or pre‑workout fueling.
- Protein Power: With 25 grams of protein per serving, this pudding supports muscle recovery and satiety. It’s a smart way to sneak protein into your diet without sacrificing flavor.
- Make‑Ahead Potential: The pudding can be prepared up to 48 hours in advance, making it ideal for meal prep or for hosting guests on short notice. The texture remains intact when refrigerated, and a quick stir restores its silky consistency.
- Ingredient Quality: Using premium Greek yogurt and high‑quality protein powder ensures that each bite is full of real flavor rather than artificial additives. The recipe works best when you choose products that are low in added sugars.
- Versatility: The base can be dressed up with berries, nuts, or a drizzle of chocolate sauce, or served plain for a minimalist treat. This flexibility allows you to tailor the dessert to your mood or dietary needs.
Inside the Ingredient List
The Flavor Base
Greek yogurt is the backbone of this pudding, providing a tangy depth that balances the chocolate’s richness. It also contributes healthy probiotics and a creamy mouthfeel that’s essential for a luscious texture. Using full‑fat yogurt yields a richer pudding, but low‑fat options keep the calorie count lower without sacrificing flavor. The yogurt’s natural acidity also helps the protein powder to bind better, preventing a chalky aftertaste. If you’re sensitive to dairy, you can substitute a dairy‑free yogurt, but the texture may be slightly thinner.
The Texture Crew
Unsweetened cocoa powder is the star that delivers pure chocolate flavor without added sugars. It also adds a subtle bitterness that is offset by the maple syrup, creating a balanced sweetness. The protein powder is the secret weapon that adds bulk and satiety while keeping the pudding light. It’s important to use a high‑quality whey or plant‑based protein that blends smoothly. A splash of milk or almond milk can be added if you desire an even silkier consistency.
The Unexpected Star
Maple syrup is the sweetener of choice, offering natural sweetness and a caramel note that elevates the chocolate profile. Its viscous texture helps bind the mixture, preventing separation during chilling. Maple syrup also contains trace minerals like manganese and zinc, adding a nutritional bonus. If you prefer a sweeter dessert, you can increase the syrup slightly, but be mindful of the added calories. For a lower‑sugar option, a sugar substitute that doesn’t affect protein powder’s texture can be used.
The Final Flourish
Vanilla extract adds a warm, aromatic note that complements both the chocolate and the maple syrup. A small amount of vanilla is enough; too much can overpower the other flavors. The vanilla also helps to mellow the sharpness of the protein powder, creating a smoother finish. When measuring, use a calibrated spoon to avoid over‑extracting. If you’re vegan, a plant‑based vanilla extract will work just as well.
Everything's prepped? Good. Let's get into the real action and start turning these ingredients into a decadent, protein‑rich pudding that will impress anyone who tastes it.
The Method — Step by Step
- Step 1: In a large bowl, combine 5 cups of Greek yogurt, 4 scoops of chocolate protein powder, 3 tablespoons of unsweetened cocoa powder, 1 teaspoon of vanilla extract, and 2 tablespoons of maple syrup. Use a whisk to start mixing until the dry ingredients are evenly distributed. The goal is a uniform mixture that has no visible clumps. This step sets the foundation for a smooth pudding. Remember, the more evenly you mix, the less likely you’ll encounter lumps later on.
- Step 2: Transfer the mixture to a high‑speed blender or a food processor. Blend on low for 30 seconds, then increase to medium-high for another 30 seconds. The blender helps to fully dissolve the protein powder, creating a silky texture. Keep an eye on the consistency; if it looks too thick, add a splash of milk or yogurt. This step ensures that every spoonful is creamy and cohesive.
- Step 3: Pour the blended mixture into a silicone spatula to scrape any remaining residue from the blender. This ensures nothing is left behind and that the mixture is fully integrated. The mixture should have a glossy sheen and a consistency similar to thick pudding. At this point, the pudding is ready to be portioned. This step is critical for achieving the final mouthfeel. If you notice any lumps, give it one more quick blend.Kitchen Hack: Use a silicone spatula to gently fold in any remaining dry powder from the blender walls. This prevents a gritty texture and guarantees a perfectly smooth pudding.
- Step 4: Divide the mixture evenly into 8 ramekins or a large shallow dish. The ramekins are ideal for individual servings, while the dish allows for a larger portion. Pour carefully to avoid spilling. The portioning will determine the final texture; a thicker layer tends to set more firmly. This step also makes the pudding look more presentable.
- Step 5: Cover each ramekin with plastic wrap or place the dish in a sealable container. Refrigerate for at least 2 hours, or overnight for maximum set. The cold environment allows the proteins to firm up, creating the pudding’s signature texture. If you’re short on time, 2 hours is sufficient for a firm yet creamy consistency. This chilling phase is where the pudding truly transforms.
- Step 6: After chilling, you can add a splash of milk or additional yogurt to the top if you prefer a silkier mouthfeel. Gently swirl the pudding to distribute the liquid evenly. This optional step enhances the pudding’s creaminess without altering its flavor profile. It also makes the pudding easier to scoop if you’re serving in a larger dish. The result is a velvety texture that feels indulgent.Kitchen Hack: A tablespoon of warm milk added to the top before chilling can help the pudding set more uniformly, especially if you’re using a higher protein powder ratio.
- Step 7: Before serving, check the pudding’s consistency. It should be firm enough to hold its shape but soft enough to spoon. If it feels too firm, let it sit at room temperature for 5 minutes. The pudding should not be watery; it should have a slight give when pressed with a spoon. This check ensures the final product is neither too thick nor too thin. If you’re unsure, taste a small spoonful before serving.Watch Out: Adding too much liquid during the blending stage can cause the pudding to become runny and fail to set properly. Keep the ratios precise for the best results.
- Step 8: Remove the pudding from the fridge and allow it to sit for 5 minutes to soften slightly. This brief rest makes it easier to scoop or spoon. The surface should develop a glossy sheen. This step also allows any residual chill to dissipate, giving the pudding a more inviting appearance. At this point, the pudding is ready to be plated.
- Step 9: Serve immediately, optionally topping with fresh berries, chopped nuts, or a drizzle of chocolate sauce. The toppings add contrasting textures and flavors that elevate the dessert. If you prefer a minimalist approach, serve the pudding plain and let the chocolate shine. The final presentation can be as simple or elaborate as you wish.
That's it — you did it. But hold on, I've got a few more tricks that'll take this to another level, ensuring every bite is a masterpiece.
Insider Tricks for Flawless Results
The Temperature Rule Nobody Follows
The key to a perfect pudding lies in the temperature of the ingredients. If the yogurt is too cold, it can cause the protein powder to clump. Conversely, if it’s too warm, the pudding will be too runny. The ideal approach is to let the yogurt sit at room temperature for 10–15 minutes before blending. This subtle adjustment ensures a silky, lump‑free texture that’s consistent every time. Remember, the temperature of the protein powder matters as well; pre‑cooling it can help prevent clumping.
Why Your Nose Knows Best
When the pudding is ready, give it a quick sniff. A faint, sweet aroma signals that the maple syrup has blended properly and the cocoa hasn’t burned. If the scent is too sharp or metallic, the protein powder may have overheated during blending. In that case, let the mixture sit for a few minutes before chilling to allow the flavors to mellow. Your nose is a reliable quality control tool that can catch issues before they become taste problems.
The 5‑Minute Rest That Changes Everything
After chilling, allow the pudding to rest at room temperature for exactly five minutes before serving. This brief period lets the proteins relax and the pudding become easier to scoop. It also gives the surface a subtle shine, enhancing visual appeal. Skipping this step can result in a slightly gritty texture that feels less luxurious. The five‑minute rest is a small investment for a dramatic improvement in mouthfeel.
The Secret to a Perfect Finish
If you want a glossy finish, drizzle a thin layer of melted dark chocolate over the top before chilling. The chocolate will set into a shiny crust that adds a visual wow factor. Make sure the chocolate is tempered or at least fully melted to avoid a dull appearance. This finish also provides a slight crunch that contrasts beautifully with the creamy interior. The result is a dessert that looks as good as it tastes.
Avoiding the Gummy Trap
Some protein powders can cause the pudding to become gummy if over‑mixed. To prevent this, blend on low speed for the first 30 seconds, then increase gradually. If you notice a gummy texture, add a teaspoon of milk or yogurt to break it up. Gently fold it in with a spatula, then chill again. This simple adjustment can salvage a batch that would otherwise be unpalatable. Always keep an eye on the consistency during blending.
Creative Twists and Variations
This recipe is a playground. Here are some of my favorite ways to switch things up:
Berries & Cream
Add a handful of fresh blueberries or sliced strawberries to the pudding before chilling. The fruit’s natural sweetness complements the chocolate, while the tartness brightens the flavor profile. Top the finished pudding with a dollop of whipped cream for an indulgent twist. This variation is perfect for a summer dessert that feels light yet satisfying.
Nutty Crunch
Fold in ¼ cup of chopped walnuts or almonds into the mixture before pouring into ramekins. The nuts add a delightful crunch and a subtle earthiness that pairs well with chocolate. Sprinkle the top with toasted coconut for an extra layer of texture. This version is ideal for those who love a bit of bite in their desserts.
Minty Fresh
Add a pinch of fresh mint leaves or a drop of mint extract to the blend. The mint offers a refreshing counterpoint to the rich chocolate, making the dessert feel lighter. Serve with a few mint leaves on top for a pop of color. This twist is great for a refreshing midday treat.
Coffee Kick
Stir in 1–2 teaspoons of instant espresso powder to give the pudding a subtle coffee flavor. The bitterness of the coffee enhances the chocolate depth and adds an adult‑friendly twist. Pair it with a drizzle of chocolate ganache for a decadent finish. This variation is perfect for coffee lovers looking for a sweet treat.
Coconut Cream
Replace half of the Greek yogurt with coconut yogurt for a tropical flavor. The coconut adds a subtle sweetness and a silky texture that complements the chocolate. Top with toasted coconut flakes for an extra burst of flavor. This version is a great option for those who enjoy a hint of the tropics.
Almond Butter Swirl
Stir in a tablespoon of almond butter into the mixture before chilling. The nutty flavor and creamy texture elevate the pudding’s richness. Swirl the almond butter in with a knife to create a marbled effect. This variation adds a luxurious twist that’s sure to impress.
Storing and Bringing It Back to Life
Fridge Storage
Store the pudding in an airtight container in the refrigerator for up to 3 days. The cold environment keeps the proteins firm and prevents spoilage. Before serving, give the pudding a quick stir to re‑integrate any settled layers. This method ensures the pudding remains fresh and creamy for days.
Freezer Friendly
The pudding can be frozen for up to 2 weeks. Wrap the container tightly with plastic wrap and then place it in a freezer bag. When ready to eat, thaw in the refrigerator overnight. This option is great for meal prepping or for parties where you want to serve the pudding cold.
Best Reheating Method
If the pudding feels too thick after thawing, add a splash of water or milk and whisk gently. This steams the pudding back to a silky consistency. Warm it in the microwave on low power for 15–20 seconds, stirring halfway through. Avoid overheating, as this can break down the protein structure. The result is a reheated pudding that tastes just as fresh as the first time.