I remember the exact moment I decided I needed a dessert that could win over even the most stubborn of sweet‑tooth skeptics. It was a rainy Saturday, the kind where the clouds look like someone pressed a giant cotton ball against the sky, and my friend dared me to bring something “so good it would make us forget the weather.” I stared at a half‑finished batch of plain cupcakes, feeling the weight of that challenge like a drumbeat in my ears. The kitchen smelled faintly of butter and vanilla, but something was missing – that “wow” factor that makes a dessert unforgettable.
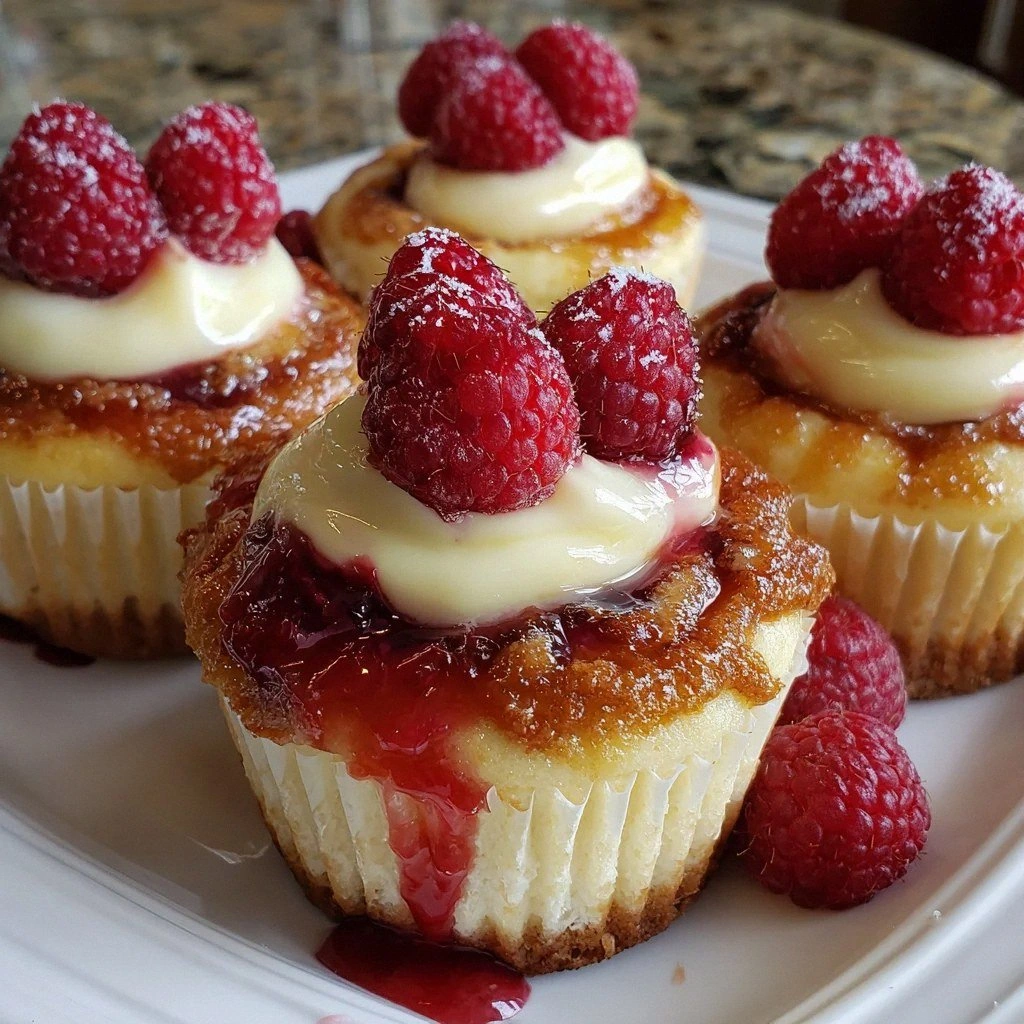
I tossed a handful of fresh raspberries into the blender, watched the deep pink puree swirl like a sunset over a calm lake, and then I thought, why not hide a silky cheesecake core inside each cupcake? The idea was half‑madness, half‑genius, and entirely delicious. I whisked, folded, and swirled, all the while daring myself to create a texture contrast so striking that the crumb would be airy, the cheesecake creamy, and the raspberry bright enough to cut through the richness like a spotlight on a stage. The moment the batter hit the tin, the kitchen filled with a warm, buttery aroma that made my mouth water before the oven even warmed up.
Most recipes I’ve tried either over‑sweeten the cheesecake filling or make the cupcake base too dense, turning the whole thing into a soggy mess. I’ve seen people try to layer raspberry jam on top and end up with a gummy disaster that slides off the fork. That’s why this version stands out: I’ve balanced each component so that the flavors sing in harmony, the textures dance, and the presentation looks like a tiny work of art. The secret? A subtle glaze that locks in moisture, a pinch of salt that brightens the sweetness, and a technique that prevents the filling from leaking during bake time.
I’m about to spill the beans on a technique that most bakers overlook – chilling the cream cheese mixture just enough to be pliable but not solid, then spoon‑dropping it into the batter before it hits the oven. This ensures a perfect, centered core that doesn’t ooze out, and it gives you that “surprise inside” moment that will have your guests shouting for seconds. I dare you to taste this and not go back for seconds. Okay, ready for the game‑changer? Let me walk you through every single step — by the end, you’ll wonder how you ever made it any other way.
What Makes This Version Stand Out
- Flavor Explosion: The raspberry puree cuts through the buttery cupcake base with a tangy pop that makes every bite feel like a celebration.
- Texture Symphony: A light, fluffy crumb meets a velvety cheesecake center, creating a contrast that’s as satisfying as a crisp apple against smooth caramel.
- Simplicity Meets Sophistication: Despite the gourmet vibe, the ingredient list is pantry‑friendly and the steps are straightforward enough for a weekend rookie.
- Unique Glaze Finish: A powdered‑sugar glaze adds a glossy crown that not only looks elegant but also locks in moisture for a tender bite.
- Crowd‑Pleaser Factor: These cupcakes have a “wow” factor that turns casual get‑togethers into memorable events – think birthday parties, brunches, or even a low‑key dinner dessert.
- Ingredient Quality: Using real raspberry puree instead of artificial flavoring elevates the taste profile to a whole new level.
- Make‑Ahead Magic: You can assemble the cupcakes a day ahead, refrigerate, and bake right before serving – perfect for busy schedules.
- Portion Control: Individual cupcakes let you enjoy a decadent treat without overindulging, keeping calories in check while still feeling indulgent.
Inside the Ingredient List
The Flavor Base
Unsalted butter is the silent hero of this recipe. Its richness creates a tender crumb, and because it’s unsalted, you have full control over the final seasoning. If you skip the butter or replace it with margarine, you’ll lose that buttery aroma that makes the cupcakes smell like a fresh bakery. A good tip is to use European‑style butter, which has a higher butterfat content for an even richer flavor.
Granulated sugar does more than sweeten – it also helps to aerate the batter when creamed with butter. This creates tiny air pockets that expand in the oven, giving the cupcakes their signature lift. If you’re watching sugar intake, you can swap half of the granulated sugar with coconut sugar, but expect a slight caramel note.
Eggs are the structural backbone. They bind the wet and dry ingredients while adding moisture. Using room‑temperature eggs prevents the batter from curdling and ensures an even rise. If you’re out of eggs, a mixture of 1 tablespoon of flaxseed meal + 3 tablespoons of water per egg works, though the texture will be a tad denser.
The Texture Crew
All‑purpose flour provides the framework for the cupcake’s crumb. It’s the canvas on which all other flavors paint their story. Over‑mixing the flour can develop gluten, leading to a tough texture, so stir just until combined. For a lighter crumb, you can sift the flour with the baking powder and salt before folding it in.
Baking powder is the leavening agent that makes these cupcakes rise like a sunrise. Too much and you’ll get a metallic aftertaste; too little and they’ll be flat. The precise 1 teaspoon ensures a fluffy interior without a bitter edge.
A pinch of salt might seem negligible, but it amplifies every other flavor, preventing the sweetness from becoming cloying. Think of it as the conductor that keeps the orchestra in harmony.
The Unexpected Star
Cream cheese is the heart of the cheesecake filling. Its tangy richness balances the sweet cupcake base, creating that perfect sweet‑and‑tart dance on the palate. Make sure the cream cheese is softened to room temperature; otherwise, you’ll end up with lumps that ruin the silky texture. If you prefer a lighter version, try a 50/50 blend of cream cheese and Greek yogurt.
Raspberry jam or fresh puree brings the bright, fruity pop that cuts through the richness. Fresh puree gives a more intense flavor, while jam adds a subtle sweetness and a glossy finish. If you’re using frozen raspberries, thaw and puree them, then strain to remove seeds for a smoother consistency.
The Final Flourish
Powdered sugar in the glaze creates a delicate, melt‑in‑your‑mouth coating that adds a glossy finish and a touch of extra sweetness. It dissolves quickly when mixed with a splash of milk, forming a thin sheen that makes the cupcakes look bakery‑ready.
Fresh raspberries for garnish aren’t just for Instagram; they add a burst of fresh acidity that lifts the overall flavor profile. Choose plump, deep‑red berries and give them a gentle rinse before patting dry.
Everything's prepped? Good. Let’s get into the real action…
The Method — Step by Step
Preheat your oven to 350°F (175°C) and line a 12‑cup muffin tin with paper liners. While the oven warms, melt the butter in a saucepan over low heat until it just begins to foam – you’ll hear a gentle sizzle that signals it’s ready. Let it cool slightly so it’s warm, not hot, to avoid cooking the eggs later.
In a large mixing bowl, cream the softened butter with the granulated sugar using a handheld mixer on medium speed. This should take about 3‑4 minutes, and you’ll notice the mixture turning pale and fluffy – a sign that air has been incorporated. Power transition: Okay, ready for the game‑changer? Add the eggs one at a time, beating well after each addition to keep the batter smooth.
Stir in the vanilla extract, then whisk together the flour, baking powder, and salt in a separate bowl. Gradually add the dry ingredients to the wet mixture, alternating with the milk, beginning and ending with the flour mixture. The batter should be thick but pourable; if it looks too stiff, add a teaspoon of milk.
Now, the cheesecake filling: In a medium bowl, beat the softened cream cheese until silky, then add the extra granulated sugar, the second egg, and the vanilla extract for filling. Mix until the mixture is completely smooth – no lumps! This is the moment of truth; a perfect filling should be glossy and thick enough to hold its shape when spooned.
Divide the cupcake batter evenly among the liners, filling each about one‑third full. Then, using a small spoon or a piping bag, drop a generous dollop (about a tablespoon) of the cheesecake mixture into the center of each cup. Gently swirl the batter around the filling with a toothpick to create a marbled effect, but be careful not to fully blend – you want that distinct core.
Slide the tin into the oven and bake for 18‑22 minutes, or until the tops are lightly golden and a toothpick inserted into the cupcake (avoiding the center) comes out clean. You’ll notice the edges pulling away slightly from the liner – that’s your visual cue that they’re done.
While the cupcakes are cooling, whisk together powdered sugar and just enough milk to achieve a smooth, pourable glaze. Drizzle the glaze over the warm cupcakes, letting it cascade down the sides and set into a glossy coat. Finally, garnish each cupcake with a fresh raspberry placed atop the glaze for that pop of color and extra burst of flavor.
That’s it — you did it. But hold on, I’ve got a few more tricks that’ll take this to another level…
Insider Tricks for Flawless Results
The Temperature Rule Nobody Follows
Always bring your butter, eggs, and cream cheese to room temperature before you start. The reason is simple physics: ingredients at the same temperature emulsify more evenly, preventing a curdled batter. I once tried to rush the process with cold butter, and the cupcakes turned out dense and uneven – a lesson learned the hard way.
Why Your Nose Knows Best
When the cupcakes are in the oven, trust your sense of smell more than the timer. Around the 15‑minute mark, you’ll start to detect a sweet, buttery fragrance with a faint raspberry hint. If the scent turns nutty or burnt, pull them out immediately – overbaking ruins the delicate cheesecake core.
The 5‑Minute Rest That Changes Everything
After removing the cupcakes from the oven, let them rest in the tin for exactly five minutes before transferring to a wire rack. This short rest allows the steam to finish cooking the center gently, preventing cracks in the glaze later. Skipping this step leads to a “dry top” that looks unappealing.
Glaze Consistency Secret
If your glaze is too thick, add a few drops of milk at a time until it flows like honey. If it’s too thin, whisk in extra powdered sugar. The perfect glaze should coat the cupcakes without pooling heavily – think of a light rain that leaves a shimmering film.
Garnish Like a Pro
Pat the fresh raspberries gently with a paper towel to remove excess moisture; otherwise, the glaze will slide off. For an extra visual wow, lightly dust the raspberry with a pinch of powdered sugar before placing it on top – it gives a frosted look that’s Instagram‑ready.
Creative Twists and Variations
This recipe is a playground. Here are some of my favorite ways to switch things up:
Chocolate Swirl Delight
Add 2 tablespoons of melted dark chocolate to the cupcake batter before folding in the flour. The chocolate ribbons create a mocha‑raspberry duet that’s perfect for coffee lovers.
Lemon Zest Burst
Stir in the zest of one lemon to the cheesecake filling and replace half of the raspberry puree with lemon curd. The citrus lifts the richness and adds a sunny note.
Nutty Crunch Surprise
Fold ¼ cup of finely chopped toasted almonds into the cupcake batter. The nuts add a subtle crunch that contrasts beautifully with the silky filling.
White Chocolate Raspberry
Melt ½ cup of white chocolate and swirl it into the glaze. The sweet, creamy finish pairs with the tart raspberry for a luxurious mouthfeel.
Vegan Friendly Version
Swap butter for coconut oil, use a plant‑based cream cheese, and replace the eggs with a flax‑seed “egg”. The texture changes slightly, but the flavor remains divine.
Storing and Bringing It Back to Life
Fridge Storage
Place the cooled cupcakes in an airtight container and refrigerate for up to 3 days. The glaze may firm up, but a quick room‑temperature sit for 15 minutes restores the soft bite.
Freezer Friendly
Wrap each cupcake individually in plastic wrap, then seal them in a freezer bag. They’ll keep for up to 2 months. To thaw, move them to the fridge overnight, then let them sit at room temperature for 20 minutes before serving.
Best Reheating Method
Preheat your oven to 300°F (150°C), place the cupcakes on a baking sheet, and heat for 5‑7 minutes. Add a tiny splash of milk (about a teaspoon) to the glaze before reheating; the steam revives the glossy finish and keeps the interior moist.