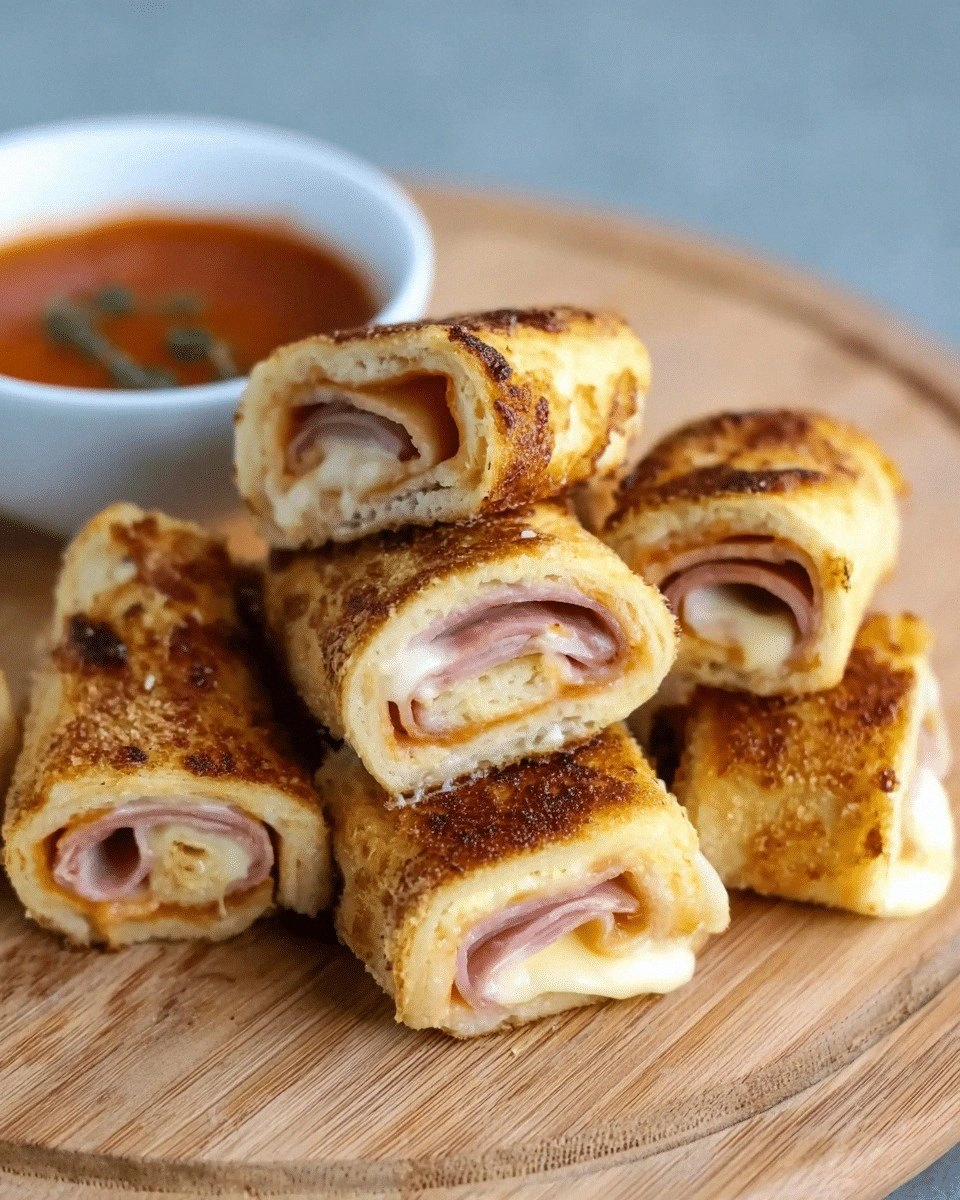
Picture this: a Saturday morning, the kitchen humming with the low buzz of the fridge, a half‑filled carton of milk, and a stubborn slice of cheddar that had been staring at you all week. I was about to toss it in the trash when a friend texted, “I’m craving something that’s both comforting and wow.” I laughed, then pulled out my trusty skillet and a handful of flour. The result? A plate of golden, buttery roll‑ups that made my taste buds do a happy dance and my friends swear they’ve never seen grilled cheese done so spectacularly.
I didn’t just stumble into this recipe by accident; I chased it down from a kitchen mishap. Last month, I tried a classic grilled cheese on a griddle, but the cheese melted so fast that the bread turned to mush. The next day, I was craving that same gooey, crispy bite, and I decided to reinvent the wheel. I kept the gooey interior but added a crispy, buttery shell that held the cheese in place. The result? A roll‑up that’s both melt‑in‑your‑mouth and crunch‑in-your‑mouth, and I’ve been sharing it ever since.
What makes this version stand out from the endless stream of grilled cheese recipes? It’s a symphony of textures: the soft, pillowy dough, the molten cheese that oozes out with each bite, and the crisp edges that crackle like thin ice under a fork. The flavor is layered too—cheddar’s sharpness, mozzarella’s silkiness, garlic’s punch, paprika’s subtle heat, and oregano’s herbal depth. I dare you to taste this and not go back for seconds. It’s a culinary revelation that turns an everyday snack into a showstopper.
And there’s a secret ingredient that you won’t expect: a splash of milk in the dough. It keeps the dough tender and gives the roll‑ups a subtle, airy lift. I’ve tried versions without milk, and the rolls were dense and chewy, not the light, airy texture you’re looking for. So, stick with the milk, and trust me, your taste buds will thank you. Let me walk you through every single step — by the end, you’ll wonder how you ever made it any other way.
What Makes This Version Stand Out
- Flavor Depth: The blend of cheddar and mozzarella creates a rich, creamy core that contrasts beautifully with the aromatic herbs.
- Crispy Perfection: A buttery, golden crust that cracks with each bite, delivering a satisfying crunch that most grilled cheese recipes miss.
- Easy Prep: All the dough is pre‑mixed, so you can roll and cook in minutes, making it ideal for busy weekdays.
- Make‑Ahead Friendly: Store them in the fridge or freezer and reheat for a quick, tasty snack or side.
- Versatile Base: The dough can accommodate any filling—ham, bacon, spinach, or even a sweet jam for dessert versions.
- Ingredient Quality: We use fresh, high‑quality cheeses and real herbs, not powdered substitutes, for maximum flavor.
- Texture Contrast: The dough’s softness is counterbalanced by the crispy edges, creating an irresistible mouthfeel.
- Crowd‑Pleaser: Whether it’s a family dinner or a party snack, these roll‑ups receive rave reviews from kids and adults alike.
Alright, let’s break down exactly what goes into this masterpiece…
Inside the Ingredient List
The Dough Foundation
Flour is the backbone of these roll‑ups. It gives the dough structure and a light, airy feel. If you skip the flour, the dough becomes gummy and won’t hold the cheese. Use a medium‑protein all‑purpose flour for a balance of chew and softness. When measuring, spoon into the measuring cup and level off; don’t pack it down, or the roll‑ups will be too dense.
The Salt and Pepper Duo
Salt is the unsung hero that brings out the flavors of every component. A teaspoon is enough to season the dough without overpowering the cheese. Pepper adds a subtle heat that lingers after each bite. If you’re watching sodium, reduce the salt to 3/4 teaspoon; the cheeses will still taste rich.
The Cheese Concoction
Cheddar provides sharpness and a melt that’s almost liquid, while mozzarella adds a silky, stretchy texture. Together, they form a gooey center that oozes out when you cut into a roll‑up. If you’re vegan, swap them for a plant‑based cheddar and mozzarella blend. Remember, the cheese should be shredded finely; larger shreds will take longer to melt.
The Milk Magic
Milk keeps the dough tender and helps it rise slightly during cooking. A half cup is the sweet spot—enough to hydrate the flour without making the dough too wet. If you prefer a dairy‑free version, substitute an equal amount of oat or almond milk. Don’t over‑mix the dough after adding milk; overworking will develop gluten and make the roll‑ups chewy.
The Butter Burst
Butter is the secret to that golden, crisp crust. Two tablespoons, melted and cooled slightly, coat the dough and melt into the surface, creating a buttery sheen. If you’re avoiding saturated fats, use a plant‑based butter or a light olive oil. Keep the butter cold; if it’s too hot, it will cause the dough to become greasy.
The Herb and Spice Layer
Garlic powder, paprika, oregano, and basil give depth and complexity. Garlic adds savory undertones, paprika brings a gentle warmth, oregano offers earthiness, and basil gives a fresh, aromatic finish. Use fresh herbs if available; they’re brighter and more fragrant. If you’re allergic to garlic, omit it and double the paprika to compensate.
Everything's prepped? Good. Let's get into the real action...
The Method — Step by Step
- In a large mixing bowl, combine 2 cups of flour, 1 teaspoon of salt, and 1/2 teaspoon of black pepper. Whisk until evenly distributed. The goal is to ensure every grain of flour is seasoned.
- Create a well in the center and pour in 1/2 cup of milk, 2 tablespoons of melted butter, and 1 teaspoon of garlic powder. Stir gently with a wooden spoon until a shaggy dough forms. Overmixing here will develop gluten and make the roll‑ups tough.
- Add 1 cup each of shredded cheddar and mozzarella, 1 teaspoon paprika, 1 teaspoon dried oregano, and 1 teaspoon dried basil. Fold the cheese into the dough until it’s evenly dispersed. The dough should feel soft and slightly tacky.
- Transfer the dough to a lightly floured surface and knead for 3–4 minutes, just until it becomes smooth. Pat the dough into a 12×8 inch rectangle. The dough should be thin enough to roll but thick enough to hold the cheese.
- Roll the dough tightly from the long side, creating a log. Slice the log into 1‑inch thick rounds. Place the rounds on a parchment‑lined baking sheet, spacing them 1 inch apart. This spacing allows the edges to crisp without merging.
- Heat a large non‑stick skillet over medium‑low heat. Brush the skillet with a thin layer of butter or oil. Place the roll‑ups in the skillet, skin side down. Cover with a lid and let them cook for 5 minutes. The cover traps steam, helping the cheese melt evenly.
- Remove the lid, flip the roll‑ups, and cook for another 4–5 minutes, until the edges are golden brown and the cheese is bubbling. The key is low heat; high heat will burn the exterior before the interior melts.
- Transfer the cooked roll‑ups to a wire rack to cool slightly. Serve warm with a side of marinara or a fresh salad. The moment the cheese pulls out, you’ll hear that satisfying sizzle—absolute perfection.
That's it — you did it. But hold on, I've got a few more tricks that'll take this to another level...
Insider Tricks for Flawless Results
The Temperature Rule Nobody Follows
Many cooks think high heat is the key to a crisp crust. In reality, low and steady heat allows the cheese to melt evenly without burning the exterior. Keep the skillet on medium‑low and use a lid to trap steam. If you notice the edges browning too quickly, reduce the heat or slide the roll‑ups to a cooler spot in the pan.
Why Your Nose Knows Best
A quick sniff before flipping tells you if the cheese is ready. The aroma should be rich, buttery, and slightly smoky. If it still smells like raw dough, give it a few more minutes. Your nose is the ultimate judge of doneness.
The 5‑Minute Rest That Changes Everything
After cooking, let the roll‑ups rest on a rack for 5 minutes. This allows the juices to redistribute, making the interior silky. Skipping the rest can result in a watery center that leaks onto the plate.
The Butter Flip Technique
Before flipping, brush a thin layer of butter over the cooked side. This creates a barrier that keeps the cheese from sticking to the skillet and gives a glossy finish. It also adds a subtle buttery flavor that complements the cheese.
The Quick Cooling Trick
If you’re in a hurry, place the cooked roll‑ups on a parchment paper‑lined plate and cover loosely with foil. This traps heat and keeps them warm without overcooking the crust.
Creative Twists and Variations
This recipe is a playground. Here are some of my favorite ways to switch things up:
The Smoky Jalapeño Roll‑Up
Add diced jalapeños and a dash of smoked paprika to the dough. The heat pairs perfectly with the creamy cheese, and the smoke adds depth. Great for a spicy kick at dinner parties.
The Mediterranean Medley
Swap the cheddar for feta and sprinkle chopped sun‑dried tomatoes, olives, and oregano. The tangy feta contrasts with the buttery crust, creating a Mediterranean flavor profile.
The Sweet Cinnamon Roll‑Up
Replace the cheeses with a mixture of cream cheese and honey, then sprinkle cinnamon sugar on top before cooking. The result is a dessert roll‑up that’s both sweet and indulgent.
The Veggie‑Loaded Version
Fold in finely chopped spinach, bell pepper, and onion before rolling. The vegetables add nutrition and a burst of color. They also soak up the cheese, creating a moist, flavorful bite.
The Breakfast Boost
Add a swirl of maple syrup and a sprinkle of chopped bacon before rolling. Serve with a side of scrambled eggs for a hearty breakfast that feels like a treat.
Storing and Bringing It Back to Life
Fridge Storage
Place the cooked roll‑ups in an airtight container and refrigerate for up to 3 days. When ready to serve, reheat in a toaster oven at 350°F for 5 minutes, or microwave on medium for 30 seconds, then finish under the broiler for a crisp edge.
Freezer Friendly
Wrap each roll‑up individually in parchment paper, then place them in a freezer bag. Freeze for up to 2 months. Thaw overnight in the fridge before reheating as described above.
Best Reheating Method
Add a tiny splash of water to the skillet before reheating; the steam will restore moisture and prevent the cheese from drying out. Heat over low to medium heat until the cheese is molten and the crust is crisp.