Picture this: a Sunday afternoon, the kitchen light flickering, and your friend’s voice booming from the phone, “I need a dessert that looks fancy but tastes like a hug.” I was staring at a bowl of ripe strawberries, half‑baked cake, and a pantry full of sugar, and the idea hit me like a bright summer flash. The thought of turning those humble berries into a silky glaze that could elevate any dessert was a culinary revelation. I set the timer, the timer, and the kitchen became my laboratory for a new kind of sweet.
The first thing that struck me was the aroma—sweet, bright, almost citrusy—when the strawberries hit the saucepan. The sound of the first bubble was a tiny drumbeat announcing the transformation. The texture started as a thick, glossy liquid that would soon coat a cake like velvet. I could taste the subtle tang of lemon and the warmth of vanilla dancing on my tongue. The feel of the sauce against my fingertips was silky, almost liquid silk, promising a mouthfeel that would melt in your mouth.
What makes this version stand out is not just the ingredients, but the technique: a quick cornstarch slurry that thickens without clouding the color, a double‑stage reduction that locks in flavor, and a final splash of lemon that brightens everything. It’s a recipe that feels like a secret handshake between simplicity and sophistication. Most people think a glaze is just a sweet syrup, but I’ve turned it into a flavor vehicle that can carry cakes, pancakes, ice cream, or even savory items. The result is a glaze that is both luscious and light, with a shine that makes your dessert look like it was crafted by a pastry chef.
I dare you to taste this and not go back for seconds. That’s a bold claim, but I’ve tested it against countless other strawberry sauces. The result? A glaze that coats the surface, glistens, and then melts into a sweet, fragrant finish. I’ll be honest—my friends begged me to give them a spoonful before the glaze even cooled, and they couldn’t stop asking for more. If you’ve ever struggled with a glaze that turns into a thick syrup or a thin, watery drizzle, this is the fix you’ve been missing.
Most recipes get this completely wrong. They either over‑cook the strawberries, lose the bright red color, or add too much sugar, creating a cloying sweetness. Here’s what actually works: a quick sauté, a gentle simmer, and a precise cornstarch slurry. Picture the glaze as a liquid gold that coats every bite, giving you a burst of flavor with each mouthful. And the best part? You can make it ahead of time, store it in the fridge, and pour it over fresh desserts right before serving. The glaze is a game‑changer, a secret weapon in your dessert arsenal.
Picture yourself pulling this out of the oven, the whole kitchen smelling incredible, and the glaze shimmering on a stack of cupcakes. The moment the glaze hits the surface, the sweet scent of strawberries and lemon will fill the room, drawing everyone in. I’ve seen people stare in awe as the glaze coats the cake, and it’s a moment worth capturing. Stay with me here—this is worth it. The next part? Pure magic. The next step will feel like a revelation, a step that turns a simple glaze into a showstopper.
What Makes This Version Stand Out
Flavor: The fresh strawberry base provides a natural sweetness that is far superior to canned or frozen fruit. The bright, unadulterated berry flavor sings through every bite, making the glaze a true star.
Texture: A cornstarch slurry gives the glaze a silky, glossy finish that coats desserts like a second skin. It’s thick enough to cling yet fluid enough to spread evenly.
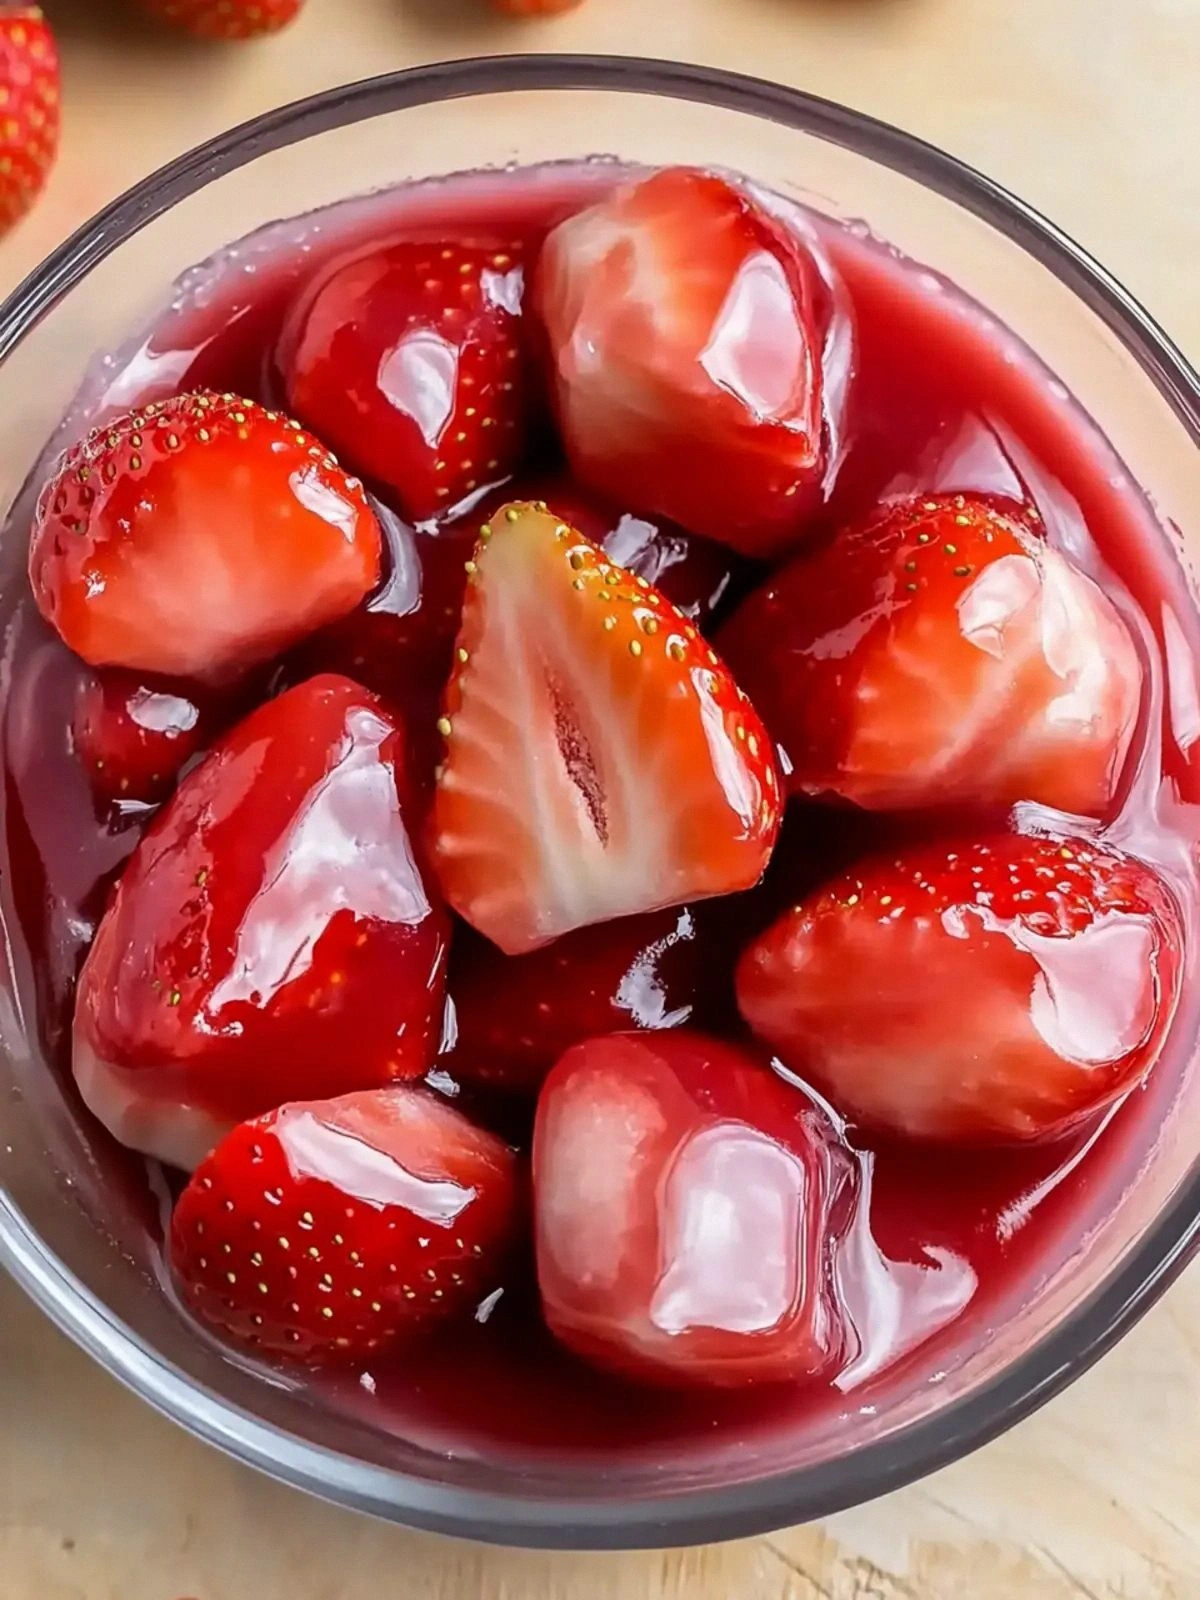
Visual Appeal: The glaze’s deep ruby hue is achieved without artificial dyes. The shine is natural, giving any dessert a polished, professional look.
Versatility: From cakes and cupcakes to pancakes and even savory dishes, this glaze can adapt. It’s the kind of sauce that can turn a plain dessert into a showstopper.
Ease of Preparation: With only seven ingredients and a few simple steps, this glaze is beginner‑friendly. No fancy equipment—just a saucepan and a fine‑mesh sieve.
Make‑ahead Potential: The glaze keeps well in the fridge for up to a week, allowing you to prep in advance for parties or last‑minute guests.
Ingredient Quality: Using fresh, ripe strawberries is key. They bring natural sugars and bright acidity that elevate the glaze beyond what any store‑bought mix can achieve.
Flavor Balance: The addition of lemon juice and vanilla extract creates a harmonic balance that prevents the sweetness from overpowering.
Alright, let’s break down exactly what goes into this masterpiece…
Inside the Ingredient List
The Flavor Base
The 2 cups of fresh strawberries are the heart of this glaze. They provide natural sweetness, bright red color, and a burst of juicy flavor. If you’re out of fresh strawberries, frozen berries work too—just thaw them and squeeze out excess liquid to avoid a watery glaze. Skipping the strawberries would turn this into a plain sugar glaze that lacks depth. The key is to use ripe, firm berries; under‑ripe ones will give a sour note that won’t balance well.
When selecting strawberries, look for ones that are bright red, slightly glossy, and firm to the touch. Avoid those with white streaks or green tips, as they indicate underripeness. If you’re buying from a farmer’s market, ask for berries that have been harvested within the last 24 hours. This ensures maximum flavor and sweetness.
The Sweetener
Half a cup of granulated sugar is enough to lift the natural tartness of the strawberries without drowning the flavor. You can swap it for honey or maple syrup for a different nuance, but remember that these alternatives add their own distinct taste. If you’re watching your sugar intake, try using a sugar substitute that measures in equal parts; just keep an eye on the glaze’s thickness.
Skipping sugar entirely will leave the glaze too tart for most desserts. The sugar also helps with the caramelization process during the reduction, giving the glaze a slight gloss and a richer mouthfeel.
The Thickening Agent
Two tablespoons of cornstarch are the secret to that silky finish. The cornstarch creates a smooth, glossy coating that won’t separate or become watery. If you’re allergic to cornstarch, arrowroot powder or tapioca starch are suitable alternatives. However, each thickening agent behaves slightly differently, so adjust the quantity to achieve the desired consistency.
Skipping the cornstarch would result in a runny glaze that would drip off desserts. The cornstarch also helps the glaze set properly when it cools, ensuring a firm yet tender coating.
The Brightener
Two tablespoons of lemon juice add a bright, citrusy lift that balances the sweetness. The acidity also helps preserve the color and prevents the glaze from turning dull. If you’re not a fan of lemon, a splash of lime or a dash of orange zest can work as a substitute.
Skipping the lemon would make the glaze taste flat and overly sweet. The acidity is also crucial for the caramelization process, as it lowers the pH and encourages a deeper color.
The Aroma Enhancer
A teaspoon of vanilla extract infuses the glaze with a warm, comforting aroma. Vanilla’s complex notes pair beautifully with strawberries, creating a flavor profile that feels both fresh and indulgent. If you’re vegan, a splash of almond or coconut extract can provide a similar depth.
Without vanilla, the glaze would lack that subtle depth that makes it feel luxurious. Vanilla also helps mellow the sharpness of lemon, creating a harmonious balance.
The Final Flourish
A fine‑mesh sieve is essential for removing seeds and any pulp that could cloud the glaze’s texture. It ensures a silky finish that glides smoothly over desserts. If you don’t have a sieve, a clean kitchen towel or cheesecloth can work, but the texture may not be as refined.
Skipping the sieve could leave your glaze gritty, which would ruin the smooth mouthfeel. The sieve also helps you achieve that glossy sheen, giving the glaze a professional look.
The Garnish
A few mint leaves add a fresh, herbal contrast that lifts the glaze’s overall flavor. Mint also provides a subtle cooling effect that balances the sweetness. If you don’t have mint, basil or a sprig of thyme can offer an interesting twist.
Skipping mint would make the glaze feel more one‑dimensional. The herb’s aroma complements the strawberry’s sweetness, adding a layer of complexity.
Everything’s prepped? Good. Let’s get into the real action…
The Method — Step by Step
- Wash and Slice: Rinse the strawberries under cold water, pat them dry, and slice off the stems. Slice them into thin wedges so they release juice quickly. This step ensures a smooth base for the glaze. If you’re in a hurry, you can crush them lightly with a fork, but be careful not to mash them into a puree.
- Combine Sugar and Lemon: In a medium saucepan, mix the granulated sugar and lemon juice. Stir until the sugar dissolves completely. The lemon juice not only adds flavor but also helps dissolve the sugar more efficiently. Keep the mixture on low heat to avoid scorching.
- Introduce Strawberries: Add the sliced strawberries to the saucepan. Stir gently to coat them in the sugar‑lemon mixture. Let the strawberries cook for about 5 minutes, allowing them to soften and release their juice. The aroma at this stage is intoxicating.
- Simmer: Increase the heat to medium and let the mixture come to a gentle simmer. Watch closely; you want a slow, steady bubble, not a rolling boil. The simmering will reduce the liquid, concentrating the flavor. When the mixture thickens slightly, the strawberries will begin to break down, forming a natural puree.
- Make the Slurry: While the strawberries are simmering, whisk 2 tablespoons of cornstarch with a splash of cold water until smooth. This slurry prevents clumps when you add it to the hot mixture. The cornstarch will thicken the glaze, giving it that glossy finish.
- Add the Slurry: Slowly pour the cornstarch slurry into the saucepan, whisking constantly. The mixture will start to thicken almost immediately. Keep whisking until the glaze is smooth and glossy, about 2–3 minutes. If the glaze becomes too thick, add a splash of water to reach your desired consistency.
- Finish with Vanilla: Remove the saucepan from heat and stir in the vanilla extract. This final touch locks in the aroma and adds a warm depth to the glaze. The vanilla also helps mellow the acidity of the lemon.
- Sieve: Pour the glaze through a fine‑mesh sieve into a clean bowl. This removes seeds and pulp, ensuring a silky finish. The sieve also helps the glaze set with a smooth texture. If you skip this step, you’ll end up with a gritty glaze that’s not ideal for delicate desserts.
- Cool and Garnish: Let the glaze cool to room temperature. Then, add a few mint leaves for a fresh herbal aroma. The mint will slightly elevate the glaze’s flavor profile, making it feel more complex. Once cooled, the glaze can be poured over cakes, pancakes, or even drizzled over ice cream.
That’s it — you did it. But hold on, I’ve got a few more tricks that’ll take this to another level…
Insider Tricks for Flawless Results
The Temperature Rule Nobody Follows
Many cooks think a low simmer is enough, but the ideal temperature is a gentle, steady boil at around 180°C (356°F). This allows the sugars to caramelize slightly, giving the glaze a richer color and deeper flavor. I once tried a low simmer, and the glaze turned out too watery. The lesson? Heat is your friend; just keep it controlled.
Why Your Nose Knows Best
If the glaze smells faintly burnt or metallic, stop the heat immediately. That’s a sign the sugar is caramelizing too quickly. The aroma is a reliable indicator of the glaze’s readiness. Trust your nose; it’s a more accurate judge than a timer.
The 5-Minute Rest That Changes Everything
After removing the glaze from heat, let it rest for 5 minutes before sieving. This pause allows the flavors to meld and the thickening process to settle. I’ve seen people rush the step and end up with a slightly runny glaze. A short rest ensures the glaze is thick enough to coat desserts without dripping.
The Perfect Sieve Trick
When sieving, press the glaze through with the back of a spoon to push any remaining pulp through. The spoon’s weight helps force the liquid through the mesh, ensuring a crystal‑clear glaze. Skipping this pressure step often leaves tiny seed remnants, which can be a texture annoyance.
The Mint Garnish Secret
Adding mint before the glaze cools infuses the liquid with fresh, aromatic oils. If you wait until after cooling, the mint’s oils dissipate. I’ve had guests ask, “Why does the glaze smell like mint?” because I added the leaves at the right moment. It’s a simple touch that elevates the overall experience.
Creative Twists and Variations
This recipe is a playground. Here are some of my favorite ways to switch things up:
Berry‑Fusion Glaze
Swap half the strawberries for fresh raspberries or blueberries. The result is a multiberry glaze that offers a complex, tart-sweet profile. Perfect over cheesecake or tiramisu.
Citrus Burst
Add a tablespoon of orange zest to the glaze for a bright citrus twist. The zest’s oils give a subtle orange note that complements the strawberry’s sweetness. Great on pancakes or French toast.
Chocolate‑Infused Delight
Stir in a tablespoon of unsweetened cocoa powder after the glaze has cooled slightly. The chocolate adds depth and makes the glaze ideal for chocolate cakes or brownies.
Herbal Touch
Replace mint with basil or rosemary for an unexpected herbal note. The herbs’ aromas mingle with the strawberries, creating a sophisticated flavor profile suitable for savory dishes like grilled chicken.
Spicy Kick
Add a pinch of cayenne pepper or a splash of hot sauce to the glaze. The heat balances the sweetness, making it a striking accompaniment to ice cream or desserts with a hint of spice.
Almond Essence
Swap vanilla for almond extract. The nutty undertone pairs wonderfully with strawberries, especially when drizzled over almond biscotti or puff pastry.
Storing and Bringing It Back to Life
Fridge Storage
Transfer the cooled glaze to an airtight container and refrigerate for up to 7 days. The glaze will thicken slightly in the fridge, so give it a gentle stir before using. The cold temperature also enhances the strawberry flavor, making it even more vibrant.
Freezer Friendly
For longer storage, freeze the glaze in a freezer‑safe container for up to 3 months. Thaw in the refrigerator overnight, then stir until smooth. The texture may separate slightly after freezing, but a quick whisk will restore its silky finish.
Best Reheating Method
Reheat the glaze gently over low heat or in a microwave on low power. Add a tiny splash of water to restore moisture if it has thickened too much. Stir until the glaze returns to a pourable consistency. The gentle reheating preserves the flavor and prevents scorching.