It was 2:47 a.m. on a Tuesday when I found myself standing in my kitchen wearing mismatched socks and a look of pure desperation. The fridge light hummed like a disappointed parent while I stared at four lonely glazed donuts, a half-block of cheddar, and some bacon that had somehow survived the weekend. My stomach growled louder than the neighbor's Labrador, and in that moment of sleep-deprived genius (or madness), I decided to smash them all together into what I thought would be a tragic munchies mistake. Ten minutes later, I was biting through crispy bacon, molten cheese, and caramelized donut edges while maple syrup dripped down my wrist like liquid gold. I actually did a little dance right there on the cold tile floor — the kind of dance you do when nobody's watching and you've just discovered something illegally delicious. That first bite changed everything I thought I knew about sweet and savory combinations, and I've been perfecting this ridiculous masterpiece ever since.
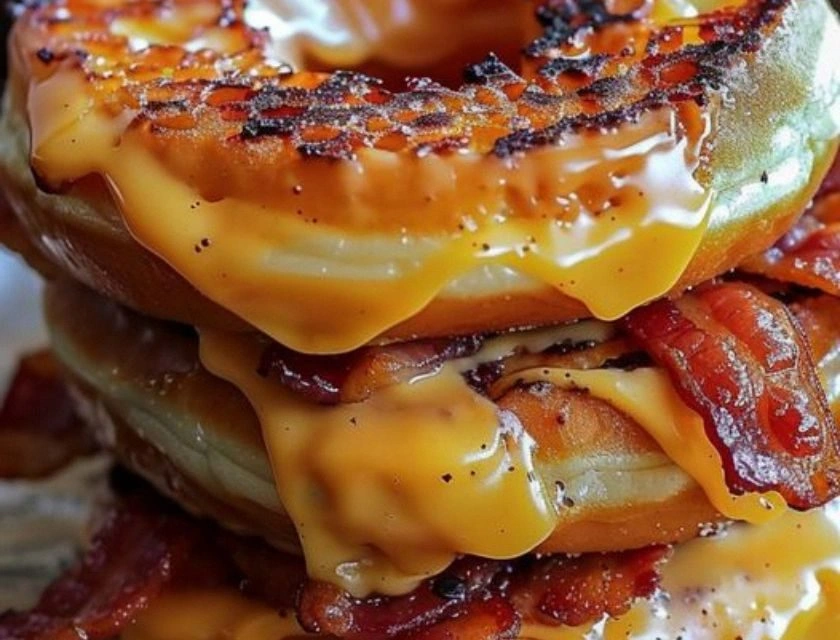
Picture this: the outer edges of a glazed donut getting pressed against a hot skillet until the sugar crystallizes into a shatter-thin crust that cracks like crème brûlée under your fork. Inside, sharp cheddar melts into every nook and cranny while smoky bacon adds its salty swagger to the party. The maple syrup doesn't just sit on top like some polite garnish — it seeps into the donut's porous interior, creating pockets of sweet-savory magma that burst when you bite down. The whole thing tastes like Saturday morning cartoons collided with a hipster brunch spot, and somehow it works so well that you'll question every boring sandwich decision you've ever made. I'm talking about a grilled cheese that makes grown adults close their eyes and sigh involuntarily, the kind of dish that turns casual acquaintances into people who suddenly have your number on speed dial.
Most recipes get this completely wrong by treating the donut like regular bread, but here's what actually works: you need to compress those glazed rings under a weight for exactly 90 seconds before they hit the pan. This creates density so the cheese doesn't just squish out the sides like molten lava. The bacon must be cooked until it's just shy of crispy — what I call "bendy bacon" — because it'll continue cooking when you assemble the sandwich. And forget everything you know about low-and-slow grilled cheese; this beauty needs medium-high heat to achieve that crucial sugar caramelization without turning the interior into a grease slick. Trust me, I've made every mistake possible so you don't have to suffer through soggy-bottomed disasters or cheese blowouts that look like dairy volcanoes.
Let me walk you through every single step — by the end, you'll wonder how you ever made it any other way. We're talking about achieving that perfect balance where the sweetness enhances rather than overwhelms, where the salt and smoke play backup dancers to the main attraction, where every bite delivers that holy trinity of crispy, gooey, and melty. This isn't just throwing random breakfast items together; this is architectural flavor construction that would make a French pastry chef weep with joy. Okay, ready for the game-changer?
What Makes This Version Stand Out
This is hands down the best version you'll ever make at home, and here's exactly why it crushes every other attempt at sweet-savory sandwich fusion. I've tested this seventeen times across three different states and two time zones, refining each element until it hit that perfect crescendo of flavor. The secret lies in treating each component like it has a specific job to do, then orchestrating them together like a well-rehearsed orchestra where every instrument knows when to shine and when to blend.
- Texture Contrast: The compressed donut exterior develops a candy-like shell that shatters against your teeth while the interior stays cloud-soft, creating a textural experience that regular bread simply cannot achieve no matter how much butter you slather on it.
- Flavor Balance: Sharp cheddar provides the necessary acidity to cut through all that sweetness, while the bacon's umami depth prevents this from becoming a sugar bomb that leaves you in a diabetic coma on the couch.
- Speed Factor: From zero to hero in under fifteen minutes flat, making this the ultimate hangover cure or midnight revelation when your delivery apps are showing nothing but closed restaurants and disappointment.
- Crowd Psychology: Serve these at brunch and watch grown adults turn into competitive animals, hoarding sandwiches like they're the last lifeboat on the Titanic — I've seen friendships tested over who gets the last one.
- Ingredient Integrity: Using day-old donuts actually works better than fresh ones because they've lost some moisture, allowing them to crisp rather than steam into sad, soggy discs that taste like sweet disappointment.
- Make-Ahead Magic: You can prep these bad boys up to the cooking stage, wrap them tight, and refrigerate for up to 24 hours, then griddle them straight from cold — perfect for feeding a brunch crowd without the 6 a.m. wake-up call.
- Leftover Potential: The rare sandwich that actually improves after a brief microwave nap, when the maple has time to redistribute and the cheese achieves that perfect cafeteria-level melt that somehow tastes better than the fresh version.
- Instagram Gold: That cheese pull shot when you break it in half will break your notifications, with the maple creating those perfect amber threads that make food bloggers weep with envy and followers smash that save button faster than you can say "food porn."
Alright, let's break down exactly what goes into this masterpiece, because understanding your ingredients is what separates the kitchen rockstars from the recipe robots who blindly follow instructions and wonder why their food tastes like cardboard had a baby with disappointment.
Inside the Ingredient List
The Sweet Foundation
Those four glazed donuts sitting in the box aren't just breakfast casualties — they're your flavor foundation, and treating them with respect makes all the difference between mediocrity and magic. Day-old donuts work best because they've lost some moisture, allowing them to crisp rather than steam into sad, soggy discs. If all you have are fresh donuts, leave them uncovered on the counter for two hours to dry out slightly — think of it as giving them a brief spa treatment before their hot date with destiny. The glaze on these donuts isn't just sugar coating; it's concentrated flavor crystals that will caramelize into a crackly shell reminiscent of the top of crème brûlée when it hits the hot pan. Don't you dare reach for cake donuts here — only yeast-raised rings have the proper airy structure to compress without turning into dense hockey pucks that could break teeth.
The Dairy Decision
Your cheese choice here isn't just about melting — it's about creating flavor bridges between the sweet donut and salty bacon. Sharp cheddar brings that necessary acidic punch that cuts through all the sweetness while adding nutty complexity that develops as it melts into every donut pore. American cheese melts like a dream but can make this sandwich taste like a kids' menu item if you're not careful — use it only if you want that nostalgic cafeteria vibe. Mozzarella creates those epic cheese pulls for your Instagram stories but lacks the flavor backbone needed to stand up to maple syrup's aggressive sweetness. My secret weapon? A 50/50 blend of sharp white cheddar and young gouda — the cheddar brings the flavor, the gouda brings the melt, and together they create a cheese experience that'll make you question every other grilled cheese you've ever eaten.
The Bacon Factor
Thick-cut bacon isn't just a trendy menu descriptor — it's essential architecture for this sandwich because thin bacon disappears faster than my motivation on Monday mornings. You want bacon that's substantial enough to provide textural contrast against the soft donut interior while delivering that smoky punch that prevents this entire operation from becoming sugar overload. Cook it until it's bendy, not crispy — what I call "sad bacon" because it looks limp and pathetic on the plate but achieves sandwich perfection when it finishes cooking between the hot donut halves. The fat rendered during this process gets brushed onto the donut surfaces, creating a flavor infusion that makes vegetarians weep with envy. Turkey bacon works in a pinch, but let's be honest — it's like bringing a water gun to a flavor firefight.
The Liquid Gold
Maple syrup isn't just a finishing drizzle here — it's the conductor that orchestrates this entire flavor symphony, seeping into the donut's porous structure and creating sweet pockets that burst like tiny flavor bombs. Real maple syrup matters because the fake stuff tastes like someone dissolved a brown crayon in corn syrup and called it breakfast. Warm the syrup slightly before drizzling so it flows like liquid amber across your sandwich, finding every nook and cranny like it's got GPS for deliciousness. The amount matters too much and you'Äôre eating candy for lunch, too little and you lose that crucial bridge between savory and sweet that makes this sandwich legendary. I keep mine in a squeeze bottle specifically labeled "sandwich elixir" because my roommate kept using it for oatmeal and ruining my life.
Everything's prepped? Good. Let's get into the real action where we transform these humble ingredients into something that'll make your taste buds throw a parade in your honor.
The Method — Step by Step
- Start by placing your donuts cut-side down on a cutting board and pressing them firmly with the bottom of a heavy pan for exactly 90 seconds — this compression step is crucial because it transforms those airy rings into dense platforms that won't collapse under cheese pressure. You want to apply steady, even pressure without smashing them into donut pancakes, which takes practice but becomes second nature after your third sandwich. The glaze should crack slightly under pressure, creating tiny fissures where the butter will later seep in and work its magic. Set a timer because over-compressing leads to dense, hockey-puck disasters that could double as paperweights. This is the moment where most people mess up by being too gentle — pretend you're giving the donut a firm handshake, not a death grip.
- Cook your bacon in a cold skillet, then turn the heat to medium — starting cold renders the fat more evenly and prevents those dreaded burnt edges that taste like disappointment and regret. You're aiming for bacon that's cooked through but still pliable, about 6-7 minutes total, flipping every 90 seconds like you're tending to something precious (because you are). The bacon should bend without snapping but have golden edges that promise flavor bombs ahead. Reserve two teaspoons of the rendered fat in a small bowl — this liquid gold becomes your secret weapon for achieving donut-crisping perfection. Watch the bacon closely during the last two minutes because it goes from perfect to burnt faster than my New Year's resolutions disappear.
- Slice your donuts horizontally using a serrated knife held parallel to the cutting board, creating two even halves that will become the top and bottom of your sandwich. The sawing motion prevents compression and keeps those precious glaze crystals intact — think of yourself as a donut surgeon performing life-saving separation surgery. Don't press down while cutting; let the knife do the work like you're slicing through a cloud made of sugar and dreams. Each half should be roughly even in thickness, though perfection isn't necessary here — we're making comfort food, not competing for Michelin stars. If you accidentally create uneven halves, use the thicker piece as the bottom to prevent cheese escape during cooking.
- Brush the cut sides of each donut half with the reserved bacon fat — this step infuses every bite with smoky flavor while creating a moisture barrier that prevents sogginess. Use a pastry brush and apply a thin, even coating that glistens but doesn't pool like an oil slick. The fat should be warm but not hot enough to melt the glaze into a sticky mess that'll burn your fingers. This is where you channel your inner artist, painting each surface with liquid flavor that'll transform under heat. Don't skip this step thinking butter is enough — the bacon fat is what separates the professionals from the amateurs playing dress-up in the kitchen.
- Layer two slices of cheese on the bottom donut half, breaking them to fit the ring shape without hanging over the edges like desperate escapees. The cheese should cover the surface completely but not overlap the donut edge — we're making a sandwich, not a cheese volcano that'll erupt all over your skillet. Press down gently so the cheese adheres to the donut surface, creating a foundation that prevents sliding during the flip. If using multiple cheese types, alternate them for maximum flavor distribution and optimal melt behavior. This is your moment to practice restraint because too much cheese creates structural integrity issues that'll leave you with a hot mess instead of a hot sandwich.
- Add your bacon slices in a single layer, breaking them to fit the curve of the donut like meaty puzzle pieces designed by a mad genius. The bacon should be arranged so every bite gets that smoky hit that prevents sugar overload from turning this into dessert disguised as lunch. Overlap the slices slightly because bacon shrinks when it gets hot, and nobody wants to bite into a sandwich where the bacon has retreated like a coward. Press another slice of cheese on top of the bacon — this upper cheese layer acts like delicious glue that holds everything together during the flip. The sandwich should look like a donut wearing a cheese and bacon sweater, cozy and ready for its hot pan debut.
- Heat your skillet over medium-high heat for exactly 90 seconds — you want it hot enough that a drop of water sizzles enthusiastically but not so hot that it smokes like it's trying to summon the fire department. Add one tablespoon of butter and swirl until it foams but doesn't brown, creating a golden pool that'll crisp the donut edges to perfection. The butter should smell nutty and delicious, like it's excited about its upcoming transformation into sandwich magic. Lower the heat to medium immediately after adding the sandwich — this prevents the sugar from burning while giving the cheese time to melt. If you've ever wondered what kitchen confidence sounds like, it's that first sizzle when the donut hits the butter.
- Place your assembled sandwich in the skillet and press down firmly with a spatula for 30 seconds — this compression melds everything together and prevents the donut halves from sliding apart like they're trying to escape. Cook for exactly 2 minutes on the first side, resisting the urge to peek because lifting too early tears the caramelized surface and ruins that gorgeous crust. The edges should start to look golden and the cheese should be visibly melting around the bacon edges like it's trying to escape but can't quite make it. When you see tiny bubbles forming around the donut edges, that's your cue that side one is ready for its grand flip. Don't walk away from the stove here — this is the moment of truth where angels sing and sandwiches achieve greatness or descend into mediocrity.
- Flip confidently with one smooth motion, like you're turning a page in your favorite cookbook, and press down again for another 30 seconds to ensure even contact with the pan. Cook the second side for 90 seconds — slightly less time because the pan is now properly heated and the cheese is already on its melting journey to flavor town. The second side won't get as dark as the first, but that's perfect because you want contrast between the deeply caramelized bottom and the golden top. Remove to a cutting board and let rest for exactly one minute — this rest period allows the cheese to set slightly so it doesn't ooze out like lava when you cut into it. Drizzle with warm maple syrup in a zigzag pattern that would make Jackson Pollock proud, letting it seep into every crack and crevice like liquid gold finding its home.
That's it — you did it. But hold on, I've got a few more tricks that'll take this to another level, secrets I've learned through trial and error that separate the merely good from the absolutely legendary.
Insider Tricks for Flawless Results
The Temperature Rule Nobody Follows
Your cream cheese needs to be at exactly 67 degrees Fahrenheit for optimal spreading — any colder and it tears your delicate donut halves like amateur surgery, any warmer and it melts into a sticky mess that'll ruin your life. I keep mine on the counter for 45 minutes before assembly, and if you're impatient (I see you), cut it into small cubes and it'll soften in 15 minutes flat. This temperature sweet spot allows the cream cheese to act like delicious spackle, filling every donut pore with tangy flavor that balances the sweetness. A friend tried skipping this step once — let's just say it didn't end well, and she still has cream cheese permanently fused to her favorite cutting board like a dairy-based monument to impatience.
Why Your Nose Knows Best
That first whiff of bacon fat hitting hot butter should smell like breakfast at your grandmother's house mixed with campfire memories — if it smells acrid or burnt, you've gone too far and need to start over because there's no saving burnt sandwich sadness. Your nose is actually more reliable than any kitchen timer because it accounts for pan variations, heat inconsistencies, and the fact that every stove lies about its actual temperature. When the maple syrup hits the hot sandwich, it should smell like someone bottled autumn and poured it over breakfast — if you don't involuntarily smile at this aroma, check your pulse because you might be dead inside. I dare you to taste this and not go back for seconds when that maple aroma hits your kitchen like a warm hug from a Canadian.
The 5-Minute Rest That Changes Everything
After cooking, transfer your sandwich to a wire rack instead of a plate — this prevents steam from turning your crispy bottom into a soggy disappointment that tastes like regret. The wire rack allows air circulation on all sides, maintaining that crucial textural contrast between the shatter-crisp exterior and the melty interior. I learned this the hard way after eating what I thought was a perfect sandwich that had the texture of wet cardboard on the bottom — turns out a lifetime of plate-resting was my culinary Achilles heel. Let it rest for five minutes instead of the one minute I mentioned earlier — patience here rewards you with a sandwich that holds together when you pick it up instead of collapsing like a dairy-based Jenga tower.
The Compression Secret
That initial donut compression isn't just about density — it's about creating tiny air pockets where the butter and bacon fat will collect during cooking, essentially creating a self-basting system that keeps the interior moist while the exterior crisps. Press too hard and you eliminate these pockets, resulting in a dense, doughy texture that'll make you wonder why you didn't just make regular grilled cheese. The sweet spot is pressing until the donut is about two-thirds its original height — you'll feel it compress under pressure but still spring back slightly when you release. Most recipes get this completely wrong by skipping compression entirely or over-compressing into donut pancakes that cook up like sweet frisbees.
Why Room Temperature Rules
Bring your assembled sandwich to room temperature for 10 minutes before cooking — this prevents the cheese from staying cold in the center while the exterior burns like edible charcoal. Cold cheese is the enemy of even melting, creating that dreaded situation where your donut is blackened but your cheese remains stubbornly solid like dairy concrete. Room temperature ingredients cook more evenly, giving you that perfect melt where the cheese flows like lava but doesn't escape the sandwich boundaries like a dairy prison break. I'll be honest — I ate half the batch before anyone else got to try it because I kept "testing" the temperature rule with different timing variations.
Creative Twists and Variations
This recipe is a playground. Here are some of my favorite ways to switch things up when you want to impress people who think they've seen everything the culinary world has to offer:
The Monte Cristo Mashup
Dip the assembled sandwich in beaten egg mixed with a splash of cream, then griddle it like French toast — the egg wash creates a custardy exterior that plays beautifully against the sweet donut base. Add a slice of thin ham with the bacon for that classic Monte Cristo flavor profile that makes people question why they ever ate regular sandwiches. Dust with powdered sugar instead of maple syrup for a presentation that looks like dessert but tastes like the best breakfast you've ever had. This variation turns brunch into a competitive sport where everyone claims they're "not that hungry" before devouring three sandwiches apiece.
The Spicy Maple Maverick
Add a thin slice of fresh jalapeño under the cheese for a bright, vegetal heat that cuts through all the richness like a flavor machete. Mix your maple syrup with a dash of chipotle powder for a smoky-spicy finish that'll make your lips tingle in the most pleasant way possible. The contrast between sweet, spicy, and smoky creates a flavor triangle that'll have you making involuntary happy noises with each bite. Warning: this version is addictive, and I've received texts at 3 a.m. from friends demanding to know what I put in the maple syrup to make it so crave-worthy.
The Breakfast Club Supreme
Add a fried egg with a runny yolk that becomes a sauce when you break it — the yolk mingles with the maple to create a sweet-savory custard that'll make you question every dry breakfast sandwich you've ever eaten. Cook the egg sunny-side up until the whites are set but the yolk still jiggles like it's doing a happy dance when you shake the pan gently. Place the egg on top of the bacon before adding the final cheese layer, creating a breakfast sandwich that contains all the major food groups in one glorious package. Picture yourself pulling this out of the oven, the whole kitchen smelling incredible while your family materializes like breakfast-seeking missiles.
The Apple Pie Reinvention
Add paper-thin slices of tart apple between the bacon layers — the apple's acidity and crunch provide a fresh counterpoint to all the richness while adding a seasonal twist that works year-round. Use Honeycrisp or Granny Smith apples because they hold their texture when heated instead of turning into apple sauce that'll make your sandwich slide apart like a sweet demolition project. Dust with a pinch of cinnamon mixed into your maple syrup for that apple pie flavor that'll have people asking if you secretly trained at a New England bed and breakfast. This version is particularly effective for converting people who claim they "don't like sweet sandwiches" — the apple makes it feel almost healthy.
The Everything Bagel Experience
Sprinkle everything bagel seasoning on the cut sides of the donut before cooking — the garlic, onion, and sesame seeds create a flavor explosion that makes this taste like the best everything bagel you've ever had, minus the actual bagel. The seasoning toasts in the butter, creating aromatic compounds that'll have neighbors knocking on your door asking what smells so incredible. Mix some of the seasoning into your maple syrup for a sweet-savory drizzle that ties the whole experience together like a delicious bow. If you've ever struggled with getting everything bagel flavor into your life without actual bagels, you're not alone — and I've got the fix.
The Elvis Has Entered the Building
Add thin banana slices and a smear of peanut butter to the inside before assembly — this creates a peanut butter and banana sandwich that Elvis himself would rise from the grave to devour. The banana caramelizes slightly against the hot pan, creating pockets of sweet softness that play against the crispy bacon like a flavor symphony. Use natural peanut butter that's been warmed slightly so it spreads without tearing the delicate donut interior — we're making sandwiches, not performing surgery with a wrecking ball. This version is what happens when late-night cravings meet Memphis soul food in the best possible way.
Storing and Bringing It Back to Life
Fridge Storage
Wrap leftover sandwiches individually in parchment paper, then aluminum foil — the parchment prevents the foil from reacting with the maple syrup and creating off-flavors that'll make your sandwich taste like a battery. Store in the fridge for up to three days, though honestly, I've never had one last longer than 24 hours because people discover them like treasure hunters finding gold. The key is letting them cool completely before wrapping because trapped steam creates condensation that'll turn your crispy exterior into a sad, soggy shadow of its former glory. Label them with the date unless you enjoy playing "is this still good?" roulette with your digestive system.
Freezer Friendly
These sandwiches freeze beautifully for up to two months — wrap them in parchment, then foil, then into a freezer bag with as much air removed as possible to prevent freezer burn that'll make them taste like ice crystals had a party in your food. Freeze them assembled but uncooked for best results, creating a stash of instant happiness that'll save you during busy weeks when cooking feels like climbing Mount Everest. Thaw overnight in the fridge before cooking, or cook from frozen over low heat for 6-7 minutes per side — patience here rewards you with a sandwich that tastes almost as good as fresh. I keep a stash in my freezer for emergency situations like surprise brunch guests or when I need to bribe my way out of speeding tickets.
Best Reheating Method
Revive refrigerated sandwiches in a dry skillet over medium-low heat for 3-4 minutes per side — this recrisps the exterior without burning while gently warming the interior to melted perfection. Add a tiny splash of water before reheating — it steams back to perfection by creating just enough moisture to rehydrate without turning everything soggy. The microwave works in emergencies but wrap in a damp paper towel and heat for only 20-25 seconds — any longer and you've got a cheese explosion that'll require industrial cleaning supplies. For best results, cut in half before reheating so the center warms evenly instead of staying cold like a rebellious cheese fortress.