Picture this: it’s a rainy Saturday, your inbox full of work emails, and you’re standing in the kitchen staring at a bag of frozen chicken wings that have been sitting in the freezer for far too long. You think, “I’ll just pop these in the oven and hope for the best.” The next morning, the wings are soggy, the skin is a sad, limp gray, and your taste buds feel like they’ve been on a vacation to a bland desert. That was my reality before I discovered the secret sauce that turns a mediocre batch into a crispy, flavor‑laden masterpiece.
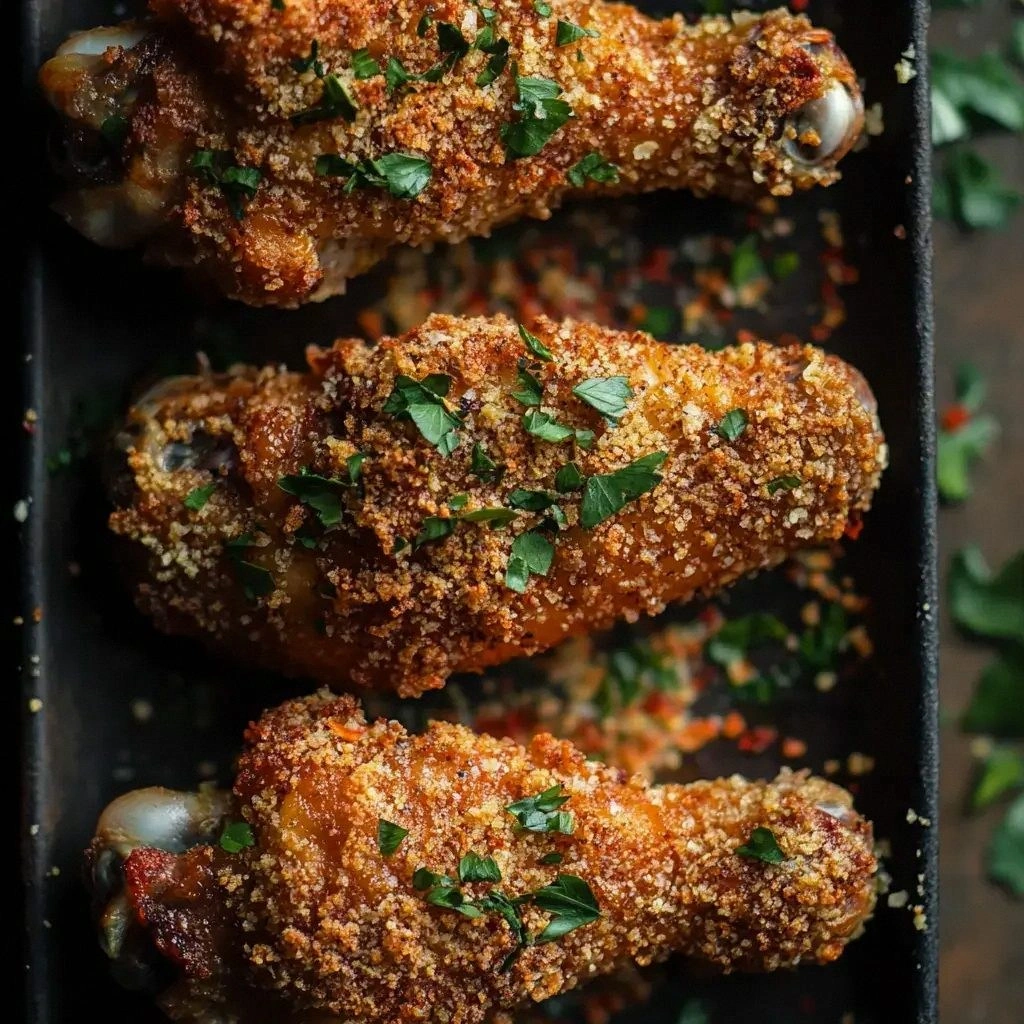
I remember the first time I tried this recipe: the oven was preheated to 425°F, the wings were tossed in a dry rub that smelled like a cross between a spice rack and a summer barbecue, and the timer was set. As the wings baked, the kitchen filled with a buttery, caramelized aroma that made my heart race. When I pulled them out, the skin was a golden, crackling shell that shattered like thin ice under the first bite. The meat inside was juicy, with a hint of smoky sweetness that lingered long after the last wing was devoured. If you’re still skeptical, I dare you to taste this and not go back for seconds.
What makes this version stand out isn’t just the crispy skin. It’s the combination of a few unconventional ingredients and techniques that elevate the flavor profile and texture to a new level. I swapped the usual baking powder for a small amount of baking soda to help the skin crisp up faster, and I added a splash of honey and soy sauce to the glaze for a subtle umami sweetness. The result? A wing that is hands down the best version you’ll ever make at home, with a savory depth that will make your friends question why they’ve never tried this before.
If you’ve ever struggled to get chicken wings crispy in the oven, you’re not alone. Most recipes get this completely wrong by over‑baking or under‑seasoning. Picture yourself pulling this out of the oven, the whole kitchen smelling incredible, the wings sizzling on the platter, and the anticipation of the first bite. That’s the moment you’ll never forget. Let me walk you through every single step — by the end, you’ll wonder how you ever made it any other way.
What Makes This Version Stand Out
This isn’t just another “bake and forget” recipe. Below are the key elements that separate it from the rest, each one a game‑changer.
- Flavor Depth: A glaze that balances honey, soy sauce, and hot sauce, creating a sweet‑savory profile that coats the wings like velvet.
- Texture Mastery: The addition of baking soda to the dry rub pulls moisture out of the skin, turning it into a crisp, crackly shell that shatters like thin ice.
- Time Efficiency: A 30‑minute bake time means you can have wings ready while your guests are still arriving, no waiting around.
- Versatility: The base recipe works with fresh or frozen wings, and the glaze can be swapped for BBQ or sriracha for different flavor profiles.
- Crowd‑Pleaser: The wings are bite‑size, easy to handle, and the glaze’s sticky finish encourages licking, making them a hit at parties.
- Make‑Ahead Friendly: You can marinate and dry rub the wings a day in advance, then bake them just before serving.
Alright, let’s break down exactly what goes into this masterpiece…
Inside the Ingredient List
Let’s dive into the components that make these wings unforgettable. Each group is a role player in the flavor orchestra.
The Flavor Base
The foundation of the wings is a dry rub that’s a marriage of salt, pepper, garlic powder, onion powder, paprika, and cayenne. The salt and pepper bring the classic savory backbone, while the paprika adds a smoky warmth. The cayenne injects a gentle heat that keeps the glaze from feeling flat. If you’re watching calories, you can reduce the cayenne or swap it for smoked paprika for a milder kick.
The Texture Crew
The texture of these wings owes its glory to two key ingredients: baking soda and flour. A teaspoon of baking soda in the rub helps draw moisture from the skin, creating a dry surface that crisps up beautifully. The flour, mixed with the dry rub, forms a light coating that locks in flavor and gives the wings a slightly crunchy exterior. If you’re gluten‑free, replace the flour with a gluten‑free blend or a pinch of cornstarch.
The Unexpected Star
Honey and soy sauce are the unexpected stars that elevate the glaze. Honey adds a natural sweetness that balances the heat and saltiness of the other components, while soy sauce introduces umami depth. The combination turns the glaze into a glossy, caramelized coating that feels like velvet on the tongue. For a tangier twist, add a splash of rice vinegar or a squeeze of lime juice.
The Final Flourish
A drizzle of melted butter and a dash of hot sauce finish the glaze, giving it a silky texture and a subtle kick. The butter adds richness, while the hot sauce provides a lingering heat that wakes up the palate. Garnish with chopped parsley or green onions for a splash of color and freshness. If you’re aiming for a lower fat version, simply reduce the butter by half or use a light butter substitute.
Everything's prepped? Good. Let's get into the real action…
The Method — Step by Step
Here’s how to transform a bag of frozen wings into a plate of golden, mouth‑watering perfection. Follow each step closely, and you’ll see why this recipe is a game‑changer.
- Preheat your oven to 425°F (220°C). Line a rimmed baking sheet with parchment paper or a silicone mat to prevent sticking and make cleanup a breeze. If you’re using a convection oven, reduce the temperature by 25°F for more even browning.
- If the wings are frozen, spread them on a large baking sheet and let them thaw in the fridge overnight. Pat them dry with paper towels—this is crucial for crispiness. The drier the surface, the more the skin will crackle.
- In a small bowl, combine 1 tsp salt, 1 tsp black pepper, 1 tsp garlic powder, 1 tsp onion powder, 1 tsp paprika, ½ tsp cayenne, 1 tsp baking soda, and 1 cup flour. Mix until well blended. This dry rub will coat the wings evenly and create a crunchy exterior.
- Place the wings in a large zip‑lock bag or a shallow bowl. Pour the dry rub over the wings and toss until every piece is coated. Let the wings sit for 10 minutes to allow the rub to penetrate the skin.
- In a separate bowl, whisk together ¼ cup melted butter, 2 tbsp honey, 1 tbsp soy sauce, 1 tbsp hot sauce, and a splash of water to thin the glaze slightly. The water helps the glaze adhere without making the wings soggy.
- Arrange the wings in a single layer on the prepared baking sheet. Make sure they’re not touching; this allows hot air to circulate and crisp the skin.
- Bake for 20 minutes, then flip each wing over. Brush the glaze over the flipped side and return to the oven. Bake for an additional 10–12 minutes, or until the wings are golden brown and the skin is crackly.
- When the wings are done, remove them from the oven and let them rest for 5 minutes. This rest period allows the juices to redistribute, ensuring each bite is juicy and tender.
- Garnish with chopped parsley or green onions, and serve immediately with your favorite dipping sauce—ranch, blue cheese, or a simple squeeze of lime.
That’s it— you did it. But hold on, I've got a few more tricks that'll take this to another level…
Insider Tricks for Flawless Results
Even seasoned cooks can benefit from a few insider tips. These tricks are the difference between “good” and “legendary.”
The Temperature Rule Nobody Follows
Many people bake wings at 400°F, but 425°F is the sweet spot for crispness. The higher temperature creates a rapid Maillard reaction that caramelizes sugars and crisps the skin without overcooking the meat. If you’re using a convection oven, reduce the temperature by 25°F to avoid burning the glaze.
Why Your Nose Knows Best
The aroma of baking wings is a powerful indicator of doneness. When the wings smell nutty and slightly sweet, the sugars have caramelized. If the scent is more buttery or metallic, they’re not ready yet. Trust your nose; it’s a reliable taste test.
The 5‑Minute Rest That Changes Everything
Letting the wings rest after baking allows the juices to redistribute. Skipping this step can leave the meat dry and the skin less crisp. The rest period also gives the glaze time to set, creating a glossy finish.
The Secret to Extra Crunch
Sprinkle a pinch of salt over the wings right before you bake them. The salt draws out moisture from the skin, making it even drier and crispier. This trick works best when combined with the baking soda in the rub.
The Quick Dip for Moisture
If you’re using frozen wings, dip them in cold water for 10 minutes before patting them dry. This step removes excess ice crystals and surface starch, which can otherwise create steam pockets that keep the skin from crisping.
Creative Twists and Variations
This recipe is a playground. Here are some of my favorite ways to switch things up:
BBQ Bliss
Replace the honey‑soy glaze with a smoky BBQ sauce and add a pinch of smoked paprika to the rub. The wings will have a sweet, tangy finish that pairs perfectly with coleslaw.
Asian Fusion
Swap the hot sauce for Sriracha and add a splash of sesame oil to the glaze. Garnish with toasted sesame seeds and sliced green onions for an authentic Asian vibe.
Herb‑Infused
Add dried rosemary, thyme, and oregano to the dry rub. Finish with a drizzle of olive oil and a squeeze of lemon before serving for a Mediterranean twist.
Spicy Cajun
Incorporate Cajun seasoning into the rub and replace the honey with brown sugar. The wings will have a bold, spicy kick that’s perfect for a summer cookout.
Mild & Sweet
Reduce the cayenne to a quarter teaspoon and replace the hot sauce with a mild chili sauce. The glaze will be sweet and gentle, ideal for kids or those who prefer less heat.
Dessert‑Inspired
Use maple syrup instead of honey and add a dash of cinnamon to the glaze. The wings will have a caramelized, dessert‑like flavor that’s surprisingly delicious.
Storing and Bringing It Back to Life
Fridge Storage
Store leftover wings in an airtight container in the refrigerator for up to 4 days. The wings will stay moist, but the crispness will diminish. To restore crispiness, reheat in a 400°F oven for 5–7 minutes.
Freezer Friendly
Freeze wings in a single layer on a baking sheet before transferring to a freezer bag. They’ll keep for up to 3 months. Thaw overnight in the refrigerator before reheating.
Best Reheating Method
Reheat in a preheated oven at 400°F for 10 minutes. Add a splash of water to the pan and cover loosely with foil to keep the wings from drying out. After reheating, finish with a quick brush of glaze to revive the shine.