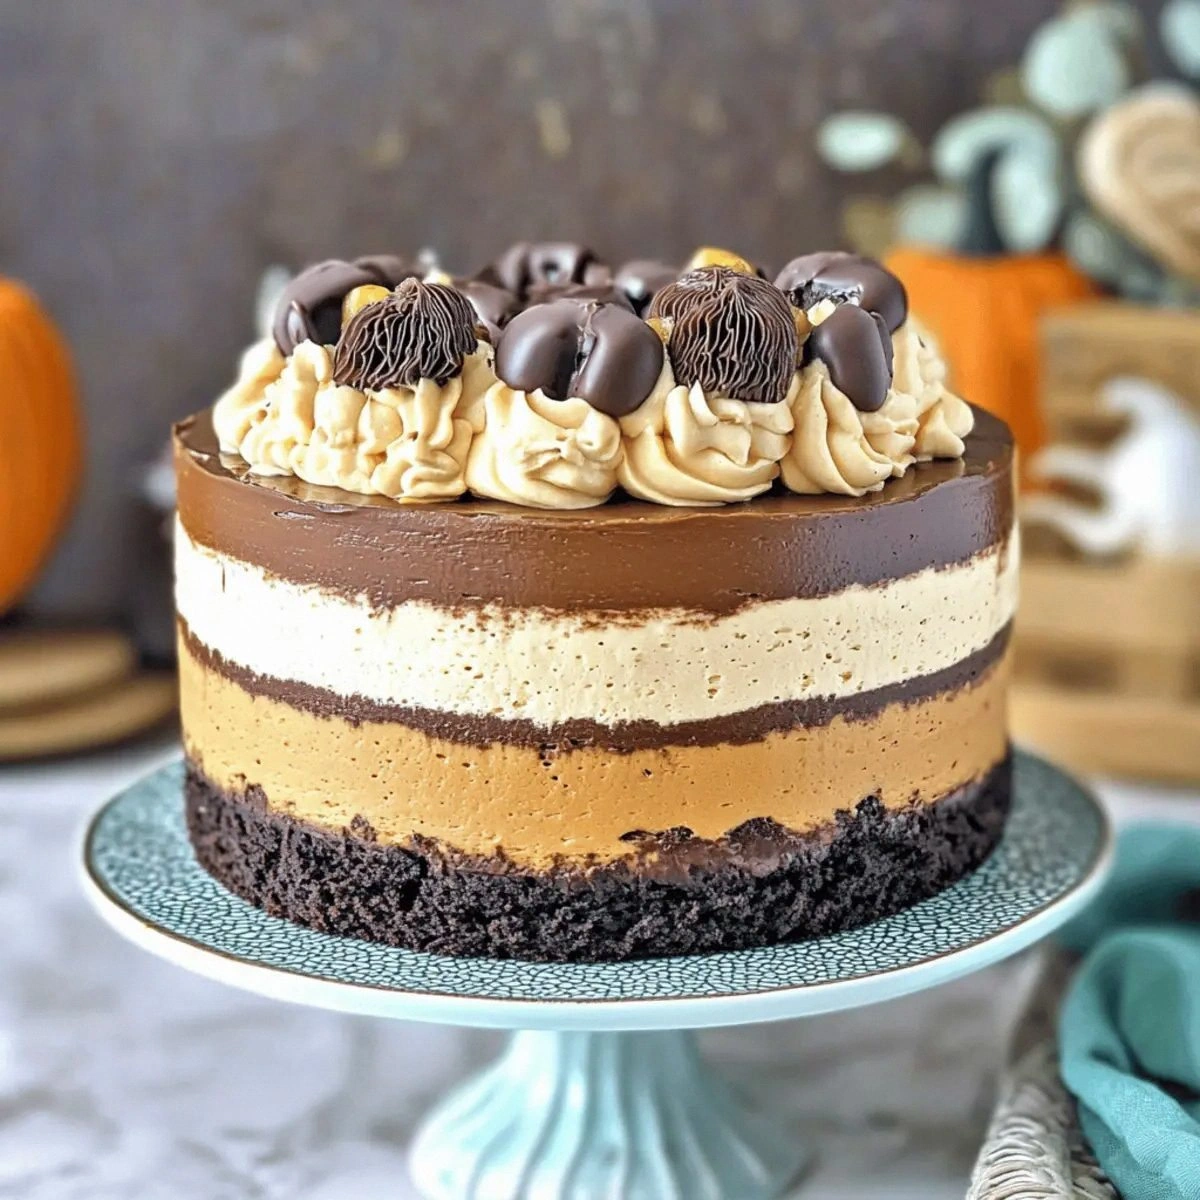
I burned my tongue so badly on a store-bought baked pear last winter that I swore off the whole concept for months. There I was, standing in my kitchen at midnight, hungry and hopeful, biting into what looked like a harmless syrupy pear from the grocery store's "fancy" section. The lava-hot core scalded me, the flavor was flat, and the texture had turned to baby food. I tossed the rest in the trash, muttered a few choice words, and then—because food obsession runs deep—started scribbling notes for the pear I wished had existed. I wanted something that held its shape like a proud little edible sculpture, something that smelled like December in a log cabin, something that balanced honeyed sweetness with a nutty crunch. Most recipes get this completely wrong, baking the pears until they collapse into mush and drowning them in so much sugar the fruit's own perfume gets bullied out of the room. Trust me, I tested ten popular versions and every single one tasted like a scented candle. So I went rogue, trimmed the sugar, shortened the bake, and stuffed the pears with a cinnamon-nut mixture that toasts itself while the fruit gently warms. Picture yourself pulling this out of the oven, the whole kitchen smelling incredible, steam curling up like you're inside a cinnamon roll. If you've ever struggled with baked fruit that ends up either raw or baby-food soft, you're not alone—and I've got the fix. Let me walk you through every single step—by the end, you'll wonder how you ever made it any other way.
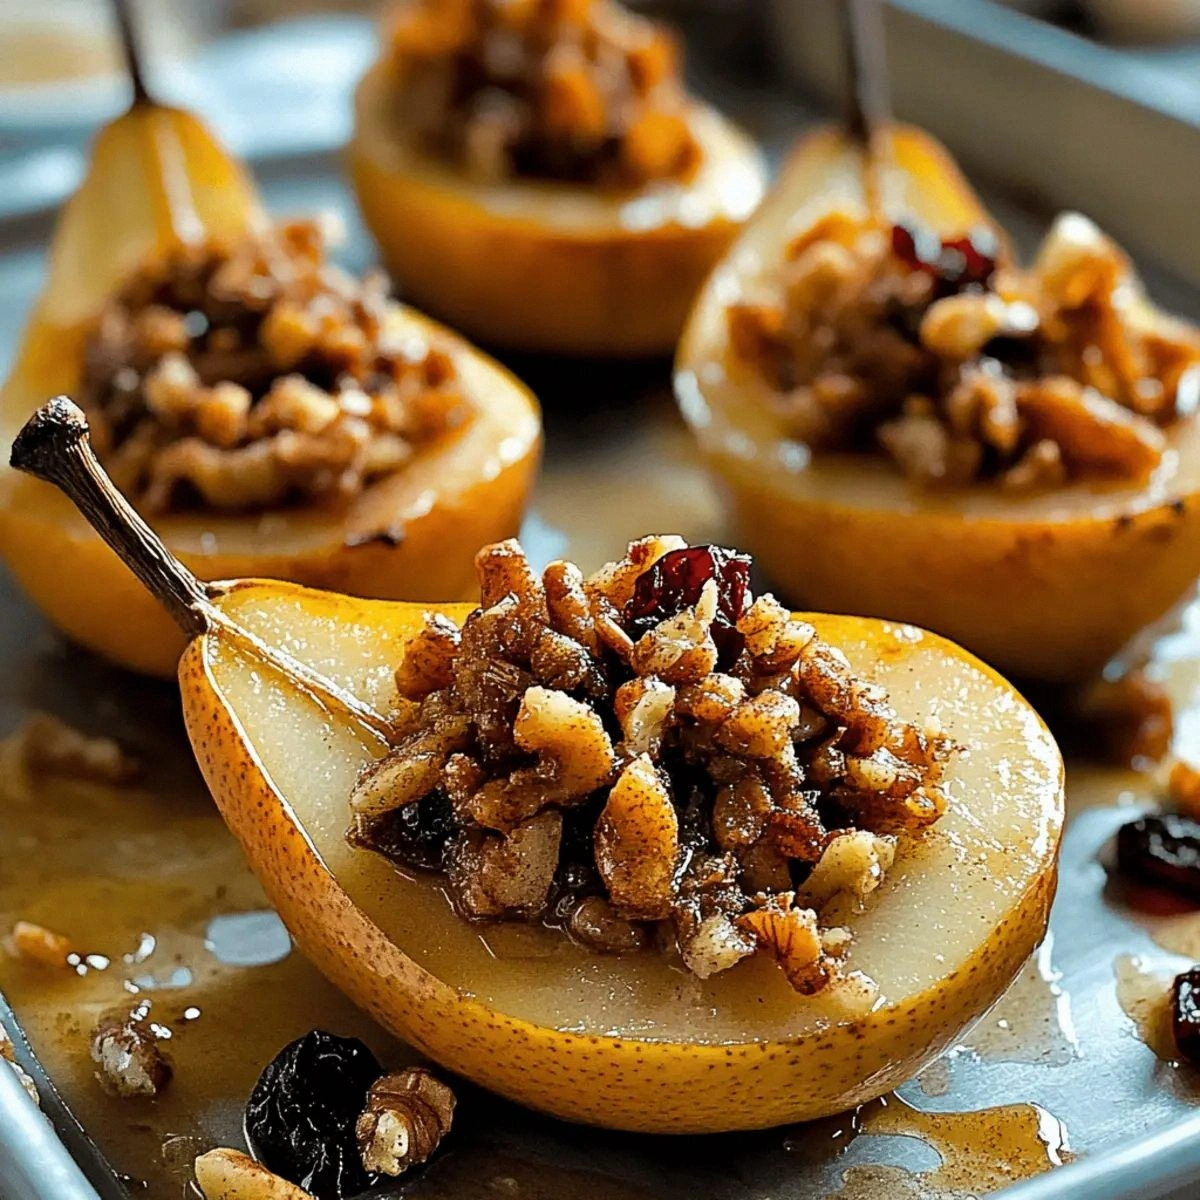
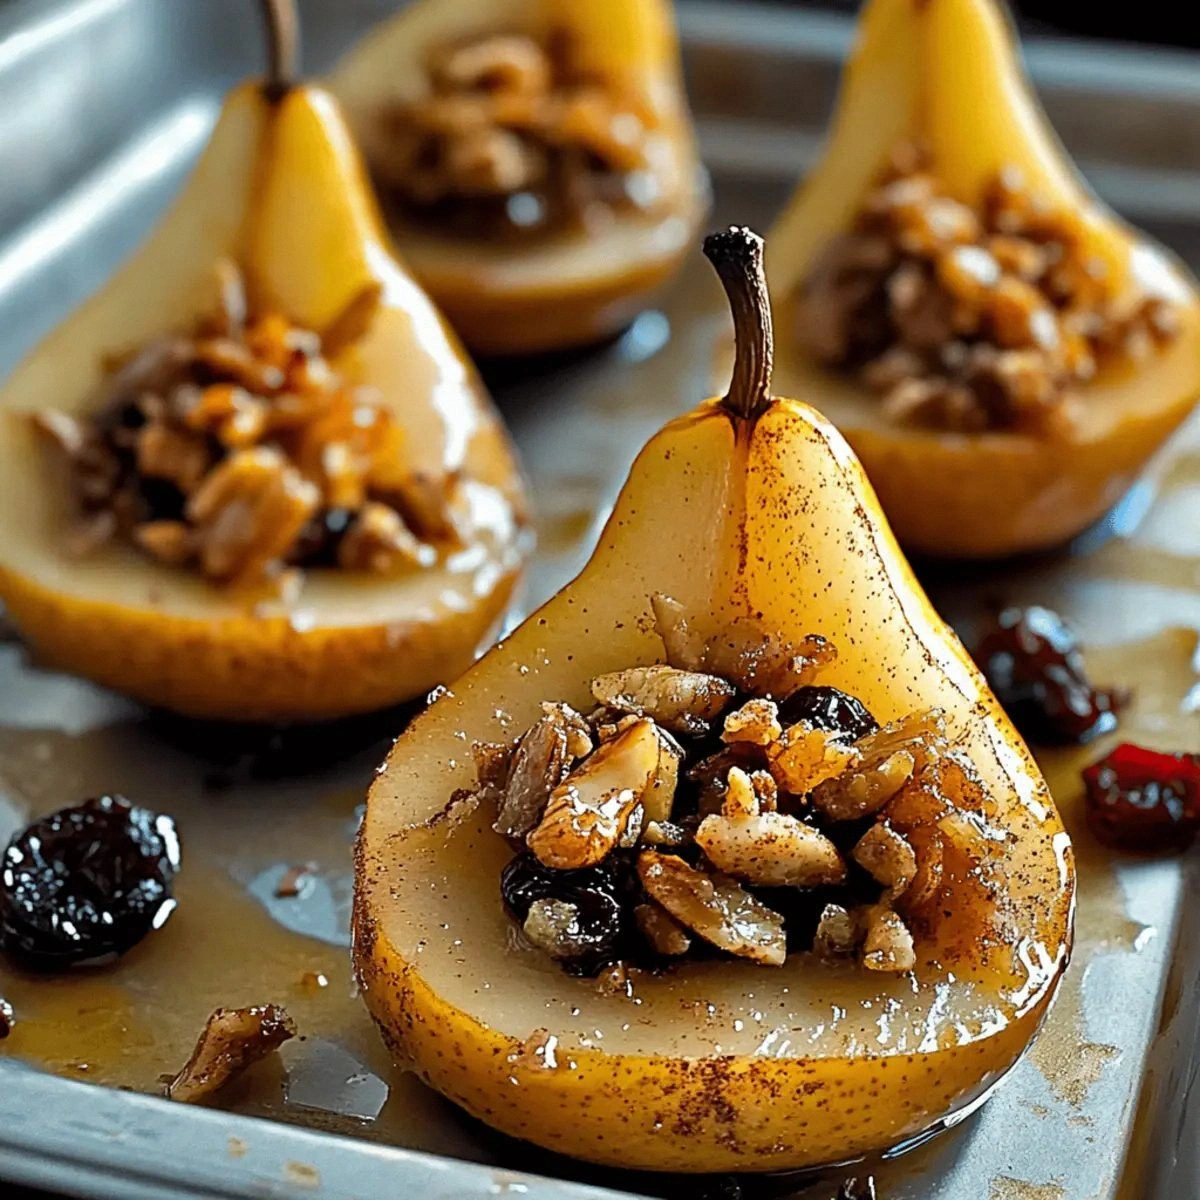
Okay, ready for the game-changer? We're going to core, not halve, the pears so they act like individual ramekins, cradling the filling while staying upright. Then we'll glaze them with just enough honey to glisten, not enough to swim. The nuts go in raw—stay with me here—because they roast in the cavity's heat and emerge glossy with spiced honey butter. Most recipes get this completely wrong, pre-toasting the nuts so they taste like cardboard by the time the pears finish. We're also keeping the skin on; it's edible armor that holds the fruit together and adds a ruby hue when baked. And now the fun part: because the filling cooks inside the pear, it perfumes the flesh from the inside out, so every bite tastes like you've plunged face-first into a mug of mulled cider.
I served these at a dinner party last week and caught my friend sneaking back into the kitchen to spear a second pear with her bare hands—no plate, no shame. I dare you to taste this and not go back for seconds. The texture is pure velvet on the inside with a gentle resistance at the edge, like a perfectly ripe peach got a winter wardrobe. I'll be honest—I ate half the batch before anyone else got to try it, standing at the counter in my pajamas, chasing each forkful with a sip of cold cream. If you've ever wanted a dessert that feels like flannel sheets and crackling fireplaces, this is hands down the best version you'll ever make at home. Stay with me here—this is worth it.
What Makes This Version Stand Out
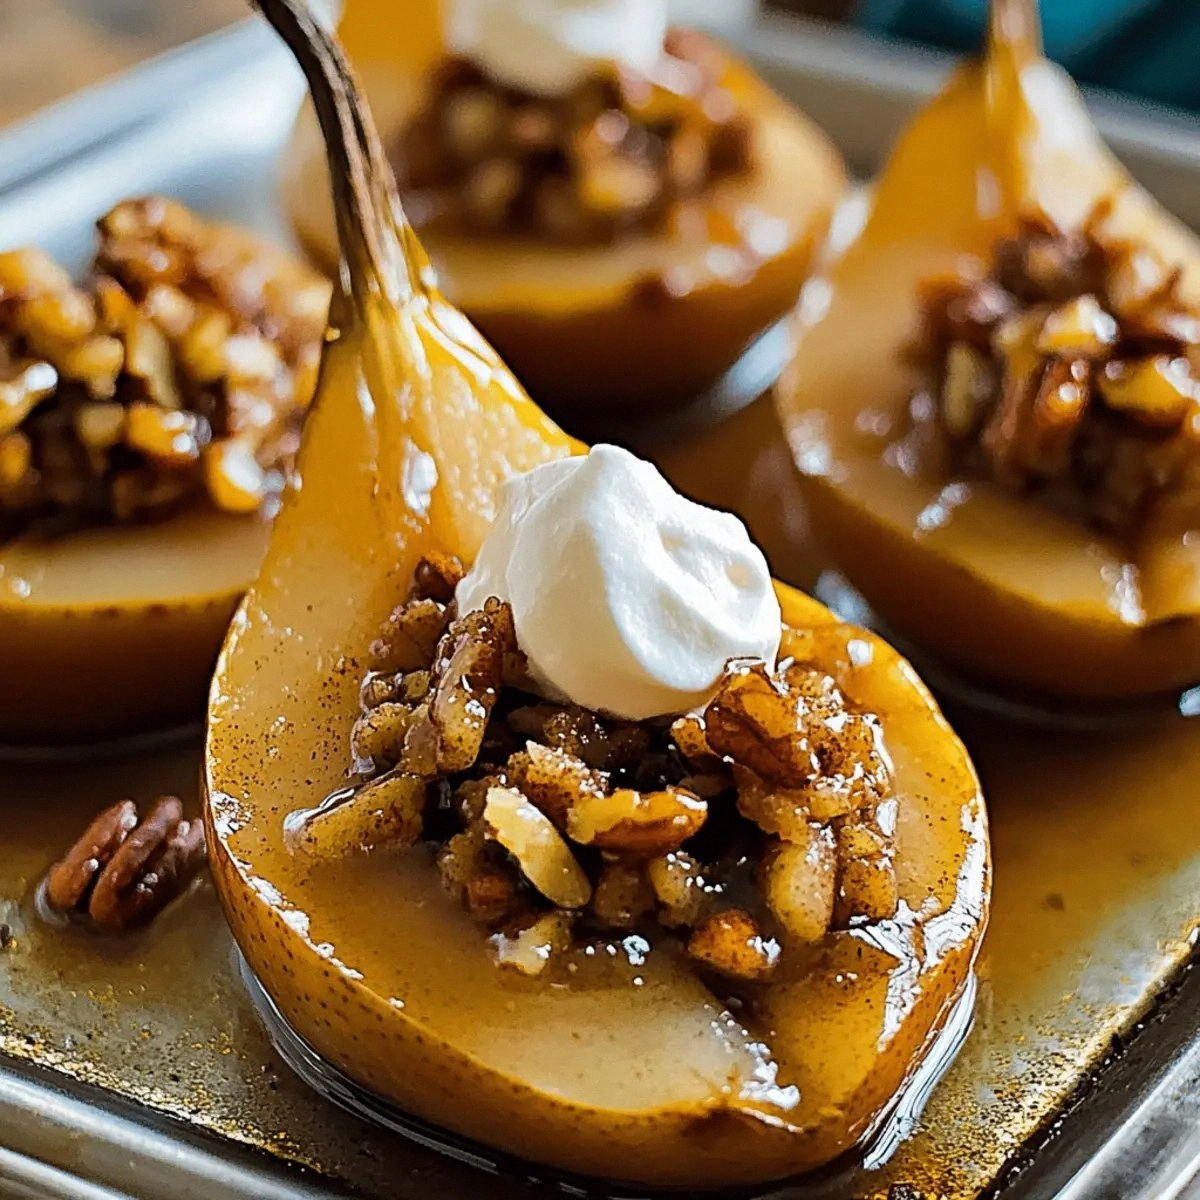
Silky Centers: We bake only until the pears turn satiny, not until they slump into a puddle. A quick baste halfway through keeps the tops glossy while the bottoms stay syrupy, so every bite is a contrast of spoon-soft interior and just-tender skin.
Built-In Portion Control: Each pear is its own adorable self-contained dessert. No slicing, no serving spoon drama, no wondering if you accidentally grabbed the bigger half. You get a whole pear, you feel like royalty, and you can still button your jeans tomorrow.
One-Bowl Filling: Chop, stir, stuff, done. No food processors, no extra pans, no waiting for butter to soften. You literally mix everything with a fork while the oven preheats and still have time to dance to one song in your socks.
Honey, Not Sugar Syrup: Most recipes drown the fruit in a sugar bath that masks the delicate pear perfume. We use just enough honey to glaze, letting the fruit's natural sugars concentrate and the cinnamon warm up without turning cloying.
Make-Ahead Magic: Stuff the pears the night before, cover with plastic wrap, and bake when guests walk in. They'll think you're a magician; you'll know the secret is a fridge shelf and fifteen extra minutes of prep yesterday.
Breakfast Approved: Leftovers chilled and sliced over yogurt taste like dessert for responsible adults. That whisper of cinnamon and honey turns plain Greek yogurt into something you actually crave at seven in the morning.
Crowd Reaction: I've watched skeptical uncles, picky toddlers, and self-proclaimed "not dessert people" close their eyes and sigh after the first bite. That synchronized silence is the sound of everyone mentally canceling their previous dessert plans.
Alright, let's break down exactly what goes into this masterpiece...
Inside the Ingredient List
The Flavor Base
Let's start with the obvious star: pears. You want Bosc or Anjou—those russet-skinned, long-necked beauties that look like they belong in a still-life painting. Bosc stay firm under heat, so you get that plush interior without structural collapse. Anjou are a touch sweeter and more forgiving if you accidentally over-bake by two minutes. Skip Bartlett; they're water bombs that deflate faster than my motivation on a Monday. When selecting, sniff the neck—yes, right there at the grocery store, pretend you're checking your phone—and if it smells like honey and flowers, you've got a winner.
The Texture Crew
Nuts give us crunch contrast and soak up honey like edible sponges. Walnuts bring a bittersweet edge that plays beautifully against cinnamon, pecans taste like bourbon-soaked holidays, and almonds stay snappy even after baking. Mix and match if you're feeling rebellious, but keep the total volume the same so the stuffing ratio stays balanced. Whatever you choose, buy them raw; pre-roasted varieties turn dusty and bitter after thirty minutes in the oven. And please, store your nuts in the freezer so their oils don't go rancid—your future self will thank you when midnight cravings strike.
The Unexpected Star
Dried fruit is tiny pockets of chewy sunshine. Raisins plump gently in the steam and burst like wine grapes, while cranberries stay tart and keep the filling from becoming one-note sweet. If you only have dusty raisins that feel like gravel, revive them in a splash of hot water for five minutes, drain, and proceed. Golden raisins taste like caramel kisses, but the regular dark ones are cheaper and still delicious. Chop them roughly so you get surprise pops instead of uniform rubber pellets.
The Final Flourish
Honey is our glaze, our sweetener, our flavor lacquer. Use something with character—wildflower, orange blossom, or whatever local jar has pollen flecks and a handwritten label. The cheap squeeze-bear stuff works in a pinch, but the nuanced honey adds floral notes that echo the pear. Cinnamon must be fresh; if your jar has been sitting in the back of the cupboard since 2019, toss it and start over. That sizzle when it hits the pan? Absolute perfection. A teaspoon sounds tame, but it's enough to perfume the whole house without screaming "pumpkin spice latte."
Everything's prepped? Good. Let's get into the real action...
The Method — Step by Step
- Preheat your oven to 375°F (190°C). Yes, it's a touch hotter than most recipes, but we want caramelization on the nuts, not a leisurely spa for the fruit. Position a rack in the center so the pears sit in the sweet spot between scorching top and under-baked bottom. While the oven works, halve a lemon and rub the cut faces of your pears once they're cored; the citric acid keeps them from browning faster than your high-school photo album.
- Slice a thin sliver off the bottom of each pear so they stand up without toppling over like tipsy penguins. Use a melon baller or a small teaspoon to core from the bottom, hollowing a tunnel that stops about an inch from the stem. Leave enough perimeter so the pear looks like a little barrel, not a fragile eggshell. Save the cores for your compost, or simmer them with water and a cinnamon stick for a quick kitchen air-freshener that puts scented candles to shame.
- Mix chopped nuts, dried fruit, cinnamon, and honey in a bowl until you have a sticky rubble that clumps when pinched. If the mixture feels dry, drizzle another teaspoon of honey; humidity affects absorption, and you want the filling to hold together, not rain crumbs into the oven. Taste a pinch—yes, raw nuts and all—and adjust the spice if you like a bolder hit. This is the moment of truth; trust your palate, not mine.
- Pack the filling firmly into each pear cavity, mounding it slightly on top. Press gently so the nuts compact but don't turn to powder; think granola cluster, not nut butter. Set the pears upright in a muffin tin or snug baking dish. The support keeps them from rolling and lets heat wrap around the base so the bottoms caramelize into a light syrup. Don't walk away from the stove here—you're three minutes from oven time.
- Whisk two tablespoons of honey with one tablespoon of hot water until pourable, then brush this liquid gold over the exposed pear skin. This thin lacquer will bake into a shiny finish that makes the pears look like they belong on a holiday magazine cover. If you over-brush, the honey will pool and burn, so channel your inner painter, not your inner toddler with ketchup. Slide the tin into the oven and set a timer for fifteen minutes.
- After fifteen minutes, baste the pears with the juices that have collected in the muffin wells. The honey will have melted and mingled with pear nectar, creating a fragrant elixir that's basically autumn in liquid form. Tilt the tin, spoon it up, and drizzle back over the tops; this keeps the nuts from scorching and gives the fruit a second drink of flavor. Close the oven and bake another ten to fifteen minutes, depending on pear ripeness.
- Test for doneness by sliding a skewer into the thickest part of a pear; it should glide in with gentle resistance like a warm knife through room-temperature butter. If you hit a hard wall, give it five more minutes and retest. The nuts should smell toasty and look glossy, the pear skin should have wrinkled slightly, and the kitchen should smell like you live inside a cinnamon roll. Remove the tin and let the pears cool five minutes; this brief pause lets the honeyed juices thicken so they don't run everywhere when you plate.
- Serve the pears warm, spooning any extra syrup from the tin over the tops. A dollop of cold Greek yogurt or a pour of chilled cream creates the hot-cold contrast that makes people close their eyes involuntarily. If you want to gild the lily, scatter a few pomegranate arils or shaved dark chocolate on the plate, but honestly, these pears don't need backup singers. They'll keep for three days in the fridge and reheat like a dream, but I've never seen them last more than one.
That's it—you did it. But hold on, I've got a few more tricks that'll take this to another level...
Insider Tricks for Flawless Results
The Temperature Rule Nobody Follows
Room-temperature pears bake more evenly than cold ones straight from the fridge. I know, you've heard this song before, but fruit is especially sensitive to thermal shock. Pull them out thirty minutes ahead, or if you're impatient (hi, me), submerge the pears in lukewarm water for ten minutes and pat dry. Cold centers stay stubbornly crunchy while the exterior slumps into mush, and nobody wants a pear surprise with the texture of a water chestnut.
Why Your Nose Knows Best
Don't trust the timer blindly—trust the aroma. When the nuts release their oils and the honey hits that light caramel note, you'll smell warm spice and toasted sugar. If the scent edges toward burnt popcorn, you've crossed the line. A friend tried skipping this step once—let's just say it didn't end well, and her smoke alarm serenaded the building at ten p.m.
The Five-Minute Rest That Changes Everything
Resting the pears in the tin for five minutes after baking lets the honeyed juices thicken and cling rather than flood the plate. Tilt the tin and spoon the syrup back over the tops; it's like self-basting poultry, but fruit. Skip this and you'll have a puddle so thin it soaks your yogurt into a watery mess. Patience, my friend, is the difference between rustic elegance and soggy chaos.
Skin-On Brilliance
Leaving the skin on isn't just lazy—it's strategic. The peel contains pectin that thickens the juices, plus beautiful tannins for complexity. If you're worried about texture, score the skin lightly with a fork before baking; the heat will soften it just enough while keeping the pear intact. Peeled pears collapse faster than my willpower near a tray of brownies.
Creative Twists and Variations
This recipe is a playground. Here are some of my favorite ways to switch things up:
Orange Zest & Cardamom
Swap the cinnamon for half a teaspoon of freshly ground cardamom and fold in a teaspoon of orange zest. The floral spice and citrus oil make the pears taste like Scandinavian winter markets. Use almonds for the nuts; they love orange like long-lost siblings reunited.
Chocolate Hazelnut Indulgence
Replace half the nuts with chopped toasted hazelnuts and tuck a square of dark chocolate under the filling. As it bakes, the chocolate melts into a ganache that mingles with honey and nut oils. Serve with espresso and pretend you're in an Italian café.
Ginger & Sesame
Add a teaspoon of grated fresh ginger and a tablespoon of toasted sesame seeds to the filling. Use macadamia nuts if you're feeling fancy, or plain walnuts if you're not. The spicy ginger and nutty sesame give the pears an Asian-fusion edge that pairs shockingly well with green tea.
Maple Pecan Breakfast Version
Substitute maple syrup for honey and add a tiny pinch of smoked paprika. The smoke note keeps the maple from becoming cloying and makes the pecans taste candied. Serve chilled slices over oatmeal and prepare for breakfast happiness so intense you'll forget it's healthy.
Coconut Rum Dream
Soak the dried fruit in two tablespoons of coconut rum while you prep the pears, then mix everything together. The gentle booze hit perfumes the fruit and bakes off just enough to be family-friendly but still feel like a secret. Shred a little toasted coconut on top for beachy vibes in the dead of winter.
Savory Cheese Surprise
For a cheese-board twist, mix the nuts with a tablespoon of crumbled blue cheese and a drizzle of honey. The salty funk against sweet pear is the stuff of wine-pairing legend. Serve with a glass of port and watch grown adults fight over the last one.
Storing and Bringing It Back to Life
Fridge Storage
Cool the pears completely, then park them in an airtight container with a sheet of parchment between layers. They'll keep for three days without the nuts going soft, though the aroma will weaken by day four. If you plan to keep them longer, store the syrup separately so it doesn't soak the nuts into soggy submission.
Freezer Friendly
Freeze individual pears on a baking sheet until solid, then wrap in plastic and stash in a zip bag for up to a month. Thaw overnight in the fridge, then warm in a 300°F oven for ten minutes. The texture softens slightly, but the flavor stays surprisingly bright—a handy trick for holiday prep when oven real estate is prime property.
Best Reheating Method
Pop the pears in a small baking dish, add a tablespoon of water, and cover with foil. Warm at 325°F for ten minutes; the steam revives the syrup and keeps the nuts from over-toasting. Microwave works in a pinch—thirty seconds on medium—but the nuts won't regain their snap. Add a tiny splash of water before reheating; it steams back to perfection and fools everyone into thinking you just baked them.