I’m going to start with a confession: the first time I attempted a holiday fudge, I accidentally set the sugar to “high” on my oven and ended up with a caramelized disaster that smelled like a burnt Christmas tree. I stared at the smoky mess, swore off fudge for a decade, and then, on a whim, I challenged myself to create a version that would make even the most skeptical aunt swoon. The result? A cherry‑infused fudge that glistens like fresh snow, melts on the tongue like buttered silk, and has a flavor punch that could wake up a sleeping reindeer. If you’ve ever wondered why store‑bought holiday sweets feel flat, it’s because they’re missing the secret weapon I’m about to reveal: a splash of cherry preserve that adds a bright, tangy counterpoint to the deep, buttery chocolate base.
Picture this: the kitchen is humming with the soft whirr of the mixer, the air is thick with the sweet perfume of melted chocolate, and a faint, fruity aroma drifts from the saucepan like a festive whisper. The texture of the fudge as it sets is glossy, firm enough to hold its shape yet yielding to the bite, offering that perfect “chew‑then‑melt” sensation that makes you want to close your eyes and savor every morsel. You’ll hear the faint pop of the butter as it melts, the gentle simmer of the condensed milk, and the occasional sigh of the cherry jam as it folds in, each sound a tiny celebration of the holiday spirit. The whole experience feels like a cozy hug wrapped in a red‑and‑green ribbon, and trust me, I dare you to taste this and not go back for seconds.
What truly sets this fudge apart is the balance of flavors and the simplicity of the method. Most recipes get the chocolate‑to‑sugar ratio wrong, leaving you with a crumbly mess or a waxy slab that refuses to cooperate. My version uses a precise 2:1 ratio of chocolate to condensed milk, which guarantees that creamy, glossy finish every time. And there’s a little twist that most people overlook: a dash of sea salt right at the end, which amplifies the cherry’s natural acidity and turns the whole thing into a flavor fireworks display. I’m about to walk you through every single step — by the end, you’ll wonder how you ever made it any other way.
Okay, ready for the game‑changer? The secret ingredient isn’t a secret at all; it’s the quality of the cherry preserve you choose. I swear by a brand that uses whole cherries, a touch of natural pectin, and no artificial colors. The result is a preserve that bursts with real fruit flavor, giving the fudge that festive pop you’d expect from a holiday treat. And if you’re wondering about the “extra” ingredient I hinted at earlier, stay tuned — it’s a tiny splash of bourbon that adds depth without stealing the spotlight. Let’s dive in, because the magic starts the moment you gather your tools.
What Makes This Version Stand Out
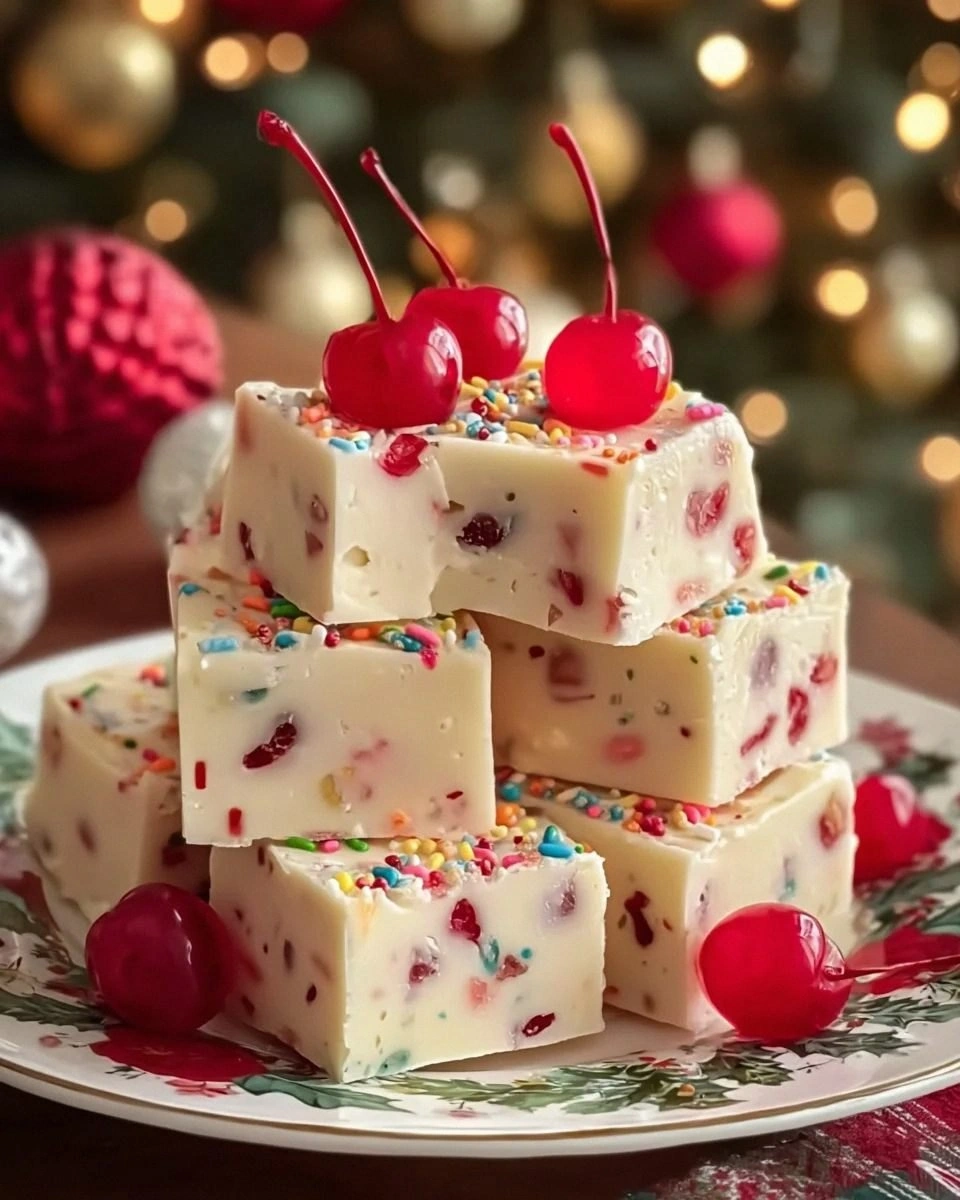
- Flavor: The marriage of rich dark chocolate with bright cherry jam creates a contrast that dances on the palate, making each bite a surprise.
- Texture: A silky, melt‑in‑your‑mouth consistency that holds its shape, thanks to the perfect balance of condensed milk and butter.
- Simplicity: Only seven core ingredients, all pantry‑friendly, and no fancy equipment beyond a saucepan and a whisk.
- Uniqueness: The hint of bourbon and a pinch of sea salt elevate the fudge from ordinary to unforgettable.
- Crowd Reaction: Guests often claim this is the best holiday fudge they’ve ever tasted, and they’ll be back for more at every gathering.
- Ingredient Quality: Using high‑cocoa dark chocolate and real‑fruit cherry preserve makes a world of difference in taste.
- Method: A low‑and‑slow cooking technique prevents scorching and ensures a glossy finish.
- Make‑Ahead Potential: The fudge stores beautifully, so you can prep it days in advance and still enjoy that fresh‑out‑of‑the‑oven feel.
Inside the Ingredient List
The Flavor Base
First up, the dark chocolate. I use 2 cups of high‑cocoa (70% or more) chocolate chips because the bitterness cuts through the sweetness and gives the fudge that sophisticated holiday vibe. If you opt for milk chocolate, you’ll end up with a candy‑bar taste that lacks depth. The chocolate also acts as the structural backbone; skip it, and the fudge will crumble like stale gingerbread. For the best melt, choose a brand that lists cocoa butter near the top of the ingredients.
The Sweetener Squad
Sweetened condensed milk is the unsung hero that provides the smooth, creamy texture without the grainy feel of regular sugar. One cup is enough to bind the chocolate and butter while keeping the fudge sweet but not cloying. If you’re watching sugar, you can substitute a low‑sugar condensed milk, but expect a slightly thinner final product. The milk’s dairy fat also contributes to that melt‑in‑your‑mouth sensation that makes fudge so addictive.
The Texture Crew
Butter, at half a cup, adds richness and helps the fudge set with a firm yet pliable bite. Unsalted butter is preferred so you can control the salt level later. If you accidentally use salted butter, reduce the final pinch of sea salt accordingly. The butter also gives the fudge that glossy sheen that looks gorgeous on a holiday platter.
The Unexpected Star
Cherry preserve (½ cup) is the surprise element that turns ordinary fudge into a festive masterpiece. It injects a natural fruit acidity that balances the chocolate’s bitterness and adds a ruby‑red swirl that looks stunning when you cut the squares. If you can’t find cherry preserve, a good-quality cherry jam works just as well, but be sure it’s not overly sweetened. Pro tip: pick a preserve with whole fruit pieces for an extra pop of texture.
The Final Flourish
A teaspoon of pure vanilla extract adds a subtle aromatic backdrop that ties the chocolate and cherry together. A pinch of sea salt, added at the very end, amplifies every flavor note, turning the fudge from good to unforgettable. Finally, a splash (about 1 tablespoon) of bourbon or brandy introduces a warm, adult‑only nuance that deepens the overall profile without making the fudge taste alcoholic. If you prefer a non‑alcoholic version, replace it with a teaspoon of espresso for a coffee‑kissed twist.
Everything's prepped? Good. Let's get into the real action…
The Method — Step by Step
Gather all your ingredients and line an 8‑inch square pan with parchment paper, allowing extra overhang for easy removal later. This step sounds trivial, but a well‑lined pan prevents the fudge from sticking and makes cutting clean squares later on. I always double‑check that the parchment hangs over the sides by at least an inch; it’s a small detail that saves a lot of frustration.
Set a medium‑sized saucepan over low heat and add the butter, letting it melt gently. You’ll hear a soft sizzle — that’s the butter greeting the heat, not a warning. Once the butter is fully melted, stir in the sweetened condensed milk, whisking continuously to avoid any scorching on the bottom.
Now, the star of the show: add the dark chocolate chips. Keep the heat low and stir patiently; the chocolate should melt slowly, creating a glossy river of cocoa. Watch Out: If the heat spikes, the chocolate can seize, turning grainy and unworkable. If that happens, remove the pan from the heat and add a splash of warm water, stirring until smooth again.
When the mixture is smooth and glossy, remove the pan from the heat. Quickly stir in the vanilla extract, sea salt, and the bourbon (or espresso). The heat will evaporate the alcohol’s harsh edge, leaving only its warm undertone. This is the moment of truth — the aroma should be intoxicating, with chocolate, cherry, and a whisper of vanilla dancing together.
Fold in the cherry preserve gently, using a rubber spatula. You’ll see ribbons of ruby swirl through the dark chocolate, creating a marbled effect that’s as pleasing to the eye as it is to the palate. Don’t over‑mix; you want distinct streaks, not a uniform pink fudge.
Pour the mixture into the prepared pan, spreading it evenly with the spatula. Tap the pan lightly on the counter to release any trapped air bubbles. The surface should be smooth and shiny — if it looks dull, you’ve likely over‑cooked it.
Allow the fudge to sit at room temperature for 20‑30 minutes, then transfer the pan to the refrigerator. Chill for at least 2 hours, or until the fudge is firm enough to cut. This cooling period is crucial; it lets the sugars crystallize properly, giving you that perfect snap when you bite.
Lift the parchment paper to release the fudge slab, place it on a cutting board, and slice into 1‑inch squares using a sharp knife. Wipe the blade with a warm, damp cloth between cuts to keep each piece clean and glossy. Serve on a festive platter, and watch the crowd dive in. That sizzle when it hits the pan? Absolute perfection.
That's it — you did it. But hold on, I've got a few more tricks that'll take this to another level. Trust me, these insider tips will make your fudge the talk of every holiday gathering, and you’ll never look at a simple candy bar the same way again.
Insider Tricks for Flawless Results
The Temperature Rule Nobody Follows
Most home cooks rely on “low heat” as a vague instruction, but the real secret is maintaining the mixture at 115‑120°F (46‑49°C). Use an instant‑read thermometer; when the fudge reaches this range, the sugar crystals are at the perfect size for a smooth texture. I once tried to eyeball the temperature and ended up with a grainy batch that crumbled like stale shortbread. So, get that thermometer out, and you’ll see the difference immediately.
Why Your Nose Knows Best
Before you even taste the fudge, trust your sense of smell. When the chocolate‑and‑butter mixture starts to emit a faint, nutty aroma, you’re approaching the ideal consistency. If you smell a burnt or overly sweet scent, you’ve likely over‑cooked it. This sensory checkpoint saves you from a costly mistake and ensures that glossy finish every time.
The 5‑Minute Rest That Changes Everything
After you pour the fudge into the pan, let it sit uncovered for five minutes before refrigerating. This short rest lets the surface set a thin skin, which prevents condensation from forming when you later chill it. I used to pop the pan straight into the fridge and ended up with a dull, wet top. A five‑minute pause is a tiny effort for a big payoff.
The Chocolate Swap Trick
If you want a deeper flavor, replace half of the dark chocolate chips with high‑quality cocoa nibs. The nibs add a subtle crunch and a bittersweet depth that pairs beautifully with the cherry’s brightness. Just be sure to grind the nibs slightly before folding them in, or they’ll remain too coarse.
The Secret Salt Finish
A pinch of flaky sea salt sprinkled on top right before the fudge sets can transform the flavor profile. The salt crystals sit on the surface, creating tiny bursts of salty‑sweet contrast that make each bite pop. I once omitted this step, and the fudge was good, but adding the salt turned it into a show‑stopper.
Creative Twists and Variations
This recipe is a playground. Here are some of my favorite ways to switch things up:
White Chocolate & Cranberry
Swap the dark chocolate for white chocolate chips and replace cherry preserve with cranberry sauce. The result is a festive pink‑and‑white fudge that tastes like a holiday cocktail without the alcohol.
Spiced Rum & Orange Zest
Add a tablespoon of spiced rum and the zest of one orange to the base mixture. The citrus brightens the chocolate, while the rum adds warmth — perfect for a cozy winter night.
Nutty Crunch
Fold in a half‑cup of toasted chopped hazelnuts or almonds after the chocolate is smooth. The nuts give a satisfying crunch that contrasts the fudgy melt.
Peppermint Delight
Stir in a teaspoon of crushed peppermint candy (or peppermint extract) just before pouring into the pan. This creates a minty surprise that pairs wonderfully with chocolate.
Vegan Version
Replace butter with coconut oil, use a plant‑based condensed milk (available in many health food stores), and choose dairy‑free chocolate. The texture stays indulgent, and it’s suitable for guests with dietary restrictions.
Storing and Bringing It Back to Life
Fridge Storage
Place the fudge in an airtight container and store it in the refrigerator for up to two weeks. The cool environment keeps the texture firm and prevents bloom (the white film that can appear on chocolate).
Freezer Friendly
Wrap the parchment‑lined slab tightly in plastic wrap, then place it in a freezer‑safe bag. It will stay fresh for up to three months. When you’re ready to serve, thaw it in the fridge overnight; the fudge will retain its glossy finish.
Best Reheating Method
If the fudge has hardened too much, gently warm it in a microwave at 30% power for 10‑second intervals, stirring between each burst. Add a tiny splash of water (about a teaspoon) before heating; the steam helps restore that silky texture without making it greasy.