I still remember the day I almost threw my mixing bowl across the kitchen in frustration. There I was, standing in my tiny apartment kitchen at 2 AM, surrounded by the sad remains of what was supposed to be "the best chocolate peanut butter cookies ever" — a batch that looked like chocolate asphalt and tasted like cardboard dipped in sadness. My roommate had dared me to make something better than the store-bought ones we devoured during our late-night study sessions, and I was failing miserably. The peanut butter had seized into weird clumps, the chocolate tasted burnt, and the texture was somewhere between a hockey puck and a sea biscuit. I was ready to admit defeat and just buy a package of Oreos like a normal person.
But something snapped in me that night — maybe it was the sleep deprivation, maybe it was the sugar withdrawal, or maybe it was just my stubborn pride refusing to let a cookie beat me. I started over from scratch, but this time I threw out every rule I'd ever learned about baking. I cranked up the vanilla, used way more peanut butter than any sane recipe would suggest, and added an extra egg yolk because why not? The dough looked weird and greasy, but I baked it anyway. When I pulled that first test cookie from the oven, the smell alone made my knees weak — like someone had bottled the essence of every childhood memory and turned it into aromatherapy. The edges were crackly and delicate, the centers soft and almost fudgy, and when I bit into it, the chocolate and peanut butter danced together like they were made for this exact moment.
That was seven years and approximately four hundred batches ago. I've tweaked and perfected this recipe through breakups, job changes, moves across three states, and more late-night cravings than I care to admit. I've made these cookies for first dates that turned into marriages, for funerals where people needed comfort more than words, for new neighbors who became best friends, and for countless 2 AM existential crises that only chocolate and peanut butter could solve. They've become my signature, my love language, the thing people request for every potluck and holiday. I dare you to taste one and not immediately go back for seconds — actually, I double-dog dare you, because resistance is futile once you experience that first warm, melty bite.
What makes this version different from every other chocolate peanut butter cookie recipe cluttering the internet? I'm glad you asked, because I'm about to spill all my secrets. Most recipes get this completely wrong — they treat peanut butter like an afterthought, add way too much flour, and bake them until they're dry and sad. This recipe does the opposite: it celebrates the peanut butter, keeps things tender and chewy, and creates those perfect crispy edges that shatter like thin ice while the center stays gloriously soft. Picture yourself pulling these out of the oven, the whole kitchen smelling like a Reese's factory had a baby with a French bakery, and tell me you're not already reaching for a glass of milk. Let me walk you through every single step — by the end, you'll wonder how you ever made it any other way.
What Makes This Version Stand Out
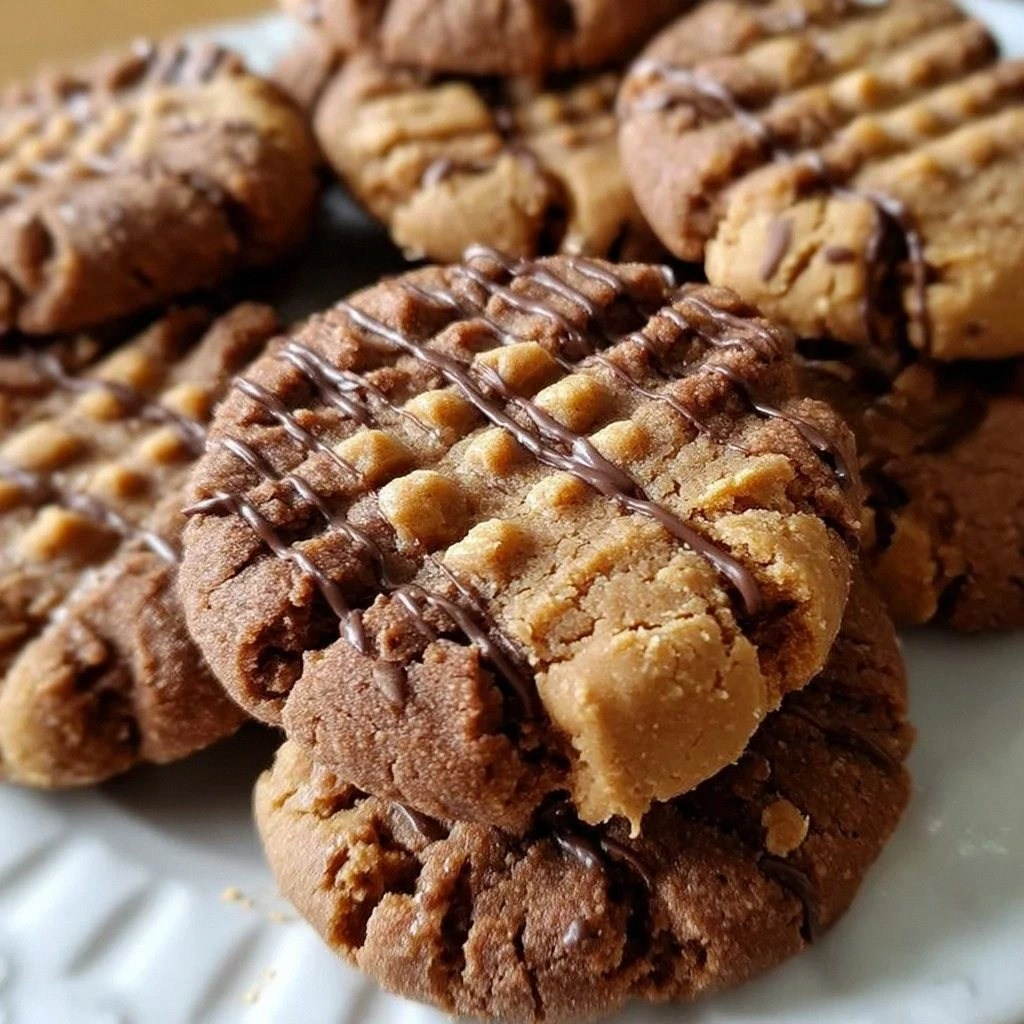
Maximum Peanut Butter Impact: Unlike those stingy recipes that barely whisper peanut butter flavor, this one packs a serious punch. We're using a full cup of creamy peanut butter, and I mean the real stuff — no natural oil separation brands here. The result is a cookie that tastes like someone took a jar of Jif and transformed it into edible velvet, with that unmistakable nutty richness in every single bite.
Texture That Defies Physics: These cookies achieve what I thought was impossible — they're simultaneously crispy and chewy, tender and substantial. The edges caramelize into this delicate lace that snaps beautifully, while the centers stay soft and almost brownie-like. It's like having two cookies in one, and yes, it's as magical as it sounds.
One-Bowl Wonder: Despite tasting like they came from a French patisserie, these come together in one bowl with a hand mixer. No creaming butter and sugar separately, no sifting dry ingredients, no chilling dough for hours. We're talking weeknight-friendly here, people. You can go from zero to cookie in under 30 minutes, which is dangerous knowledge to have at 11 PM when Netflix asks if you're still watching.
Sweetness That Knows Its Place: Too many chocolate cookies assault your taste buds with sugar shock. This recipe uses brown sugar for depth and just enough sweetness to make the chocolate and peanut butter sing without giving you a headache. The cocoa powder adds richness without extra sweetness, creating a sophisticated flavor profile that grown-ups love and kids still devour.
Make-Ahead Champion: The dough keeps beautifully in the fridge for up to five days, so you can bake off just a few at a time. I like to roll the dough into balls and freeze them on a sheet pan, then transfer to a bag for instant cookie emergencies. Frozen dough balls go straight into the oven — just add two extra minutes to the bake time for fresh-baked cookies whenever the craving strikes.
Crowd Reaction Guaranteed: I've never brought these to a gathering without being asked for the recipe within five minutes. They're the kind of cookies that make people close their eyes when they take the first bite, that disappear from the plate faster than you can say "diet," that inspire normally polite adults to hide the last one in their purse. If you've ever struggled with cookies that spread too much or stay too puffy, you're not alone — and I've got the fix.
Alright, let's break down exactly what goes into this masterpiece...
Inside the Ingredient List
The Flavor Foundation
Creamy peanut butter isn't just an ingredient here — it's the entire foundation of flavor that everything else builds upon. I'm talking about the classic supermarket stuff, the kind that makes purists clutch their artisanal pearls. Natural peanut butter with the oil separation might work for your morning toast, but in cookies it creates a greasy, separated mess that spreads like a bad rumor. The stabilizers in regular peanut butter help the cookies hold their shape while delivering that nostalgic, in-your-face peanut flavor that makes these impossible to resist. If you absolutely must use natural, make sure it's the no-stir variety that's been fully incorporated, and expect slightly flatter cookies that still taste incredible.
The unsweetened cocoa powder is where we get our chocolate fix without turning these into sugar bombs. Dutch-processed cocoa will give you a deeper, almost Oreo-like flavor, while natural cocoa keeps things brighter and more intensely chocolatey. Either works beautifully here — I usually go with whatever's in my pantry because these cookies are forgiving like that. The cocoa doesn't just add flavor; it creates that gorgeous dark color that makes people think you're a much more skilled baker than you actually are, which is a nice bonus.
Vanilla extract might seem like a background player, but leaving it out is like forgetting to season your food — everything tastes flat and one-dimensional. I use a full tablespoon here because we're not messing around. The vanilla bridges the gap between chocolate and peanut butter, creating this harmonious flavor that's greater than the sum of its parts. Splurge on the good stuff if you want, but honestly, the regular grocery store vanilla works perfectly fine when you're already working with chocolate and peanut butter.
The Texture Crew
Shortening is my secret weapon for achieving that perfect tender texture that stays soft for days. I know, I know — everyone's all about butter these days, but hear me out. Butter melts at a lower temperature, which can make cookies spread too much and turn crispy throughout. Shortening holds its shape better, creating those gorgeous thick centers with delicate crispy edges. If you're morally opposed to shortening (I get it), you can use butter, but chill the dough for at least 30 minutes and expect a flatter, crisper cookie that's still delicious but different.
The brown sugar isn't just here for sweetness — it's bringing moisture, chewiness, and that gorgeous caramel flavor that makes people ask what your secret ingredient is. Pack it firmly into your measuring cup like you're trying to win a compression contest. Light or dark both work; dark brown sugar gives you more molasses flavor and deeper color, while light keeps things milder. I switch between them depending on my mood and what's in my pantry, because these cookies are flexible like that.
That single large egg is doing serious heavy lifting as our binder and structure-builder. I add one extra egg yolk for richness — it's like adding liquid gold to your dough. The yolk contains lecithin, which helps emulsify the fats and creates that tender, almost velvety texture that makes these cookies melt in your mouth. Save the white for an omelet or meringue, because here we only want the golden goodness.
The Unexpected Star
Milk might seem like an odd addition, but it's the key to getting the perfect dough consistency. We're only using a couple tablespoons, just enough to bring everything together into a soft, pliable dough that doesn't crack when you roll it. The milk proteins also help with browning, giving you those gorgeous golden edges that make these cookies look as good as they taste. Any milk works — I've used everything from whole milk to oat milk with equally delicious results.
Baking soda is our leavening agent, creating those beautiful cracks on top and giving the cookies just enough lift to stay tender. It's also crucial for the Maillard reaction — that magical chemical process that creates hundreds of flavor compounds and makes baked goods taste complex and wonderful. Make sure yours is fresh (see my kitchen hack above) because old baking soda is about as useful as a chocolate teapot.
Salt is the unsung hero that makes everything else taste more like itself. Just a half teaspoon balances the sweetness and brings out the nutty, chocolatey flavors in ways that will make you wonder why you ever skipped it. I use regular table salt here because it distributes evenly, but if you're feeling fancy, a tiny sprinkle of flaky salt on top before baking creates little flavor explosions that will ruin you for plain cookies forever.
The Final Flourish
All-purpose flour provides the structure that holds everything together without making these cookies cakey or tough. I measure using the spoon-and-level method because too much flour creates dry, sad cookies that no amount of milk can save. If you want to get technical, we're using just enough flour to give the cookies structure while keeping them tender — it's a delicate balance that this recipe nails perfectly.
Everything's prepped? Good. Let's get into the real action...
The Method — Step by Step
- Start by preheating your oven to 350°F (175°C) and positioning the rack in the middle. This temperature is crucial — too hot and the bottoms burn before the tops set, too cool and the cookies spread into sad puddles. Line two baking sheets with parchment paper or silicone mats because we're not animals who bake directly on metal. The parchment prevents sticking and helps the bottoms brown evenly, creating that perfect snap when you bite into them.
- In a large bowl, beat together the shortening and peanut butter until they're completely combined and fluffy — about 2 minutes with an electric mixer on medium speed. You're looking for a pale, whipped texture that resembles peanut butter mousse. This step incorporates air into the fat, which helps create tender cookies. Don't rush it; this is where the magic begins. The mixture should smell intensely peanutty and look lighter in color than when you started.
- Add the packed brown sugar and continue beating for another 2 minutes until the mixture is light and fluffy. Stop halfway to scrape down the sides and bottom of the bowl because nobody wants pockets of unmixed sugar in their cookies. The sugar should dissolve into the fat mixture, creating a smooth, caramel-colored base that looks good enough to eat with a spoon. Resist the urge — we're so close to cookie glory.
- Beat in the milk, vanilla extract, and egg (plus that extra yolk if you're feeling fancy) until everything is fully incorporated. The mixture might look slightly curdled at this stage, but that's totally normal and nothing to panic about. Just keep mixing until it comes together into a smooth, glossy mixture that resembles thick cake batter. This is your flavor base, and it should smell like the best peanut butter frosting you've ever encountered.
- In a separate bowl, whisk together the flour, cocoa powder, baking soda, and salt until they're evenly distributed. I know, I know — I said one bowl, but trust me on this. Whisking the dry ingredients separately prevents those nasty pockets of baking soda that taste like soap and ensures the cocoa powder doesn't clump. Use a whisk or fork and really get in there for about 30 seconds until the mixture looks uniformly brown and slightly fluffy.
- Add the dry ingredients to the wet mixture all at once and mix on low speed just until no dry streaks remain. This is where most people go wrong — they overmix the dough, developing the gluten and creating tough cookies. Stop as soon as the flour disappears; the dough will be soft and slightly sticky, like thick brownie batter. If you see a few tiny flour pockets, finish mixing by hand with a spatula to avoid overworking the dough.
- Using a medium cookie scoop or two spoons, drop rounded tablespoons of dough onto your prepared baking sheets, leaving about 2 inches between each cookie. I use a #40 scoop which holds about 1.5 tablespoons — this gives you cookies that are substantial but not monstrous. Don't flatten them; they'll spread just enough during baking to create those perfect rippled edges. If the dough sticks to your scoop, dip it in water between scoops.
- Bake for 9-11 minutes, rotating the pans halfway through for even browning. The cookies are done when the edges look set and slightly darker than the centers, which should still look a bit underbaked. They'll continue cooking on the hot pan after you remove them from the oven — this is crucial for achieving that soft center. Don't overbake! Better to pull them out early than late; you can always put them back in, but you can't un-bake a cookie.
- Let the cookies cool on the baking sheet for 5 minutes — this is the hardest part because they smell incredible and you want to eat them immediately. But resist! Moving them too early causes them to break apart. After 5 minutes, transfer to a wire rack to cool completely, or just slide the whole parchment sheet onto the counter if you're feeling lazy. The cookies will firm up as they cool, developing that perfect texture contrast.
That's it — you did it. But hold on, I've got a few more tricks that'll take this to another level...
Insider Tricks for Flawless Results
The Temperature Rule Nobody Follows
Room temperature ingredients aren't just baking snobbery — they're the difference between cookies that spread like oil paintings and ones that hold their shape beautifully. Cold eggs don't incorporate properly, leaving you with streaky dough. Straight-from-the-fridge peanut butter is too stiff to cream properly. Let everything sit out for 30 minutes before you start, or be lazy like me and put the egg in warm water for 5 minutes while you measure everything else. Your future self will thank you when you're not scraping cookie batter off the bottom of your oven.
But here's the twist — slightly warm dough actually helps these cookies develop those gorgeous crackly tops. If your kitchen is freezing (hello, winter baking), let the dough rest for 10 minutes after mixing. The baking soda will start working its magic, creating tiny air pockets that translate to tender, beautiful cookies. Just don't let it sit too long or you'll lose the leavening power and end up with dense, sad little pucks.
Why Your Nose Knows Best
Forget timers — your nose is the most reliable indicator of when these cookies are perfectly baked. About 7 minutes in, you'll start smelling this incredible aroma that's part peanut butter roasting, part chocolate melting, part caramel magic happening. When that scent intensifies and fills your kitchen, start checking for doneness. The edges should look set and slightly darker, while the centers still appear soft and slightly underbaked. This is the sweet spot where cookie dreams come true.
A friend tried skipping this step once — let's just say it didn't end well. She set her timer for the full 11 minutes and walked away to answer a phone call. She returned to cookies that resembled chocolate-flavored coasters. Now she sets a timer for 8 minutes, then hovers like a helicopter parent until they reach that perfect state of done-but-not-overdone. Your nose knows, trust it.
The 5-Minute Rest That Changes Everything
I know you're going to want to eat these straight from the oven — I can practically feel your impatience through the screen. But here's the thing: these cookies need exactly 5 minutes on the hot pan to finish setting up. During this time, the centers continue cooking from residual heat while the edges firm up enough to handle. It's like a magic transformation where raw dough becomes the perfect cookie texture. Set a timer and find something else to do for those 300 seconds, because moving them too early results in cookies that fall apart in your hands.
After the pan rest, transfer to a wire rack if you have one. The bottom of the cookies will stay crispier this way, and they'll cool faster so you can eat more of them sooner. No rack? No problem — just slide the whole parchment sheet onto your counter. Whatever you do, don't stack them while warm or you'll end up with one giant cookie blob that, while delicious, lacks the aesthetic appeal we're going for here.
Creative Twists and Variations
This recipe is a playground. Here are some of my favorite ways to switch things up:
The Elvis Special
Channel the King by adding 1/2 cup of chopped banana chips and swapping half the peanut butter for chunky style. The banana chips add little pockets of tropical sweetness that play beautifully with the chocolate and peanut butter. I like to press a few extra chips on top right after baking for that bakery look. These taste like a peanut butter banana sandwich had a baby with a chocolate cookie, and honestly, who wouldn't want to eat that?
Salted Caramel Swirl
Before baking, use your thumb to make a small indentation in each cookie dough ball and fill it with 1/2 teaspoon of caramel sauce. Top with a tiny pinch of flaky sea salt. The caramel melts into the cookie, creating these incredible pockets of gooey sweetness that contrast with the slight saltiness. Pro tip: warm caramel works better than cold, so microwave it for 5 seconds first.
Double Chocolate Decadence
Replace 1/4 cup of the flour with Dutch-processed cocoa powder and fold in 1 cup of dark chocolate chunks. These are for serious chocolate lovers only — they're rich, intense, and completely over-the-top in the best possible way. The double dose of chocolate creates this almost black color that's stunning on a cookie platter, and the chunks melt into pools of chocolate that make people close their eyes when they eat them.
Holiday Peppermint Bark
Add 1 teaspoon of peppermint extract to the dough and replace half the peanut butter with white chocolate peanut butter if you can find it. Press crushed candy canes into the tops right after baking for that festive look and flavor. These taste like Christmas morning and are guaranteed to make you the star of any holiday cookie exchange.
Birthday Cake Remix
Swap the cocoa powder for an equal amount of flour, add 1/2 cup of rainbow sprinkles to the dough, and use vanilla extract instead of the full tablespoon. These become funfetti-peanut butter cookies that taste like childhood birthday parties. They're colorful, cheerful, and somehow taste like cake even though they're definitely cookies. Kids go absolutely wild for these, and adults who claim they don't like sprinkles secretly love them too.
Savory-Sweet Thai Inspired
Add 1 tablespoon of Thai red curry paste and 2 tablespoons of coconut milk to the dough, then top with chopped peanuts and a drizzle of honey after baking. Sounds weird, tastes incredible — the curry paste adds this subtle warmth and complexity that makes people ask what your secret ingredient is. It's like a peanut satay sauce met a chocolate cookie and they decided to get married.
Storing and Bringing It Back to Life
Fridge Storage
These cookies stay fresh in an airtight container at room temperature for up to 5 days — if they last that long. I like to add a slice of bread to the container because the cookies will steal moisture from the bread instead of the air, keeping them soft and chewy. Replace the bread slice every couple days when it gets stale. Stored this way, they actually taste better on day two when the flavors have had time to meld and deepen.
For longer storage, layer cookies between sheets of wax paper in an airtight container. They'll keep for up to a week this way, though honestly, I've never had a batch survive past day four. If they start to feel slightly stale, pop them in the microwave for 8 seconds — it's like magic, they taste freshly baked again.
Freezer Friendly
Both the dough and baked cookies freeze beautifully. For dough, roll into balls and freeze on a sheet pan, then transfer to a freezer bag. They'll keep for up to 3 months and can be baked straight from frozen — just add 2 extra minutes to the bake time. I like to freeze them in portions of 6-8 cookies so I can have fresh-baked treats without the temptation of making 3 dozen at once.
Baked cookies freeze well too. Let them cool completely, then freeze in a single layer before transferring to a container. They'll keep for 2 months and taste almost as good as fresh when thawed. For best results, thaw at room temperature for 30 minutes rather than microwaving, which can make them tough.
Best Reheating Method
The microwave is your friend here — 8 seconds on high brings back that fresh-from-the-oven taste and texture. Any longer and they get weirdly hot and lose their structural integrity. If you're reheating multiple cookies, do them in batches. For a large quantity, wrap in foil and warm in a 300°F oven for 5 minutes. Add a tiny splash of water to the foil packet before sealing — it steams back to perfection without drying out.