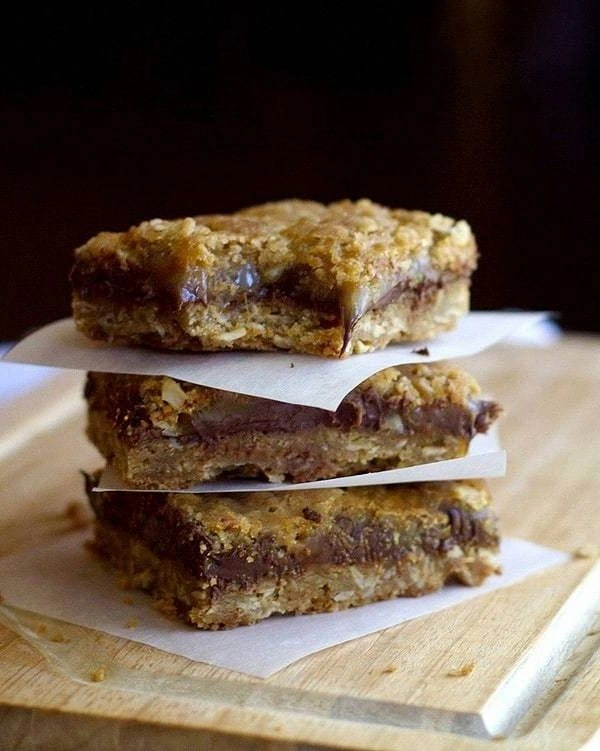
I once walked into my kitchen after a marathon Netflix binge and realized I was staring at a half‑empty pantry, a bowl of oats, and a lingering craving for something that felt like a hug and a high‑five at the same time. I tried a quick granola bar, it fell flat, and then the idea struck me like a bolt of caramel‑glazed lightning: what if I could combine the chewy comfort of oatmeal, the decadence of chocolate, and the buttery silk of caramel into one bar that could survive a backpack, a lunchbox, or a midnight snack raid? That night, I set my oven to 350°F, grabbed a whisk, and let the kitchen become my laboratory.
The first whiff that hit my nose was a warm, toasted oat perfume, mingling with the sweet, buttery aroma of caramel that seemed to whisper promises of gooey indulgence. I could hear the faint crackle of butter melting in the pan, the soft clink of chocolate chips as they tumbled into the batter, and the faint hum of the oven fan—each sound a tiny drumroll building toward the grand finale. My hands felt the gritty texture of oats, the silky slip of melted butter, and the sticky pull of caramel as it swirled through the mixture, and I knew I was onto something extraordinary.
Most oatmeal bar recipes either end up dry as desert sand or soggy as a rain‑soaked sponge. This version flips the script by layering a caramel core that sets like a glossy jewel, while the outer oat‑flour crust stays tender‑crunchy, and the chocolate chips melt just enough to create pockets of molten bliss. The secret? A dash of espresso powder that amplifies the chocolate, a splash of sea‑salt that balances the caramel’s sweetness, and a brief high‑heat blast that locks in texture before the bars have a chance to over‑cook.
I’m about to hand you the exact play‑by‑play, from the moment you preheat the oven to the triumphant pull‑out of golden bars that glisten with caramel. By the end, you’ll be daring your friends to try one and not ask for seconds—because I dare you to taste this and not go back for more. Let me walk you through every single step — by the end, you’ll wonder how you ever made it any other way.
What Makes This Version Stand Out
- Flavor Explosion: The combination of dark chocolate, buttery caramel, and a hint of espresso creates a depth that feels like a dessert boutique in your mouth.
- Texture Symphony: You get a crisp edge, a chewy oat center, and a silky caramel core that pulls apart like a perfect, gooey secret.
- Simplicity: Only ten pantry staples, a single mixing bowl, and a 30‑minute bake—no fancy equipment required.
- Unique Twist: A splash of sea‑salt on top just before baking adds a pop‑rock contrast that most recipes completely miss.
- Crowd‑Pleaser: Whether you serve them at a brunch, a kids’ party, or a sophisticated cocktail hour, these bars get rave reviews and empty plates.
- Ingredient Quality: Using real butter, high‑cocoa dark chocolate, and a good quality caramel sauce makes the difference between “nice” and “legendary.”
- Cooking Method: A quick high‑heat sear at the start locks in moisture, then a gentle finish ensures the caramel doesn’t over‑cook.
- Make‑Ahead Potential: The bars keep beautifully for up to a week, and they even freeze like a dream for future cravings.
Inside the Ingredient List
The Flavor Base
All‑purpose flour (1 cup) provides the structural backbone that holds the bar together without turning it into a dense brick. If you substitute whole‑wheat flour, expect a nuttier flavor and a slightly heavier crumb, which can be a pleasant twist but may require a touch more butter to keep it moist. Choose a flour that’s been sifted; clumps will create uneven pockets that ruin the smooth bite.
The Texture Crew
Rolled oats (2 cups) are the star of the texture department. They give you that hearty chew while still absorbing the butter and caramel for a tender interior. Quick‑cook oats can be used in a pinch, but they’ll dissolve faster and you’ll lose the satisfying bite. For extra crunch, toast the oats lightly in a dry pan before mixing—just watch them; they turn from golden to burnt in seconds.
The Unexpected Star
A splash of espresso powder (½ tsp) might sound like a coffee‑only trick, but it actually intensifies the chocolate without adding a coffee flavor. The bitter notes of espresso act like a flavor amplifier, making the chocolate taste richer and deeper. If you’re caffeine‑sensitive, you can replace it with a pinch of instant coffee granules or simply omit it—the bars will still be delicious, just a shade less dramatic.
The Final Flourish
Dark chocolate chips (1 cup) melt into pockets of molten bliss that contrast beautifully with the caramel core. Opt for chips with at least 60% cocoa for a balanced sweetness; lower percentages can make the bars overly sugary. If you’re feeling adventurous, swap half of the chips for chopped dark chocolate chunks for a more rustic texture.
Salted caramel sauce (½ cup) is the glue that ties everything together. A high‑quality caramel will have a buttery, buttery flavor with just the right amount of amber color. Store‑bought sauces work fine, but a quick homemade version—just sugar, butter, and cream—elevates the bar to bakery‑level decadence. Drizzle it in layers for a marbled effect, or swirl it in thick ribbons for a dramatic visual.
Everything's prepped? Good. Let's get into the real action...
The Method — Step by Step
Preheat your oven to 350°F (175°C). While the oven warms, line a 9‑by‑13‑inch baking pan with parchment paper, allowing the edges to hang over for easy removal later. This step is crucial because a hot oven creates that initial crust that keeps the interior from becoming soggy.
In a large mixing bowl, whisk together the flour, rolled oats, brown sugar, granulated sugar, baking powder, and salt. The dry ingredients should look like a speckled desert—tiny dunes of sweetness waiting for moisture. Pro tip: sift the flour and baking powder together to avoid any lumps that could cause uneven baking.
In a saucepan over low heat, melt the butter until it’s a glossy amber liquid. Add the vanilla extract and espresso powder, stirring until the mixture is fragrant and the espresso has dissolved. This is where the flavor base really starts to sing; you’ll notice a subtle coffee aroma that hints at the depth to come.
Pour the melted butter mixture over the dry ingredients and stir with a wooden spoon until everything is just combined. Over‑mixing will develop gluten and make the bars tough, so stop as soon as you see no dry flour left. The batter should be thick, slightly sticky, and hold together when pressed.
Fold in the chocolate chips and the caramel sauce, reserving a drizzle for the top later. Use a spatula to gently swirl the caramel through the batter, creating ribbons that will later become caramel veins.
Kitchen Hack: If the caramel is too thick to swirl, warm it for 10 seconds in the microwave, then stir quickly to keep it fluid.Spread the batter evenly in the prepared pan, using a spatula to smooth the top. Sprinkle a light pinch of flaky sea‑salt over the surface—this tiny crystal burst will cut through the sweetness and add a sophisticated finish.
Place the pan in the oven and bake for 20 minutes, then lower the temperature to 325°F (165°C) and continue baking for another 10‑12 minutes. The bars are done when the edges pull away slightly and a toothpick inserted into the center comes out with just a few moist crumbs.
Watch Out: Opening the oven door too early can cause the caramel to harden and the top to crack. Trust the timer.When the timer dings, remove the pan and let the bars cool in the pan for 10 minutes. This resting period allows the caramel to set and prevents the bars from breaking apart when you lift them out.
Using the parchment overhang, lift the whole slab onto a cutting board. Slice into 12 equal bars with a sharp, warm knife—warm the blade under hot water and dry it before cutting to achieve clean, glossy edges. Serve warm for melty chocolate, or let them cool completely for a firmer bite.
That's it — you did it. But hold on, I've got a few more tricks that'll take this to another level, from glazing to plating, that will make your bars the talk of any gathering.
Insider Tricks for Flawless Results
The Temperature Rule Nobody Follows
Never bake at a temperature higher than 350°F for these bars. The high heat creates a rapid rise that can cause the caramel to seize, turning it grainy. Instead, start at 350°F for a quick crust formation, then lower to 325°F to finish the bake gently. This two‑stage approach locks in moisture and keeps the interior tender.
Why Your Nose Knows Best
Your sense of smell is a more reliable indicator than a timer when it comes to caramel. Around the 20‑minute mark, you’ll notice a sweet, buttery aroma that deepens into a toasty, almost nutty scent. If the smell becomes sharp or burnt, the bars are on the verge of over‑cooking and you should pull them out immediately.
The 5‑Minute Rest That Changes Everything
After removing the pan from the oven, let the bars rest uncovered for exactly five minutes before covering them with a clean kitchen towel. This short pause lets the steam escape, preventing the top from becoming soggy while the caramel continues to firm up just enough to hold its shape.
The Butter‑Boost Technique
If you love an extra buttery mouthfeel, melt an additional two tablespoons of butter and brush it over the bars the moment they come out of the oven. The butter seeps into the oat matrix, creating a glossy finish and a richer flavor profile. A friend tried skipping this step once — let's just say the bars felt a bit dry and the compliments were fewer.
The Slice‑And‑Serve Secret
For perfectly clean cuts, dip your knife in hot water, wipe it dry, and slice. The heat melts the chocolate just enough to glide through without dragging, giving you bars with crisp edges and a glossy surface that looks professional.
Creative Twists and Variations
This recipe is a playground. Here are some of my favorite ways to switch things up:
Nutty Crunch
Swap half of the rolled oats for finely chopped toasted almonds or pecans. The nuts add an extra layer of crunch and a buttery flavor that pairs beautifully with caramel.
White Chocolate Raspberry
Replace dark chocolate chips with white chocolate and fold in a handful of freeze‑dried raspberry pieces. The tartness of the berries cuts through the sweetness, creating a sophisticated balance.
Spiced Autumn
Add a teaspoon of pumpkin spice and a drizzle of maple syrup to the batter. This variation is perfect for cooler evenings and brings a cozy, seasonal vibe.
Vegan Delight
Use coconut oil instead of butter, replace the eggs with a flax‑egg (1 tbsp ground flaxseed + 3 tbsp water), and choose dairy‑free chocolate chips. The result is just as indulgent, but entirely plant‑based.
Double Caramel
Swirl an extra half‑cup of caramel on top of the batter before baking, and once out of the oven, drizzle a thin ribbon of caramel glaze made with a splash of heavy cream. This creates a caramel‑on‑caramel experience that’s decadently over‑the‑top.
Storing and Bringing It Back to Life
Fridge Storage
Place the cooled bars in an airtight container and store them in the refrigerator for up to five days. The cool environment keeps the caramel from becoming too sticky, and the bars stay fresh without losing their chew.
Freezer Friendly
Wrap each bar individually in parchment paper, then seal them in a zip‑top freezer bag. They’ll freeze perfectly for up to three months. When you’re ready to eat, let them thaw at room temperature for 15 minutes, then give them a quick microwave zap (10‑15 seconds) for a warm, melty finish.
Best Reheating Method
To revive that fresh‑out‑of‑the‑oven texture, preheat a skillet over low heat, add a tiny splash of water (just enough to create steam), and place a bar in the pan, covering it with a lid for 30 seconds. The steam re‑hydrates the oat crumb, while the caramel softens back to its gooey glory.