Ever had that moment when you’re staring at a half‑cooked chicken breast, wondering if you should just order pizza and call it a night? I’ve been there, and let me tell you, the panic was real. The kitchen was a battlefield of burnt garlic, a lemon that rolled off the counter, and a sauce that looked more like a sad puddle than anything worth bragging about. I swear I could hear my stomach growling louder than the oven timer, and I was ready to surrender to the delivery guy. Then, a daring friend tossed me a challenge: “Make something that will make me forget about my diet for a week.” I accepted, and the result was a lemon chicken piccata that turned my kitchen into a five‑star Italian bistro.
The first bite was a revelation – the chicken was crisp on the outside, buttery and tender underneath, while the sauce sang with bright lemon, briny capers, and just the right amount of garlic. Imagine a summer garden in a pan: the zest of a lemon like sunshine, the capers popping like tiny fireworks, and a buttery glaze that clings to the meat like a silk shawl. The grilled bread on the side, that “Gri” we’ve all been craving, was the perfect vehicle for scooping up every last drop of that liquid gold. I dare you to taste this and not go back for seconds; I’ll be honest — I ate half the batch before anyone else got to try it.
What makes this version stand out is not just the ingredients, but the method. Most recipes get the piccata sauce wrong by either over‑cooking the lemon (turning it bitter) or drowning the chicken in a watery broth. I discovered that a quick deglaze with white wine and a splash of chicken broth, followed by a precise finish with butter, creates a sauce that’s both bright and velvety. And the secret weapon? A light dusting of flour that gives the chicken a golden crust without making it heavy. Most people skip the grilling step for the bread, but that char adds a smoky depth that elevates the whole dish. This next part? Pure magic.
Picture yourself pulling this out of the pan, the whole kitchen smelling like a Mediterranean seaside café, the golden chicken glistening under the light, and that gorgeous, buttery lemon sauce pooling on the plate. The grilled bread sits beside it, crispy edges that shatter like thin ice when you bite into them. If you’ve ever struggled with a soggy piccata, you’re not alone — and I’ve got the fix. Let me walk you through every single step — by the end, you’ll wonder how you ever made it any other way.
What Makes This Version Stand Out
- Bright Flavor: The lemon juice is added at the perfect moment, preserving its zing without turning bitter, while the capers provide a salty pop that balances the acidity.
- Silky Texture: Finishing the sauce with butter creates a glossy, velvety coat that clings to the chicken like a lover’s embrace.
- Simplicity: Only nine pantry staples plus fresh lemon and capers are needed, making it a weeknight hero without any fancy gadgets.
- Unique Twist: Grilled bread (the “Gri”) adds a smoky crunch that turns the dish into a full‑on experience, not just a main course.
- Crowd Reaction: Guests invariably ask for seconds, and the leftover sauce makes for a killer sandwich filling the next day.
- Ingredient Quality: Using fresh, zestful lemons and high‑quality chicken breast guarantees a juicy, flavorful bite every time.
- Cooking Method: A quick pan‑sear followed by a gentle simmer locks in moisture while developing a caramelized crust.
- Make‑Ahead Potential: The sauce can be prepared in advance and reheated with a splash of broth, keeping it bright and fresh.
Alright, let's break down exactly what goes into this masterpiece...
Inside the Ingredient List
The Flavor Base
Fresh lemon juice is the heart of piccata – its acidity cuts through the richness of butter, creating a balanced profile that wakes up the palate. If you substitute bottled lemon juice, you’ll lose that bright, aromatic zing and end up with a flat sauce. The zest, on the other hand, adds essential oils that intensify the citrus aroma, making the dish smell like a sun‑kissed orchard. When selecting lemons, go for ones that feel heavy for their size; they’re juicier and more flavorful. Pro tip: roll the lemon on the countertop before zesting to loosen the skin.
Capers bring a briny, slightly tangy bite that mirrors the lemon’s acidity while adding a textural surprise. Rinsing them removes excess salt, preventing the dish from becoming overly salty. If you can’t find capers, chopped green olives make a decent stand‑in, though they’ll shift the flavor toward a Mediterranean olive tapenade. Remember, the capers should be scattered throughout the sauce, not just perched on top, so each forkful gets that pop.
The Texture Crew
All‑purpose flour is the silent hero that delivers that coveted golden crust. By dusting the chicken lightly, you create a barrier that locks in juices while forming a crispy exterior when it hits the hot pan. Too much flour, and you’ll get a gummy coating; too little, and the chicken will stick. If you’re gluten‑free, substitute with rice flour or a 1:1 gluten‑free blend – the texture will stay crisp, though the flavor may be slightly different.
Butter, divided into two portions, serves two purposes: the first portion helps brown the chicken, while the second finishes the sauce, adding richness and a glossy sheen. Using unsalted butter gives you control over the final salt level, especially important when capers already contribute saltiness. If you’re dairy‑intolerant, try a high‑quality plant‑based butter; it will still emulsify the sauce nicely.
The Unexpected Star
White wine isn’t just a fancy garnish; it deglazes the pan, lifting those caramelized bits (fond) that are flavor gold. The alcohol evaporates quickly, leaving behind a subtle fruitiness that deepens the sauce without overwhelming the lemon. Choose a dry, crisp wine – think Pinot Grigio or Sauvignon Blanc – and avoid sweet varieties, which would clash with the citrus.
Chicken broth adds body and a savory backbone, ensuring the sauce isn’t just a lemon‑butter slurry. Homemade broth is ideal, but a low‑sodium store‑bought version works just as well. If you’re watching sodium, dilute the broth with a splash of water, then adjust seasoning at the end.
The Final Flourish
Fresh parsley isn’t just for color; it introduces a fresh, herbaceous note that brightens the finished plate. It also adds a pop of green that makes the dish visually inviting. When chopping, use a rocking motion with a sharp chef’s knife to avoid bruising the leaves, which can turn them bitter.
The grilled bread, affectionately called “Gri,” is the unsung hero that turns a simple sauce into a full‑on experience. Lightly brush each slice with olive oil, then toast on a hot grill or skillet until you see those beautiful char lines. The crunchy texture contrasts the tender chicken, and the smoky flavor adds depth that you won’t get from a plain toast.
Everything's prepped? Good. Let's get into the real action...
The Method — Step by Step
-
Start by patting the chicken breasts dry with paper towels; this tiny step prevents steam from forming later and helps the flour adhere. Place each breast between two sheets of plastic wrap and gently pound them to an even ½‑inch thickness; this ensures uniform cooking and a tender bite. Season both sides with 1 tsp salt and ½ tsp black pepper, then set aside for a minute while you prepare the flour station.
Combine ½ cup all‑purpose flour in a shallow dish, sprinkling a pinch of extra pepper for added depth. Dredge each chicken piece in the flour, shaking off any excess – you want a thin, even coating, not a clumpy crust. Let the floured chicken rest for 5 minutes; this allows the flour to adhere better, creating that signature golden crust.
-
Heat a large skillet over medium‑high heat and add 2 tbsp olive oil along with 1 tbsp of the butter. Once the butter foams and the oil shimmers, you’ll know the pan is hot enough – the sizzle should be immediate, like a tiny fireworks show.
Lay the chicken breasts in the pan, careful not to crowd them; you should hear a confident, steady sizzle. Cook for 4‑5 minutes on the first side, resisting the urge to move them. The edges will start pulling away from the pan, a clear sign that the crust is forming perfectly. Flip and cook another 3‑4 minutes until the chicken reaches an internal temperature of 165°F (74°C). Transfer the cooked chicken to a warm plate and tent with foil to keep it juicy.
-
Reduce the heat to medium and add the minced garlic to the same pan; it should sizzle gently, releasing a fragrant aroma that fills the kitchen – that’s the perfume of good cooking. Stir the garlic for about 30 seconds, being careful not to let it brown; burnt garlic turns bitter and can ruin the sauce.
Pour in ½ cup dry white wine, letting it bubble and steam away. As the liquid reduces by half, you’ll notice the pan’s surface lightening, a visual cue that the alcohol is evaporating. Sprinkle in 1 cup chicken broth, then whisk gently to combine, scraping any browned bits from the bottom of the pan – those are flavor gold.
-
Now the star ingredients join the party: stir in the fresh lemon juice, lemon zest, and 2 tbsp capers. The sauce should immediately brighten, turning a luminous pale gold that looks like liquid sunshine. Let the mixture simmer for 2‑3 minutes, allowing the flavors to meld; you’ll smell a perfect harmony of citrus, brine, and buttery richness.
Finish the sauce by whisking in the remaining 2 tbsp butter, one piece at a time, creating an emulsion that coats the pan like silk. Taste and adjust seasoning with a pinch more salt if needed – remember the capers already add salt, so go easy.
-
Return the chicken breasts to the skillet, spooning the sauce over each piece. Let them sit in the sauce for another minute, allowing the meat to re‑absorb some of that buttery lemon goodness. This step also ensures the chicken stays warm while the sauce finishes its silky transformation.
While the chicken rests, heat a grill pan or outdoor grill to high. Lightly brush each slice of crusty bread with olive oil and place them on the grill. Grill for 1‑2 minutes per side, watching for those classic char lines – they should be dark but not burnt. The result is a smoky, crunchy “Gri” that will soak up the sauce beautifully.
-
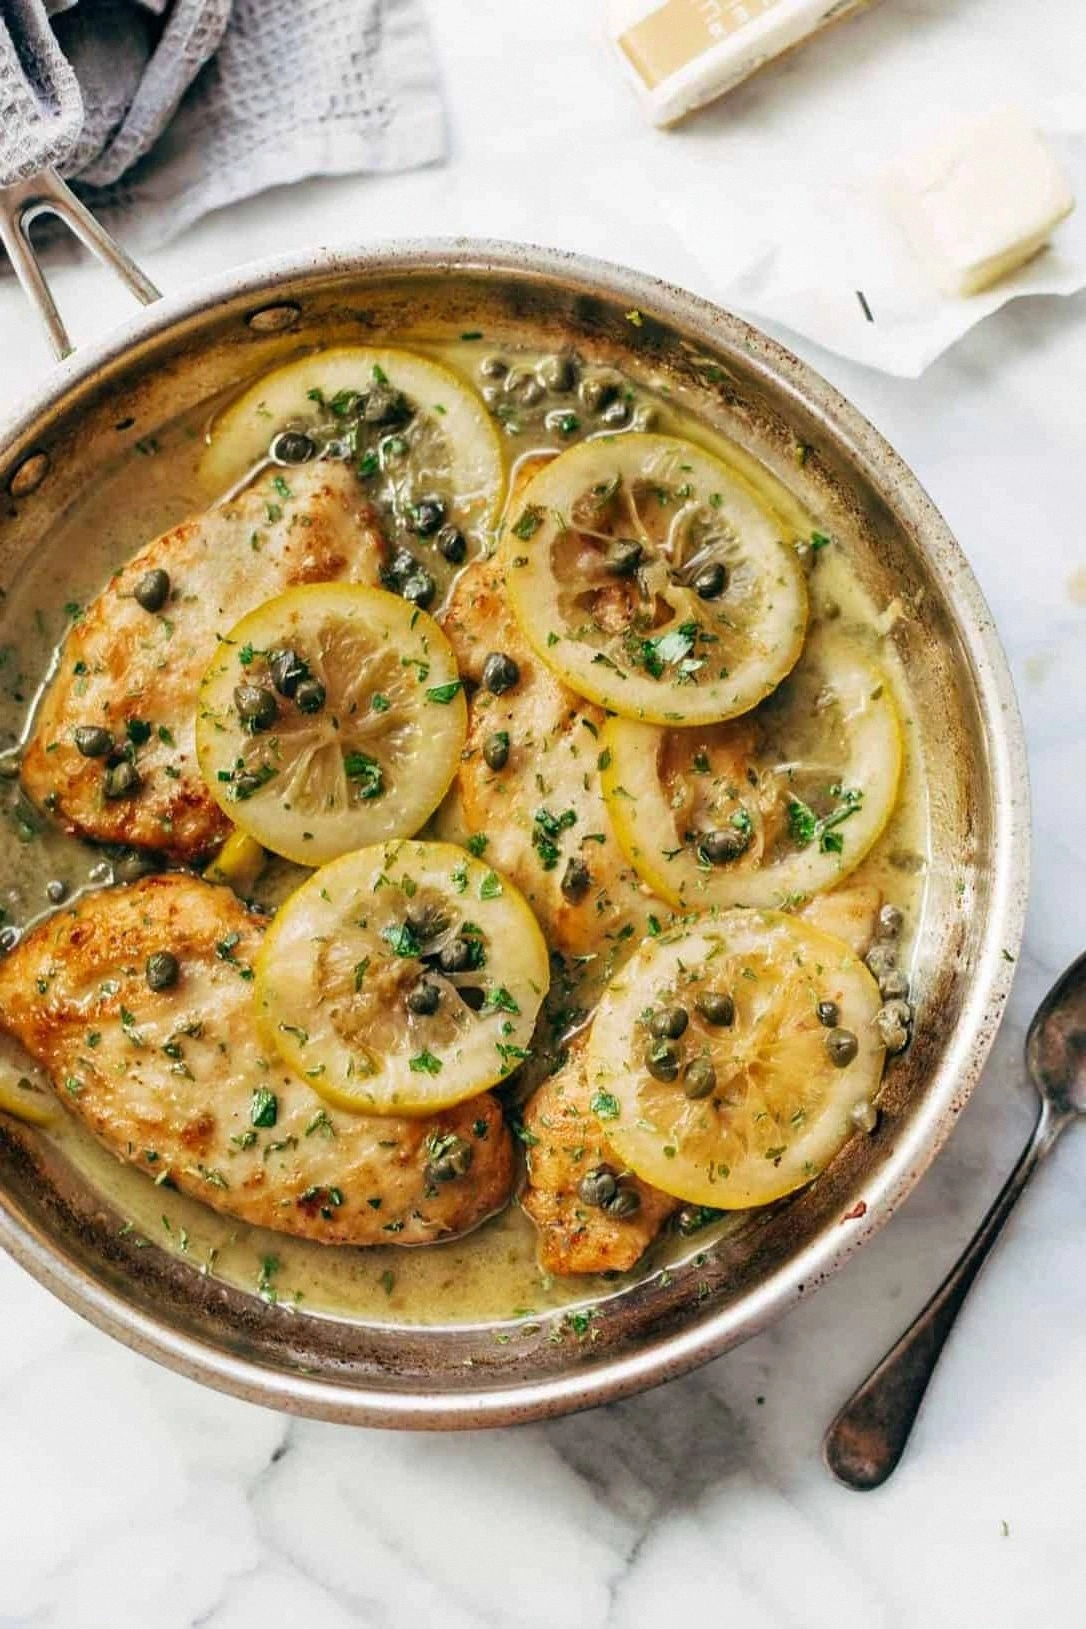
To plate, arrange a chicken breast on each plate, drizzle generous spoonfuls of the lemon‑capers sauce over the top, and sprinkle with freshly chopped parsley for a pop of color. Position a slice of grilled bread beside the chicken, inviting your guests to scoop up the sauce.
Take a moment to admire the dish – the golden chicken, the glossy sauce, the vibrant green parsley, and the charred bread all together create a visual symphony. That sizzle when it hits the pan? Absolute perfection. Serve immediately, and watch the smiles appear.
That's it — you did it. But hold on, I've got a few more tricks that'll take this to another level...
Insider Tricks for Flawless Results
The Temperature Rule Nobody Follows
Never cook the chicken over high heat for the entire time; start high to sear, then drop to medium‑low to finish. This prevents the exterior from scorching while the interior stays raw. I once tried “full blast” and ended up with a burnt crust and a pink center – not pretty. By adjusting the heat, you get a uniform golden crust and a juicy interior every single time.
Why Your Nose Knows Best
The aroma is your most reliable indicator of doneness. When the garlic turns golden and the wine reduces, you’ll smell a sweet, slightly nutty perfume. If the sauce still smells raw or overly acidic, let it simmer a minute longer. Trust your nose; it’s more accurate than any timer.
The 5‑Minute Rest That Changes Everything
After cooking, let the chicken rest under loose foil for exactly five minutes. This short pause lets the juices redistribute, turning each bite from dry to succulent. Skipping this step is a common mistake – I’ve seen people slice immediately and watch the juices pool on the plate instead of staying inside the meat.
Butter Timing Is Everything
Adding butter at the very end, off the heat, creates a glossy finish without breaking the emulsion. If you add it too early, the sauce can separate; too late, and you lose that silky texture. A good trick is to whisk in the butter one piece at a time, allowing each piece to melt fully before adding the next.
Grill Marks for the Win
When grilling the bread, press it lightly with a spatula to ensure even contact with the grill grates. This guarantees uniform char lines and prevents one side from staying pale. I once let the bread sit too long on one side; the result was a burnt edge and a soggy middle – not the crunchy contrast we’re after.
Creative Twists and Variations
This recipe is a playground. Here are some of my favorite ways to switch things up:
Herb‑Infused Piccata
Swap the parsley for a mixture of fresh thyme and oregano. The earthy herbs complement the lemon while adding a Mediterranean depth. This variation works especially well if you’re serving the dish alongside roasted vegetables.
Spicy Kick
Add a pinch of red pepper flakes to the sauce when you deglaze with wine. The subtle heat balances the bright acidity, creating a lively palate experience. If you’re daring, a dash of hot honey drizzled over the finished plate adds a sweet‑spicy contrast.
Creamy Lemon Piccata
Stir in ¼ cup of heavy cream after the lemon juice, before adding the final butter. The sauce becomes richer, almost like a lemon beurre blanc, perfect for serving over pasta instead of just chicken.
Capers to the Max
Double the capers for an extra briny punch. If you love the salty tang, this is the way to go, but remember to reduce the added salt accordingly.
Gluten‑Free Version
Replace the all‑purpose flour with rice flour and use gluten‑free bread for the “Gri.” The texture stays crisp, and the flavor remains unchanged, making it safe for those with gluten sensitivities.
Storing and Bringing It Back to Life
Fridge Storage
Allow the chicken and sauce to cool to room temperature for no more than 30 minutes, then transfer to an airtight container. Store in the refrigerator for up to 3 days. When reheating, place the chicken in a skillet with a splash of chicken broth and gently warm over low heat, allowing the sauce to re‑emulsify.
Freezer Friendly
Separate the sauce from the chicken before freezing; place the sauce in a freezer‑safe bag and the chicken on a parchment‑lined tray. Freeze for up to 2 months. To use, thaw overnight in the fridge, reheat the sauce on the stove, and briefly pan‑sear the chicken to restore the crust.
Best Reheating Method
The secret to a revived piccata is steam. Add a tiny splash (about 2 tbsp) of water or broth to the pan before warming, then cover with a lid for 2‑3 minutes. This creates a gentle steam that revitalizes the sauce and keeps the chicken moist, preventing it from drying out.