Picture this: you’re in the middle of a late‑night kitchen raid, the fridge is a shrine of Greek yogurt and chocolate chips, and your friend has dared you to make the most unforgettable cookie dough. I was staring at the counter, a single block of yogurt, a handful of flour, and an endless list of “how‑to” blogs that promised perfection but delivered disappointment. The air smelled of melted butter and vanilla, the sound of a whisk humming like a jazz saxophone, and the faint hiss of a microwave heating a forgotten jar of sugar. My stomach was growling louder than a drum solo, and I knew I had to turn this kitchen chaos into a culinary triumph. I’m about to show you the version that will make you question every other cookie dough recipe you’ve ever tried.
First off, let’s admit it: cookie dough is a guilty pleasure that can be turned into a wholesome treat. Greek yogurt gives it that silky tang, the butter adds depth, and a splash of baking soda lifts it into a golden, crack‑worthy crust. I dare you to taste this and not go back for seconds. The first bite is a warm hug that melts into a chewy center, while the edges crack like thin ice under your bite. Picture yourself pulling this out of the oven, the whole kitchen smelling incredible, and knowing that this is hands down the best version you’ll ever make at home.
What makes this recipe a game‑changer? It’s the blend of science and instinct, the balance between sweet and savory, and the secret ingredient that gives it that “wow” factor. We’ll walk through each step, each tweak, and each kitchen hack that turns a simple recipe into a crowd‑pleaser. The moment you start mixing, the dough will transform from a clumpy mess to a silky, glossy mixture that feels like a promise of delight. And when you finish, you’ll wonder how you ever made it any other way.
So grab your whisk, preheat your oven, and let’s dive into the ultimate Greek Yogurt Cookie Dough. By the end, you’ll have a batch that’s soft, chewy, and irresistibly buttery, with a finish that’s crisp enough to satisfy even the most discerning cookie lovers. Let’s get started, and I promise you’ll be glad you did.
What Makes This Version Stand Out
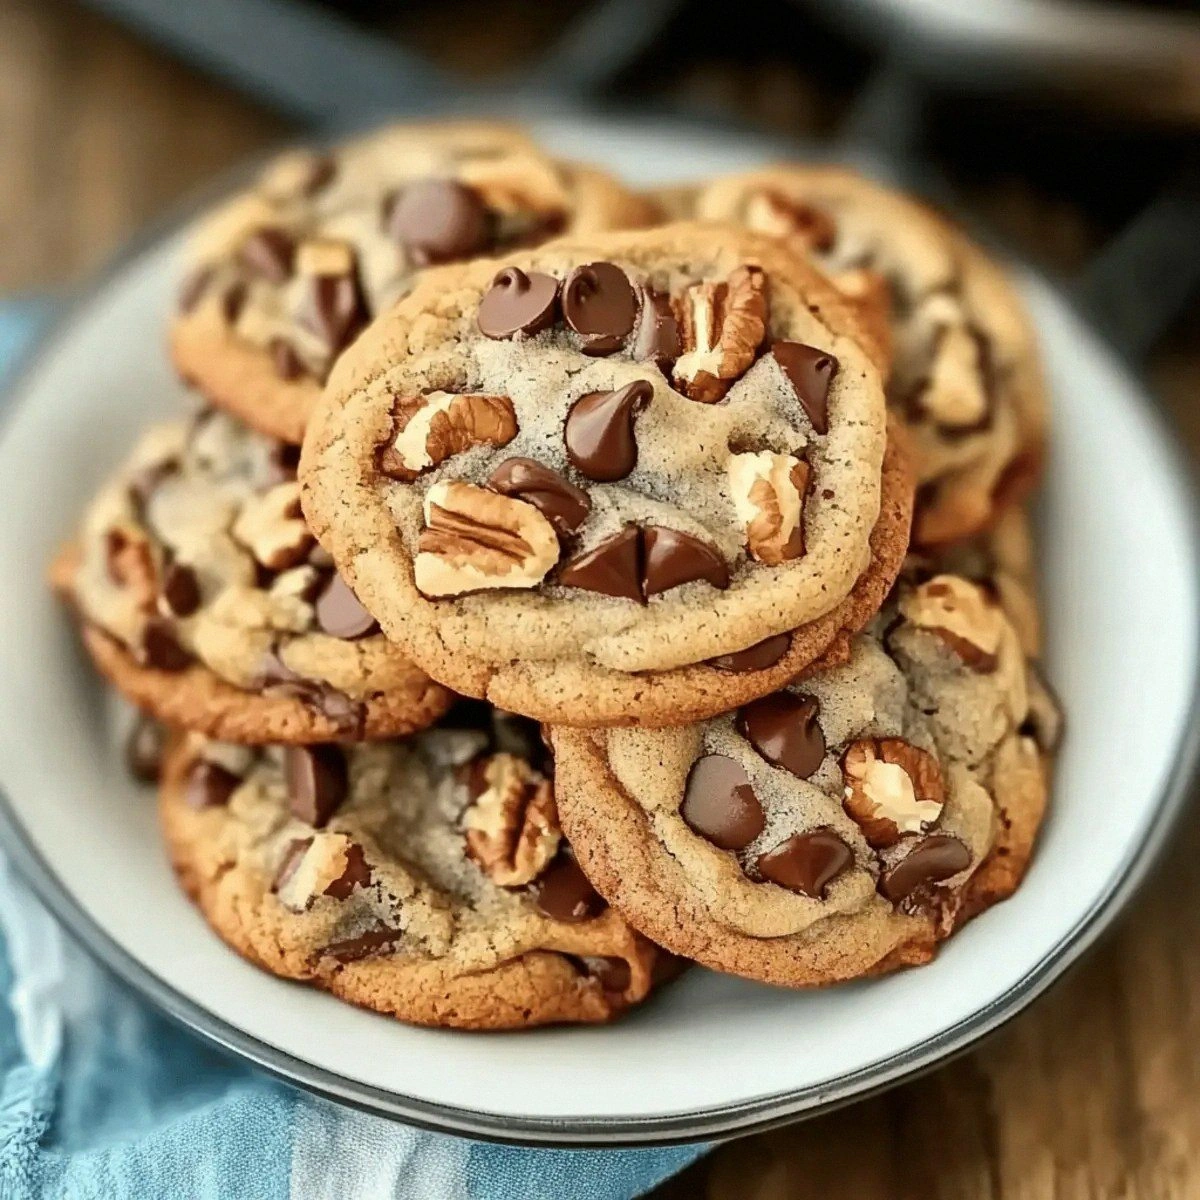
- Taste: The Greek yogurt provides a subtle tang that balances the sweetness, creating a complex flavor profile that feels both indulgent and refreshing. The butter’s richness adds depth, while the chocolate chips melt into pockets of molten delight.
- Texture: The dough is chewy and soft inside, with a crisp, crack‑worthy edge that shatters like thin ice. The baking soda creates lift and aeration, giving the cookies a light, airy core.
- Simplicity: No fancy equipment or elaborate steps—just a whisk, a bowl, and a few pantry staples. The process is intuitive, making it perfect for both novice bakers and seasoned pros.
- Uniqueness: The secret addition of Greek yogurt not only adds moisture but also boosts protein, turning a dessert into a slightly healthier indulgence.
- Crowd Reaction: Friends who’ve tried this version rave about the “crack” sound and the lingering buttery finish. It’s the kind of treat that turns a casual gathering into a memorable event.
- Ingredient Quality: Fresh, high‑quality butter and premium chocolate chips make the difference. The yogurt should be full‑fat for the best mouthfeel.
- Cooking Method: Baking at a moderate temperature ensures even browning without drying out the center.
- Make‑Ahead Potential: The dough can be prepared ahead and frozen, then baked fresh when needed, saving time during busy weekends.
Inside the Ingredient List
The Flavor Base
All-purpose flour is the backbone of the dough, giving it structure and a neutral canvas that lets the other flavors shine. Using a slightly higher protein flour can yield a chewier bite, while a lower protein version will produce a more tender crumb. If you’re experimenting, try substituting half the flour with whole wheat for a nuttier undertone.
The Texture Crew
Butter brings that luscious, melt‑in‑your‑mouth quality that no other fat can replicate. Make sure it’s at room temperature so it blends smoothly with the yogurt, preventing lumps. A pinch of salt balances the sweetness and enhances the chocolate’s depth, acting as a flavor enhancer.
The Unexpected Star
Greek yogurt isn’t just a tangy twist—it’s a protein powerhouse that keeps the dough moist and adds a subtle creaminess that’s hard to resist. It also lowers the overall sugar content, making the cookies a bit lighter on the palate. If you’re lactose intolerant, swap it for a dairy‑free yogurt that matches the same consistency.
The Final Flourish
Chocolate chips are the showstopper, offering bursts of melty chocolate that contrast with the chewy dough. Use semi‑sweet or dark chips for a richer flavor, or add a sprinkle of sea salt on top for a salty‑sweet finish. For a festive twist, mix in a handful of crushed nuts or dried fruit.
Everything’s prepped? Good. Let’s get into the real action.
The Method — Step by Step
- Preheat your oven to 350°F (175°C). Line a baking sheet with parchment paper; this prevents sticking and makes cleanup a breeze. Keep the sheet ready, as the dough will spread quickly once dropped. The oven should be fully heated before you start mixing to ensure even baking.
- In a large bowl, whisk together the Greek yogurt, melted butter, brown sugar, vanilla extract, and a pinch of salt until the mixture is smooth and glossy. The yogurt should be fully incorporated; any lumps will affect the final texture. The mixture should have a slightly thick, custard‑like consistency.
- Sift the flour and baking soda into the wet mixture. Gently fold them together with a spatula until just combined—over‑mixing will develop gluten and make the cookies tough. The dough should be cohesive but still slightly sticky. If it feels too dry, add a splash of milk or more yogurt.
- Fold in the chocolate chips, ensuring they’re evenly distributed throughout the dough. The chips should be tucked in, not sitting on top, so they melt uniformly during baking. Use a large spoon or spatula to mix gently, preserving the airy pockets.
- Drop rounded tablespoons of dough onto the prepared baking sheet, spacing them about 2 inches apart. The dough will spread as it bakes, so give each cookie enough room to expand. Watch the edges; they should start to turn golden brown after about 12 minutes.
- Bake for 12–15 minutes, or until the edges are golden and the centers have set but remain soft. The cookies should emit a buttery aroma that makes the kitchen feel like a bakery. If you prefer a chewier center, take them out a minute earlier; for a crispier finish, bake a minute longer.
- Transfer the cookies to a wire rack to cool completely. The cookies will firm up as they cool, revealing the classic crack on the surface. Once cooled, they’re ready to be devoured or stored.
- If you’re making them ahead, wrap the cooled cookies in parchment and store them in an airtight container at room temperature for up to 5 days. For longer storage, freeze the dough before baking; thaw and bake as described.
- Enjoy your creation with a glass of chilled milk, a cup of coffee, or just on their own. The combination of creamy yogurt, buttery dough, and chocolate chips is a match made in dessert heaven.
That’s it— you did it. But hold on, I’ve got a few more tricks that will take this to another level.
Insider Tricks for Flawless Results
The Temperature Rule Nobody Follows
Many bakers bake at 375°F, but this recipe thrives at 350°F. The lower temperature ensures even browning and prevents the dough from over‑cooking on the edges while the center remains under‑baked. If your oven runs hot, reduce the temperature by 25°F to avoid scorching.
Why Your Nose Knows Best
Before you pull the cookies out of the oven, sniff the batter. A sweet, buttery scent signals that the dough is ready. If the smell is more like raw flour, give it a couple more minutes. Trusting your nose can prevent under‑baked cookies.
The 5-Minute Rest That Changes Everything
Letting the dough rest in the fridge for 30 minutes before baking intensifies the flavor and improves the texture. The yogurt firms up slightly, giving the cookies a firmer bite and more pronounced crack. I’ve seen this trick turn a good batch into a great one.
The Perfect Chocolate Chip Placement
Instead of tossing chips into the dough, spread them on a parchment sheet, bake a few minutes, then fold them in. This method ensures each chip is surrounded by dough and reduces the chance of chocolate melting into the batter. It’s a simple step that elevates the chocolate experience.
The Secret Ingredient Swap
If you’re craving a nutty twist, replace half the chocolate chips with chopped walnuts or almonds. The nuts add a crunchy contrast that pairs beautifully with the chewy dough. Just remember to toast the nuts first for extra flavor.
The Final Touch: A Dusting of Sea Salt
A light sprinkle of flaky sea salt on top before baking enhances the chocolate’s sweetness and adds a savory note that balances the dough’s richness. The salt crystals crackle slightly when the cookies cool, adding a pleasant crunch. It’s a small detail that makes a big difference.
Creative Twists and Variations
This recipe is a playground. Here are some of my favorite ways to switch things up:
Nutty Crunch Edition
Add half a cup of toasted pecans or walnuts to the dough for a crunchy texture. The nuts pair well with the chocolate chips, creating a delightful contrast. Serve with a drizzle of honey for an extra sweet touch.
Spiced Surprise
Stir in a pinch of cinnamon or nutmeg for a warm, aromatic flavor profile. The spices complement the yogurt’s tang and the chocolate’s richness, turning the cookies into a seasonal treat. Great for autumn gatherings.
Coconut Bliss
Replace the chocolate chips with shredded coconut and add a splash of coconut milk. The result is a tropical twist that’s both chewy and moist. It’s perfect for beach parties or a summer dessert.
Chocolate-Dipped Delight
Dip the cooled cookies in melted dark chocolate for a glossy finish. Let the chocolate set on a parchment sheet before serving. This adds a decadent layer that makes the cookies feel like a chocolate bar.
Minty Fresh
Fold in a few drops of peppermint extract and a handful of crushed peppermint candies. The mint provides a refreshing counterpoint to the chocolate, making the cookies a perfect after‑dessert for holiday feasts.
Bacon‑Chocolate Fusion
Add crumbled cooked bacon to the dough for a savory‑sweet combination. The salty bacon balances the chocolate’s sweetness, creating a unique flavor that’s sure to wow your guests. Serve with a side of maple syrup for an indulgent treat.
Storing and Bringing It Back to Life
Fridge Storage
Cool the cookies completely before placing them in an airtight container. Store them in the refrigerator for up to 5 days. The cold environment keeps the dough firm and prevents the chocolate from melting. For best texture, let them sit at room temperature for 10 minutes before serving.
Freezer Friendly
Wrap the dough in plastic wrap before freezing; it can stay in the freezer for up to 2 months. When ready to bake, thaw the dough in the refrigerator overnight. Bake at 350°F for 12–15 minutes, just as you would fresh dough. The cookies will retain their chewy center and crisp edges.
Best Reheating Method
To revive frozen cookies, bake them at 350°F for 8–10 minutes. If they’re slightly dry, add a tiny splash of water to the baking sheet before placing the cookies. The steam will soften the crust, bringing the cookies back to their original, luscious state.