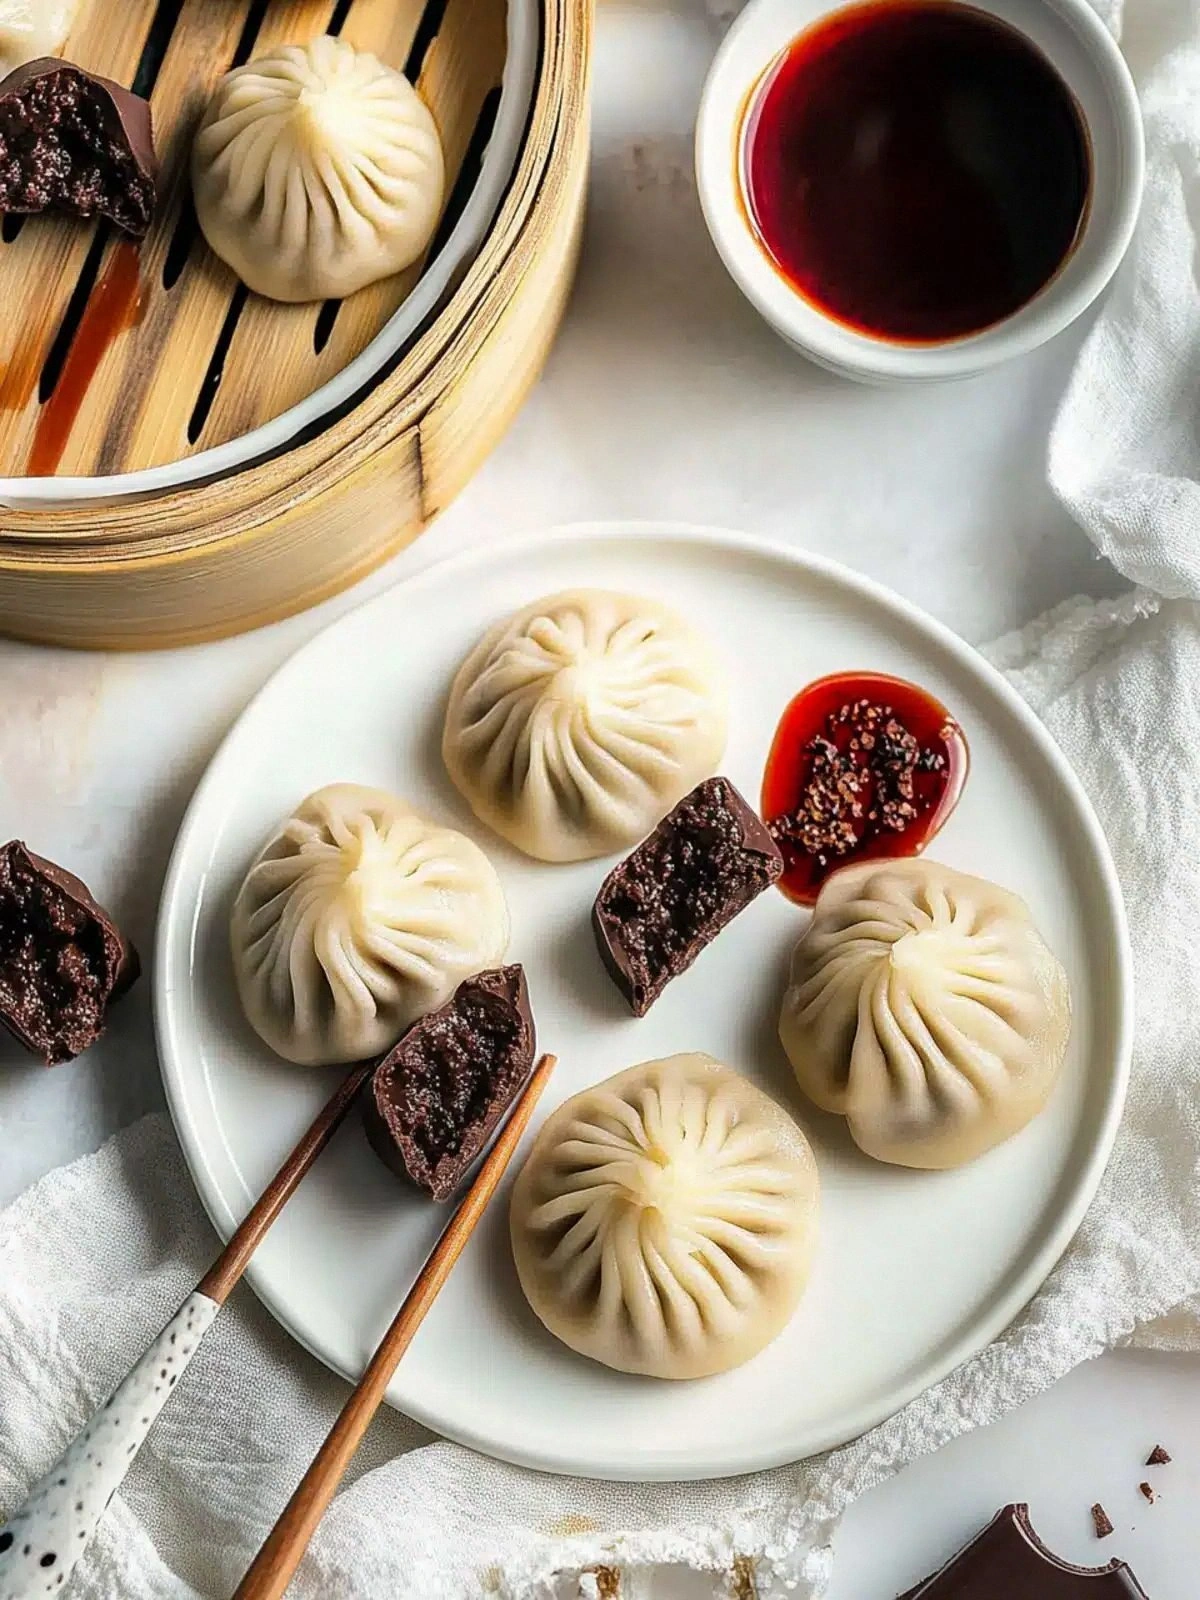
When the kitchen lights flickered on that cold December afternoon, I was halfway through a failed attempt at chocolate bark and the room smelled like burnt sugar. I had a craving that could only be satisfied by something sweet, crunchy, and utterly indulgent, and I was determined to turn that craving into a masterpiece. Picture a mound of glossy dark chocolate, studded with glossy milk chocolate shards, airy marshmallows, and the unmistakable crunch of nuts and biscuits—each bite a symphony of textures that melts in your mouth like a snowflake on a warm tongue. Most recipes get this completely wrong by over‑cooking the chocolate or under‑toasting the nuts, but I discovered a technique that keeps the chocolate silky while the nuts remain crisp, and it’s a game‑changer. I dare you to taste this and not go back for seconds, because once you start, you’ll be craving more. This is hands down the best version you’ll ever make at home, and I’m about to show you why it’s a holiday staple that deserves a permanent spot on your dessert shelf. If you’ve ever struggled with uneven chocolate coating or soggy marshmallows, you’re not alone—and I’ve got the fix. Picture yourself pulling this out of the oven, the whole kitchen smelling incredible, and knowing that every bite will be a reminder of that first, glorious crack of chocolate. Let me walk you through every single step—by the end, you’ll wonder how you ever made it any other way.
What makes this recipe feel like a secret, almost magical trick is that it balances the boldness of dark chocolate with the playful sweetness of marshmallows and the nutty crunch that adds a satisfying bite. The crunch is not just a texture; it’s a tactile reminder of holiday joy, like the crunch of fresh snow underfoot. The chocolate is tempered just enough to hold its shape, yet soft enough to melt in your mouth in seconds, creating a silky finish that coats the palate like velvet. The dried fruit adds a burst of natural sweetness that cuts through the richness, and the optional coconut flakes bring a subtle tropical twist that elevates the entire experience. The result is a dessert that feels indulgent but remains surprisingly balanced, a harmony that will make your guests ask for the recipe before you even tell them. This is the kind of dish that can be served at a holiday party or simply enjoyed in the quiet of a winter evening, and it never feels out of place.
One of the things that sets this version apart is the way each ingredient is treated as a star performer, rather than just a filler. The dark chocolate isn’t just a base; it’s a bold, complex flavor that carries the entire dish. The milk chocolate provides a smooth, creamy counterpoint, while the marshmallows add lightness and a playful texture that melts into a velvety sauce. The nuts or seeds give that satisfying crunch that keeps the mouth moving, and the biscuits add a subtle crumbly element that adds depth. The dried fruit offers a chewy, juicy contrast that brightens the overall profile, and the coconut flakes, if you choose to add them, give a hint of tropical sweetness that surprises the palate. Together, they form a balanced composition that is both indulgent and refined, a perfect balance of sweet, salty, crunchy, and melt‑in‑your‑mouth textures.
In short, this recipe is a masterclass in chocolate confectionery that doesn’t just satisfy your sweet tooth but also delights your senses in ways you never imagined. The secret lies in the precise timing, the careful tempering of chocolate, and the thoughtful layering of flavors and textures. By the end of this post, you’ll have a fool‑proof method that guarantees a perfect result every single time, and you’ll be ready to wow anyone who tastes it. Ready to dive in? Let’s get started and create a holiday treat that will become an instant favorite.
What Makes This Version Stand Out
- Taste: The combination of dark and milk chocolate creates a depth of flavor that is both complex and comforting, with a hint of bitterness that balances the sweetness of marshmallows and fruit.
- Texture: Each bite delivers a distinct contrast—crunchy nuts, chewy dried fruit, airy marshmallows, and smooth chocolate—making it a sensory adventure.
- Visual Appeal: The glossy chocolate coating, speckled with colorful morsels, looks as stunning as it tastes, turning an ordinary dessert into a showstopper.
- Ease: No elaborate equipment or advanced techniques are required; the recipe is straightforward, even for beginners, yet it delivers professional results.
- Make‑Ahead: It can be prepared in advance, frozen, or stored in the fridge, making it perfect for holiday parties and last‑minute gatherings.
- Versatility: The optional coconut flakes and the choice between nuts or seeds allow you to tailor the dessert to dietary preferences or personal taste.
Alright, let’s break down exactly what goes into this masterpiece, starting with the individual groups that make up this decadent treat.
Inside the Ingredient List
The Flavor Base
Dark chocolate is the backbone of this dessert, providing a robust, slightly bitter foundation that anchors the sweetness of the other components. Choosing a chocolate with at least 60% cocoa content ensures a rich, complex flavor profile that won’t be overwhelmed by the marshmallows or fruit. If you prefer a smoother bite, you can blend in a small amount of high‑quality milk chocolate, but keep the ratio modest—roughly 50% dark to 50% milk—to maintain the chocolate’s depth. Skipping the dark chocolate entirely would turn this into a simple chocolate bark; you’d lose the sophisticated undertones that make each bite memorable.
The Texture Crew
Mini marshmallows are the key to that signature melt‑in‑your‑mouth sensation. Their fluffy interior melts into a silky sauce that coats the chocolate, giving the dessert a luxurious finish. The nuts or seeds add a satisfying crunch that contrasts with the soft marshmallows and the smooth chocolate. If you’re on a nut allergy, seeds such as pumpkin or sunflower provide a similar crunch while keeping the dish nut‑free. The biscuits, crushed into fine crumbs, introduce a subtle chewiness that adds depth to the texture profile. Skipping any of these components will diminish the textural dance that makes this dessert so engaging.
The Unexpected Star
Dried fruit, such as cranberries or apricots, offers a burst of natural sweetness and a chewy texture that cuts through the richness of the chocolate. The tartness of cranberries balances the sweet marshmallows, while apricots bring a mellow, honeyed note. If you’re looking for a different flavor profile, consider dried cherries or raisins for a sweeter, fruitier twist. The fruit also adds a pop of color, turning the dessert into a visual delight. Removing the fruit will make the dessert flatter, lacking that juicy surprise in each bite.
The Final Flourish
Coconut flakes, though optional, contribute a subtle tropical sweetness and an additional layer of texture. Toasting the flakes lightly before adding them brings out a nutty aroma that complements the chocolate. If you’re avoiding coconut, you can replace it with finely chopped dried figs or a sprinkle of sesame seeds for a unique twist. The flakes also add a hint of crunch that enhances the overall mouthfeel. Omitting them keeps the dessert simpler but slightly less complex.
Everything’s prepped? Good. Let’s get into the real action.

The Method — Step by Step
- First, line a 9‑inch square baking pan with parchment paper, leaving an inch of overhang on two sides for easy removal later. This will prevent the chocolate from sticking and make cleanup a breeze. Gently press the paper into the corners so it sits flat. The overhang will also help you lift the finished bark without tearing it. Once the pan is ready, set it aside and move on to the chocolate.
- Melt the dark chocolate in a heat‑proof bowl over a pot of simmering water, using the double‑boiler method. Stir constantly until the chocolate is completely smooth and glossy, then remove from heat. Repeat the same process for the milk chocolate, but do so in a separate bowl to avoid cross‑flavor contamination. Once both chocolates are melted, set them aside on a low‑heat plate to keep them warm. This step ensures that the chocolate remains fluid enough to coat the other ingredients without hardening.
- Add the crushed biscuits to the melted dark chocolate and stir until they’re fully coated. The biscuits will absorb some of the chocolate, creating a crumbly base that adds depth. Next, fold in the mini marshmallows, ensuring they’re evenly distributed. The marshmallows will melt slightly when they touch the warm chocolate, forming a silky sauce that glazes the bark. At this point, you’ll notice a delightful aroma of toasted chocolate and buttery biscuits filling the kitchen.
- Now it’s time to add the nuts or seeds. Stir them in gently, making sure each piece is coated in chocolate. The nuts should retain their crunch, so avoid over‑mixing. If you’re using seeds, they’ll provide a lighter bite but still contribute a satisfying texture. This step is crucial for achieving that perfect balance between crunch and melt.
- Pour the chocolate mixture into the prepared pan, spreading it evenly with a spatula. Tap the pan gently on the counter to eliminate air bubbles and create a smooth surface. The chocolate should form a glossy, even layer that’s about 1‑2 inches thick. This thickness ensures a rich chocolate bite without being too heavy. Let the mixture cool slightly; it should still be warm but not hot to the touch.
- Sprinkle the dried fruit over the surface, pressing lightly so it sticks to the chocolate. The fruit should be evenly distributed for balanced flavor in every bite. If you’re using coconut flakes, sprinkle them on top now as well. This layer adds a subtle tropical sweetness and a final crunch. The combination of fruit and coconut will give the bark a vibrant, festive look.
- Place the pan in the refrigerator for at least 30 minutes, or until the chocolate has set completely. The chocolate will firm up, creating a solid yet slightly chewy texture that’s perfect for cutting. If you’re short on time, you can use a low‑heat setting on your oven (around 200°F) for 10 minutes, but the refrigerator method is preferred for the best consistency. During this time, you’ll hear the faint crackle of chocolate setting, a comforting sound that signals the bark is almost ready.
- Once set, use the parchment overhang to lift the entire bark from the pan. Place it on a cutting board and use a sharp knife to slice into bars or squares. If the bark is too soft, chill it again for a few minutes before cutting to ensure clean, crisp edges. The final product should have a glossy sheen, a satisfying crunch, and a melt‑in‑your‑mouth finish. Enjoy immediately or wrap tightly in parchment for storage.
That’s it—you did it. But hold on, I’ve got a few more tricks that will take this to another level.
Insider Tricks for Flawless Results
The Temperature Rule Nobody Follows
Chocolate is a fickle friend; it will set perfectly if you keep it between 90°F and 95°F. Many people underestimate the importance of temperature, which can lead to a dull, chalky finish. I’ve found that a small kitchen thermometer is a lifesaver—once you get the chocolate at the right temperature, the bark will shine like polished silver. A friend once tried to skip the thermometer and ended up with a chocolate that was too soft to hold its shape; it was a disaster, but it taught me the value of precision.
Why Your Nose Knows Best
The aroma of chocolate is a powerful indicator of its quality. Fresh chocolate will smell rich and slightly nutty, while stale chocolate has a flat, almost metallic scent. If the chocolate smells off, it’s best to start over. I’ve learned to trust my nose, and it’s saved me from countless ruined batches. The scent of toasted nuts and sweet fruit is the first sign that your bark is on the right track.
The 5‑Minute Rest That Changes Everything
After the bark has set, let it rest at room temperature for 5 minutes before cutting. This brief pause allows the chocolate to finish setting, ensuring clean cuts and preventing the bark from crumbling. I’ve seen people cut straight away and end up with uneven pieces; the rest step eliminates that risk. It’s a small time investment that pays off with a polished final product.
Keep It Moist, Not Wet
Don’t let the bark sit out for too long; moisture can cause the chocolate to bloom, creating a white film that looks unappetizing. Store the bark in an airtight container, preferably with a desiccant packet to absorb excess humidity. If you’re storing it in the fridge, wrap it tightly in plastic wrap before placing it in a zip‑lock bag. This keeps the bark’s texture intact and prevents the chocolate from absorbing odors from the fridge.
Reheating for the Perfect Melt
When you’re ready to serve the bark after storage, a quick reheating step can bring it back to its original melt‑in‑your‑mouth glory. Place the bark in a heat‑proof container and add a splash of water—just a tablespoon—to create steam. Cover the container and microwave on 50% power for 30 seconds, then stir and repeat as needed. This gentle method prevents the chocolate from burning or separating. I’ve used this trick to revive a batch that had been in the freezer for a week, and it tasted as fresh as the day it was made.
Use the Right Knife
A serrated knife is your best friend when cutting chocolate bark. It cuts cleanly through the chocolate without crushing the layers, preserving the texture. A dull knife will drag the chocolate and leave uneven edges. Keep the knife warm by wiping it with a hot towel before cutting; this reduces friction and makes slicing smoother. It’s a small detail, but it makes a noticeable difference in the final presentation.
Creative Twists and Variations
This recipe is a playground. Here are some of my favorite ways to switch things up:
Nut-Free Delight
Swap the nuts or seeds for extra dried fruit or a handful of chocolate chips. This version is lighter and still offers a satisfying bite. The fruit’s chewiness compensates for the missing crunch, making it a great option for those with nut allergies.
Minty Marvel
Add a teaspoon of peppermint extract to the melted chocolate. The mint provides a refreshing contrast to the rich chocolate, and it’s perfect for a holiday treat that’s both indulgent and cool.
Spiced Sensation
Stir in a pinch of cinnamon or a dash of cayenne pepper for a spicy kick. The heat from the pepper balances the sweetness and adds a subtle warmth that’s reminiscent of holiday spices.
Berry Burst
Replace the dried fruit with fresh berries, like strawberries or blueberries. The berries add a juicy pop of color and a fresh, tart flavor that brightens the entire dessert.
Caramel Crunch
Swirl in caramel sauce or caramel chips for an extra layer of sweetness. The caramel’s buttery flavor pairs beautifully with the chocolate, creating a decadent, gooey center.
Holiday Spruce
Top the bark with a sprinkle of crushed candy canes or a dusting of powdered sugar for a festive look. The candy canes add a sweet crunch and a pop of color that makes the dessert feel truly seasonal.
Storing and Bringing It Back to Life
Fridge Storage
Wrap the bark tightly in plastic wrap, then place it in an airtight container. Store it in the refrigerator for up to one week. The cool temperature keeps the chocolate firm and prevents melting. Before serving, let it sit at room temperature for 5 minutes to soften slightly.
Freezer Friendly
For longer storage, wrap the bark in parchment paper and then in foil. Freeze for up to three months. When you’re ready to enjoy it, let it thaw in the refrigerator overnight. The texture will remain crisp, and the flavors will stay vibrant.
Best Reheating Method
To revive a frozen or refrigerated bark, add a splash of water to a heat‑proof container and microwave on 50% power for 30 seconds. Stir, then repeat until the bark is warm and silky. This method prevents the chocolate from scorching and preserves its glossy finish. A tiny splash of water steams the bark back to perfection.